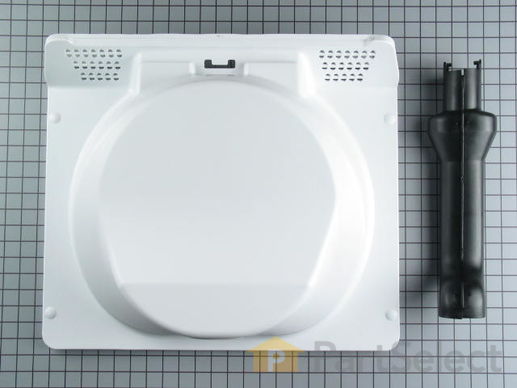
Part Location Diagram of 22003083 Whirlpool Inner Door Liner with Vent
See part 022 in the diagram
( Grid squares measure 1x1 inch )
Customer Service Representative

Get in touch, we're here to help!

Daily 8am - 9pm EST

customerservice@partselect.com

Inner Door Liner with Vent 22003083

 Fits your MAH4000AWW!
★★★★★
★★★★★
1 Review

Rated by 3 customers 

Easy 

15 - 30 mins 

Ratings submitted by customers like you who bought this part.

$ 183.36
  Special Order
 Fits your MAH4000AWW!
PartSelect Number PS2020827
Manufacturer Part Number 22003083
Manufactured by Whirlpool
Troubleshooting
This part fixes the following symptoms:
Leaking
This part works with the following products:
Washer, Washer Dryer Combo.
This part works with the following products:
Maytag.
Part# 22003083 replaces these:
AP4027714, 785455, 22002252, 22002355, 22002446, 22002539, 22003076, 22003083, 22003208, 33002210
Back to Top
Customer Reviews
Average Rating:
★★★★★
★★★★★
1 Review
5.0
Filter By Rating:
  • 5 Stars
    1
  • 4 Stars
    0
  • 3 Stars
    0
  • 2 Stars
    0
  • 1 Star
    0
Sort by:
  • 1
Sorry, we couldn't find any existing reviews that matched. Try using some different or simpler keywords.
  • 1
Customer Repair Stories
 Average Repair Rating: 3.6 / 5.0, 3 reviews. What's this?
Sort by:
  • 1
Sorry, we couldn't find any existing installation instruction that matched.
inner panel of washer door had been damaged/worn through
removed phillips headed screws from sides (hinge on one side) and bottome of door, placed door flat on counter top. Removed interior vent, disassembled the door latching mechanism - somewhat difficult to figure out because needed to undo snapped in parts (used flat screwdriver to pry). Then removed inner panel from door, placed new inner panel into door interior, reassembled door latch mechaninsm, replaced vent tube. screwed in phillips head screws to bottom and non-hinged side of door. Brought door back over to machine and attached hinges to door.
  • anthony from SAINT CHARLES, MO
  • Difficulty Level:
    Really Easy
  • Total Repair Time:
    30 - 60 mins
  • Tools:
    Pliers, Screw drivers
1 person found this instruction helpful.
Was this instruction helpful to you?
Thank you for voting!
The door liner broke while my wife was washing a comforter
Taking off the old door and removing the inner door line was relatively easy. I believe I had to remove a total of 8 screws to completely remove the hinges and gain access to the inner panel. Removing the vent tume and grommet was easy, however, I regret not taking a picture of the door latch assembly before removing the vent tube. The door latch is held in by a pair of springs and I had a heck of a time getting the springs back on the door frame assembly. I don't know if I attached it correctly, but the washer locks properly! Attaching the vent tube itself was not that difficult but the same cannot be said of the vent grommet. There was no way to get this grommet in the bottom opening without distorting it or tearing it apart. I finally had to slide it up on the vent tube assembly and basically force it down into the bottom opening. It was not the easiest task to do and I spent more time fiddling about with this stupid grommet than I did with the entire repair. The one thing I would caution anyone doing this repair in the future is to pay close attention to how the speed nuts are installed on the exterior door frame when you go to attach the inner liner. If you do not install them properly you will not be able to attach the inner liner to the exterior door panel.
Other Parts Used:
Inner Door Liner with Vent Vent Tube Grommet
  • Ted from Chicago, IL
  • Difficulty Level:
    A Bit Difficult
  • Total Repair Time:
    15 - 30 mins
  • Tools:
    Nutdriver, Pliers, Screw drivers
8 of 9 people found this instruction helpful.
Was this instruction helpful to you?
Thank you for voting!
Washed a stroller seat w/ a semi hard plastic back and it wore a large friction hole in the door liner.
First I removed the door itself from the unit by taking out 2 screws and lifting the door slightly so that the hinges can slide out of their slots. I then preceded to remove the liner assembly from the door. Once all the screws where removed I separated the liner from the door and continued to remove the additional hardware from the damaged liner and transfered it to the new one. I paid close attention to how items were removed but other than the hinges, all other items can only fit one way. The liner was then replaced and the door put back on the unit. Pay close attention to the door hinges, reattaching them wrong won't allow the door to line up or close properly.
  • Mike from Kissimmee, FL
  • Difficulty Level:
    Easy
  • Total Repair Time:
    15 - 30 mins
  • Tools:
    Screw drivers
6 of 6 people found this instruction helpful.
Was this instruction helpful to you?
Thank you for voting!
  • 1
Questions and Answers

Be the first to ask our experts a question about this part!

Model Cross Reference
This part works with the following models:
PartSelect Number: PS2020827
Manufacturer Part Number: 22003083
Brand
Model Number
Description
Maytag
MAH14PDAAL
Washer - Commercial
Maytag
MAH14PDAAW
Washer - Commercial
Maytag
MAH14PDABL
Washer - Commercial
Maytag
MAH14PDABW
Washer - Commercial
Maytag
MAH14PDAEW
Washer
Maytag
MAH14PDAGW
Washer
Maytag
MAH14PDBAW
Washer
Maytag
MAH14PDBEW
Washer
Maytag
MAH14PDBGW
Washer
Maytag
MAH14PDCBQ
Washer
Maytag
MAH14PDCBW
Washer
Maytag
MAH14PDDWW
Washer
Maytag
MAH14PDSAW
Washer
Maytag
MAH14PNAEW
Washer
Maytag
MAH14PNAGW
Washer
Maytag
MAH14PNAWW
Washer
Maytag
MAH14PNBAW
Washer
Maytag
MAH14PNBEW
Washer
Maytag
MAH14PNBGW
Washer
Maytag
MAH14PNSAW
Washer
Maytag
MAH14PRAWW
Washer
Maytag
MAH14PSAAW
Washer - Commercial
Maytag
MAH20PDA3W
Washer
Maytag
MAH20PDAWQ
Washer
Maytag
MAH20PDAWW
Washer - Commercial
Maytag
MAH20PDCXQ
Washer
Maytag
MAH20PDCXW
Washer
Maytag
MAH20PNAWW
Washer
Maytag
MAH20PRAWW
Washer
Maytag
MAH20PRDWW
Washer
Customer Service Representative

Get in touch, we're here to help!

Daily 8am - 9pm EST

Contact Customer Service