Your coupon for will be reflected when you check out!
✖
Your coupon for
✖
Hello!
You're visiting the PartSelect site in U.S.
Would you like to shop on the Canadian site?
Stay on this site
Go to Canadian site
✖
Model Number Locations
1Select Category Type
Select Category Type
2Select Product Type
Select Product Type
3Select {MODEL} Type
Select {MODEL} Type
Sample Model Number Tags
Model numbers can be made up of numbers (1005400, for example) or a combination of letters and numbers (LAT1000AAE). The model number will most likely appear on either a paper sticker or a metal plate. Your appliance's model number tag may look similar to the sample model number tags shown here (model number highlighted in yellow):
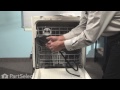
This dishwasher door gasket, or door seal, allows the dishwasher door to have an airtight seal when closing the door. No tools are required for this installation, simply remove the existing gasket and press the replacement gasket into the channel around the door. It is recommended to clean the channel while the gasket is removed. This part may need to be replaced if the existing one is cracked, broken, or hardened, possibly causing water to leak through the door while it is running. This part is sold individually, and is sourced from the original manufacturer.
How Buying OEM Parts Can Save You Time and Money
Why buy the real thing?
OEM stands for Original Equipment Manufacturer. Simply put, this means that the company who made your appliance is also supplying the replacement part for it.
Keep searches simple. Use keywords, e.g. "leaking", "pump", "broken" or "fit".
Sorry, we couldn't find any existing reviews that matched. Try using some different or simpler keywords.
★★★★★
★★★★★
Carol B - March 27, 2020
Verified Purchase
Easy Install - worked like a charm
The replacement foam seal fit perfectly. The video offered here on the website was extremely helpful. We were able to replace the seal in about 15 minutes - no real technical skill required. And the leak has stopped! So glad we avoided replacing the whole dishwasher!
★★★★★
★★★★★
Norm G - February 11, 2021
Verified Purchase
Gasket
Fit perfectly
★★★★★
★★★★★
Walter M - November 17, 2020
Verified Purchase
Old dishwasher, new gasket
My dishwasher is about 27 years old. Despite that, PartSelect led me to the correct item based on its old model number from the 90s (!) even though it's no longer an available Maytag model.
Frankly $70 bucks seemed like a lot for a strip of plastic, but it's pretty much in line with other websites out there.Ordering was easy and the item arrived within a few days, with just standard shipping.
It was a perfect fit, and I'm completely satisfied with the result.
★★★★★
★★★★★
Susan H - July 11, 2018
Verified Purchase
Part was exactly what I needed !
Received my order quickly & was very easy to install. Back to working great ! Will order in the future if anything else needed.
★★★★★
★★★★★
Larry B - May 28, 2020
Verified Purchase
Hasn’t leaked a bit - dishwasher door gasket.
Yes, it came in perfect condition got here soon, was easily installed, and has performed flawlessly.
★★★★★
★★★★★
John O - October 7, 2022
Verified Purchase
Door leak.
Fast & easy ordering , Right size fit perfectly.
★★★★★
★★★★★
Nancy N - July 23, 2019
Verified Purchase
Worked as expected
The video on replacing this part was very helpful and the gasket went in exactly as described. It was a good match for our machine. Sadly, there is still a leak out of the bottom of the dishwasher door.
★★★★★
★★★★★
James P - January 26, 2018
Verified Purchase
Door Gasket
My Appliance is back in working order., Thank you
★★★★★
★★★★★
Arthur G K - November 6, 2019
Verified Purchase
Worked fine
Part was easy to install! Ran dishwasher after installing and had a small leak. Ran next day and it worked fine. Working fine ever since.
★★★★★
★★★★★
Katie C - February 13, 2022
Verified Purchase
Fixed the issue
We had a problem with our dishwasher intermittently leaking from the bottom corner. After some research it seemed like a new gasket would fix it, and the old one was pretty worn. It’s been about a month and we haven’t had any problems with leaks since. The part came in excellent condition and quickly.
< Prev
1
2
3
Next >
Customer Repair Stories
Average Repair Rating: 4.1 / 5.0, 101 reviews.
What's this?
Sort by:
< Prev
1
2
3
Next >
Search filter:
Clear Filter
Your search term must have 3 or more characters.
Keep searches simple. Use keywords, e.g. "leaking", "pump", "broken" or "fit".
Sorry, we couldn't find any existing installation instruction that matched.
water leaking out the bottom of the door
ordered new gasket, watched the video that was in the order conformation on how to install which was very easy to understand. the actual installation was right on the money. Thank-you.
RONALD from HIGHLAND, IN
Difficulty Level:
Really Easy
Total Repair Time:
30 - 60 mins
1 personfound this instruction helpful.
Was this instruction helpful to you?
Thank you for voting!
When I would run my dishwasher, water would pool on the right side front of the washer. It was even dripping down into the basement. When I figured out it might be the the front door gasket, I ordered the part.
The repair was very easy! I simply pulled out the old gasket from around the front part of the dishwasher. I cleaned the area with a damp rag from any residue that was left on. I bent the long gasket in half and and pushed it in starting at the center of the dishwasher and went down one side at a time until the whole gasket was in. I then
... Read more ran a short cycle on the dishwasher to make sure it was properly in place and the problem was fixed. NO MORE WATER ON THE FLOOR! I was so very happy to know my problem was fixed and I didn't need to buy a new dishwasher! It's been running great! :) ~ Elizabeth ~
Read less
Elizabeth from CHEEKTOWAGA, NY
Difficulty Level:
Very Easy
Total Repair Time:
Less than 15 mins
2 of 2 peoplefound this instruction helpful.
Was this instruction helpful to you?
Thank you for voting!
It was leaking out of the front door of the dishwasher
Pride old gasket out with screw driver easily removed it cleaned where the gasket was with mild detergent and easily installed new gasket
Patrick from MURRAY, UT
Difficulty Level:
Very Easy
Total Repair Time:
Less than 15 mins
Tools:
Screw drivers
1 personfound this instruction helpful.
Was this instruction helpful to you?
Thank you for voting!
Leaking in front right bottom corner of dishwasher
I removed the gasket from around the dishwasher. Cleans the grove of any dirt, mold or other debris. I started the gasket replacement at the top center of dishwasher by folding the gasket in half to find the center and inserting that center point into the grove just below the latch.i then inserted the rest of gasket with my thumb into the
... Read more remaking grove first to the right corner then to the left. No told were needed leak was gone
Read less
melvin from CHICAGO, IL
Difficulty Level:
Really Easy
Total Repair Time:
15 - 30 mins
1 personfound this instruction helpful.
Was this instruction helpful to you?
Thank you for voting!
Gasket around the door wasn't sealing. Leaked water on the floor when running.
Pulled out old gasket with pliers. Pushed the new one in place by hand. Note: the replacement gasket was slightly narrower and also a good 3 inches shorter! I compensated for the length by leaving in a 3 inch section of old gasket in the middle where I knew there was no leaking and cut the new one into two pieces on either side. The narro
... Read morewer width was a problem because it could not hold itself in place by friction as it was supposed to. Instead I used spray mount adhesive on the backside to help it stay put. Hope it continues to hold. I wish the product description was more precise to help me determine whether this product would work or not. The photos were not sufficient to tell.
Read less
David from Arlington, VA
Difficulty Level:
Really Easy
Total Repair Time:
Less than 15 mins
Tools:
Pliers
0 of 1 peoplefound this instruction helpful.
Was this instruction helpful to you?
Thank you for voting!
Leak out of the left bottom corner
Used a piece of tubing and jammed it in until the part came and that worked. Got the gaskets, took out the old one, in with the new ... and cut a wee bit off the end and presto done ... could be my imagination but it seems a tad quieter now as well. Naturally the soap dispenser door took a powder now, so I'm waiting for those pieces (Coul
... Read moredn't find them in the tub, but did manage to slice a finger open on a piece of glass while feeling around for them!) ...
Read less
Gary from Aquebogue, NY
Difficulty Level:
Really Easy
Total Repair Time:
Less than 15 mins
0 of 1 peoplefound this instruction helpful.
Was this instruction helpful to you?
Thank you for voting!
Door leaking during operation at bottom
Thanks for the instructions. It helped. However, there should be more attention spent with the seal at each end. On one side it is evident that the seal should be flush to the bottom of the door. However, the right side seems to indicate that the excess seal should be left hanging out. That is what I did the previous time I replaced the s
... Read moreeal. Soon it started leaking. This time I made both sides of the seal flush with the bottom of the door. Also the first time I installed the seal, it was too short. I had to reset and slightly pull the seal to increase length.
Read less
NORBERT from Dearborn, MI
Difficulty Level:
Easy
Total Repair Time:
15 - 30 mins
Tools:
Screw drivers
1 of 3 peoplefound this instruction helpful.
Was this instruction helpful to you?
Thank you for voting!
Dishwasher Leaked after soap dispenser opened
I read your website and followed the GREAT directions that others provided. Repair complete! Dishwasher working and not leaking!
Water Leak at right side bottom of the dishwasher door
After dissassembling the unit to discover the leakage source I determined that it would do best to replace the top three contributors to the problem as listed by you. Disassembly, parts replacement and reassembly was straight forward and a few hints garnered from your good instructions and assembly blow-up drawings made the job simple wi
... Read moreth the most difficult task being the removal of the adhesive foam gasket at the bottom of the door's interior. After scraping as much of the deteriorated foam away as possible with a plastic scraper I used some of my wife's nail polisher remover and a clean-up rag (being careful not to get the remover on plastic parts)and soon I had the adhesion area surface clean and ready to receive the new seal. With close attention to clean up of residues left behind from detergent and water and care taken with part installation and reassembly it no longer leaks and I hope to get another 10-15 years of leak free operation out of the dishwasher
Pulled out the old gasket and pressed in the new one. No more leakage.
Lawrence W. from Ventura, CA
Difficulty Level:
Really Easy
Total Repair Time:
Less than 15 mins
2 of 3 peoplefound this instruction helpful.
Was this instruction helpful to you?
Thank you for voting!
< Prev
1
2
3
Next >
Questions and Answers
Ask our experts a question about this part and we'll get back to you as soon as possible!
10 questions answered by our experts.
Sort by:
< Prev
1
Next >
Search filter:
Clear Filter
Your search term must have 3 or more characters.
Keep searches simple. Use keywords, e.g. "leaking", "pump", "broken" or "fit".
Sorry, we couldn't find any existing answers that matched.Try using some different or simpler keywords, or submit your new question by using the "Ask a Question" button above!
Jeanine
January 27, 2018
I ordered the door gasket, is the flat side supposed to go up against the tub? I don't know what the "barbed side " is ,as stated in the video.
For model number MDB9100AWB
Hi Jeanine,
Thank you for your question. The smooth side of the gasket will always face out. There is a video listed with the part on our website that you can reference for more information. I hope this helps. Thank you and have a great day!
9 people found this helpful.
Was this helpful?
Thank you for voting!
Scott
November 27, 2017
This is the replacement door gasket for my Maytag dishwasher. But am concerned that it is one long piece but my door frame is square and has a 3 piece door gasket.
For model number mdb6000aww
Hi Scott,
Thank you for your question. Your door gasket is all one piece. Your cabinet gasket is a different part and seems to be the part that you are describing. I have linked that part down below for you. Good luck with your repair.
My dishwasher is leaking from the bottom right. Will this fix the problem? Other # on it is e71195 type 776-0
For model number MDB7851AWS 41868901NL
Hi Deborah,
Thank you for your question. No, this would not be the correct door gasket for your dishwasher. The part number listed under your model number for the door gasket is PS11747771. I hope this helps. Thank you and have a great day!
2 people found this helpful.
Was this helpful?
Thank you for voting!
Kay
May 23, 2019
Replaced door gasket with a new one. Door is very hard to close now and i can't get it back open. What causes this?
For model number MDB4000AWW
Hi Kay, thank you for your question. The only thing that I could think of is that the part was not properly installed or the door was not properly put back together after the installation. We do have a video that shows how to install this part, you can view that here: https://youtu.be/TX3e5EwRBco. Good luck with your repair.
1 person found this helpful.
Was this helpful?
Thank you for voting!
Bill
July 9, 2019
So I installed new gasket after seeing leaks coming from left and right side bottom of door. After I put gasket in it leaked even worse. From the sides too. I double checked that the gasket was seated properly all the way around. whats going on?
For model number MDB4800AWW
hello Bill, Thank you you for the question. I suggest checking to see if the water level is too high. If the water is over the element then it is too high and over filling. If this is the case you can check the Float Switch, PartSelect Number PS11747680. Water that fills your dishwasher lifts this float. When it reaches a certain level, the float triggers the float switch to shut off, thereby shutting off the flow of water into the dishwasher. Hope this helps!
How long is the door seal in inches, part number wp902894.
For model number MDB7000AWB
Hello Joe,
Thank you for your question. This door gasket measures to be 66.5 inches long. We hope this helps.
Was this helpful?
Thank you for voting!
Grant
October 29, 2021
The door gasket is stated to be 66.5 inches long but my measurement seems to indicate it should be 68 inches long. The install video says not to stretch the gallery so I am concerned that this replacement part is to short.
For model number MDB7100AWW
Hello Grant, Thank you for your question. This Door Gasket PartSelect Number PS11746830 measures to be 66.5 inches long. We hope this helps. No tools are required for this installation, simply remove the existing gasket and press the replacement gasket into the channel around the door. It is recommended to clean the channel while the gasket is removed. We hope to hear from you soon.
Was this helpful?
Thank you for voting!
Keith
March 22, 2022
I replaced the door gasket on my Maytag dishwasher with part # WP902894 as recommended for this model. I reran the dishwasher and it had leaking at the bottom. I also noticed some leaking at the side of the door.
For model number WP902894
Hello Keith, thank you for writing. You many need to inspect under the dishwasher or behind the kickplate Look for leaks or dripping. Inspect water connections, check the floor and hose for dampness. Tighten hose as needed. You may also want to check if there may be a clog. If the line is not installed correctly or clogged, residual water will remain in the bottom of the tub and can cause your dishwasher to leak. If you need help placing an order, customer service is open 7 days a week. Please feel free to give us a call. We look forward to hearing from you.
Was this helpful?
Thank you for voting!
G
July 11, 2023
This is a Maytag model from the 1990's. The original seal that's around the perimeter of the tub is like a spongy foam which appears to be attached via an adhesive backing. The part which you're recommending is rubber. Will it stay in place in the flat track?
For model number DWU7550AAX
Hi G, thank you for contacting us. The compatible door gasket for your model is part number PS11746830. This part is sourced from the original manufacturer and will fit your model. Glad to be of help!
Was this helpful?
Thank you for voting!
Richard
July 27, 2021
Is this the right door gasket for this Norge dishwsher?Thanks,
richard
For model number Norge NDU655P
Hello Richard, Thank you for your inquiry. Yes, this would be the correct gasket for your dishwasher based on the model number. Good luck with your repair.
Was this helpful?
Thank you for voting!
< Prev
1
Next >
✖
Ask a Question
Ask our experts a question on this part and we'll respond as soon as we can.
Item is in stock and is estimated to be delivered in 2-3 business days via Standard Shipping.
On Order
Item is not in stock and usually ships 3-5 business days from the time you place your order.
Special Order
Item is not in stock and usually ships 10-15 business days from the time you place your order.
NLA - No Longer Available
This item is no longer being made by the manufacturer, and cannot be added to your shopping cart.
[{"position":0,"name":"Home","title":"Home","url":"/"},{"position":1,"name":"Dishwasher","title":"Dishwasher","url":"/Dishwasher-Parts.htm"},{"position":2,"name":"Seal or Gasket","title":"Seal or Gasket","url":"/Dishwasher-Seals-and-Gaskets.htm"},{"position":3,"name":"WP902894","title":"WP902894","url":""}]
You added 1 item to your cart
✖
% OFF
$
$
Qty:
Total item(s) in cart:
Order Subtotal
$
*Taxes and shipping will be applied during checkout