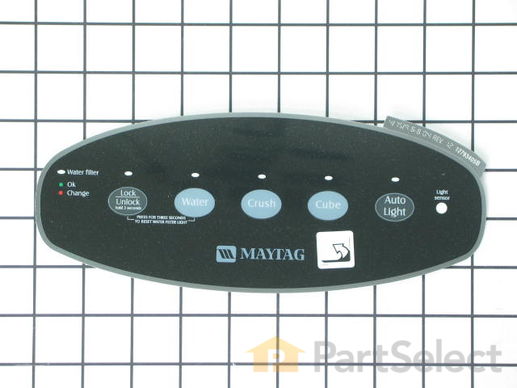
This is the replacement façade insert for your refrigerator. It is essentially the control panel that allows you to choose between water and ice, select different types of ice, turn on the light, and lock the control panel. If your refrigerator will not dispense ice, or if you are not able to select from the above options, you may need to replace the insert. This insert is black in color and is oval shaped. Be sure to check that this insert matches the damaged insert on your refrigerator. This part is sold individually.
We're sorry, but our Q&A experts are temporarily unavailable.
Please check back later if you still haven't found the answer you need.
5 questions answered by our experts.
< Prev
1
Next >
Sort by:
Search filter:
Clear Filter
Your search term must have 3 or more characters.
Keep searches simple. Use keywords, e.g. "leaking", "pump", "broken" or "fit".
Sorry, we couldn't find any existing answers that matched.Try using some different or simpler keywords, or submit your new question by using the "Ask a Question" button above!
Jackson
September 16, 2019
Does this fountain push button overlay come in white for my Maytag refrigerator msd264rhew? All i see is black on your website.
For model number Maytag part 67004121
Hello Jackson, thank you for your question. This part for your model is only available in black. You may want to reach out to Maytag directly for an alternate and compatible part number and get back in touch with us. We look forward to hearing back from you!
5 people found this helpful.
Was this helpful?
Thank you for voting!
NANCY ELAINE
January 3, 2018
No water no ice no light on the part
For model number MSD2651KES
Hi Nancy,
Thank you for your question. Based on what you described, you will need to check the dispenser electronic control board, the touchpad and the wiring between them to see what is going on. You will need to use a multimeter to test the continuity of each part. I hope this helps. Thank you and have a great day!
3 people found this helpful.
Was this helpful?
Thank you for voting!
Khatoon
May 22, 2019
My question is is it easy to replace on your own or do you need a technician
For model number Msd2651hes
Hi Khatoon, thank you for your question. We have a customer, Tom from Kansas who wrote in with a very good example of instructions on how this part is installed: "The repair was very simple. Turn off power to unit. Remove the spill plate, it just pulls out. Then remove the two screws that are seen when the spill plate is pulled out. The cover slides down and comes out. Disconnect the two wires to the operator switch, they just pull off. Take two small screw drivers and gently raise the tabs that latch in the circuit board jack and pull the jack down to remove it. Remove the one screw that secures the circuit board and use a small screw driver to gently raise the tabs that hold the circuit board in place on the bottom side and remove the circuit board. Install the circuit board on the new cover and intall the holding screw. Plug in the jack that connects the circuit board to the unit. The plug in the two wires to the microswitch. Install the cover and install the two holding screws. Slide in the spill plate. Finally install the face plate, it just sticks on and is very easy because the cover is resessed where it is to be installed. In all I think it took me longer to wright this than it did to do the repair. ". I hope that helps. Good luck with your repair.
3 people found this helpful.
Was this helpful?
Thank you for voting!
Greg
March 4, 2020
I installed my new ice maker by following your video, but it’s been a day and a half and still no ice cubes have been made. I checked the electrical connection and it was fine. I’m at a loss and could use some help.
For model number MSD2651HEW
Hello Greg, thank you for your question. We would recommend testing the icemaker. It is possible the part is defective. It is also imperative that you check the valve to be sure it is opening to allow water to the icemaker. Here is a link for testing the valve.
https://www.partselect.com/Refrigerator+test-water-valve+repair.htm
And testing instructions for the icemaker.
Behind the cover is a series of electrical test points that can be used to diagnose the ice maker. The unit can be manually operated by inserting an insulated jumper wire into test points “T” and “H” to initiate a “test harvest”. The jumper should be insulated 14 gauge solid wire that has the insulation stripped back about 3/4 of an inch on both ends, and bent into a “U” shape. When inserted into the test points for 5 to 10 seconds, the motor should start and the cycle will continue on its own. You may have to manually close the freezer door switch for this to operate. This test will simulate a real harvest cycle and will operate the ejector blades, shut off arm and the fill valve in the proper sequence, and will allow you to do a proper diagnosis. This is a live voltage test and should only be performed by a qualified person. If the motor does not start, you can verify that you have power to the ice maker at test points “L” and “N”. If the ice maker is getting power and does not perform a cycle, then the icemaker would have to be replaced.
1 person found this helpful.
Was this helpful?
Thank you for voting!
Jake
October 15, 2019
The thin control cover has cracked through in the area you push for water dispensing. So now we can't switch from water dispensing to ice dispensing. What would need to be fixed?
For model number MSD2351HES
Hello Jake, thank you for your question. If just the outside button is cracked enough to prevent you from pressing the button, then you will just need to replace this Facade Insert, part number PS11743579 for your model refrigerator. If the electronic part underneath the Facade Insert is also damaged, then you will need to replace it as well. It is the Dispenser Electronic Control Board, part number PS11743557. Good luck with your repair!
Was this helpful?
Thank you for voting!
< Prev
1
Next >
Part Videos
Replacing your Maytag Refrigerator Facade Insert - Black
Customer Repair Stories
Average Repair Rating: 4.6 / 5.0, 9 reviews.
What's this?
< Prev
1
Next >
Sort by:
Search filter:
Clear Filter
Your search term must have 3 or more characters.
Keep searches simple. Use keywords, e.g. "leaking", "pump", "broken" or "fit".
Sorry, we couldn't find any existing installation instruction that matched.
the touch pad cover was cracked
I ordered the cover and the face plate because I was unsure of the condition of the cover and because the face plate is stuck on the cover. The repair was very simple. Turn off power to unit. Remove the spill plate, it just pulls out. Then remove the two screws that are seen when the spill plate is pulled out. The cover slides down and comes out. Disconnect the two wires to the operator switch, they just pull off. Take two small screw drivers and gently raise the tabs that latch in the circuit board jack and pull the jack down to remove it. Remove the one screw that secures the circuit board and use a small screw driver to gently raise the tabs that hold the circuit board in place on the bottom side and remove the circuit board. Install the circuit board on the new cover and intall the holding screw. Plug in the jack that connects the circuit board to the unit. The plug in the two wires to the microswitch. Install the cover and install the two holding screws. Slide in the spill plate. Finally install the face plate, it just sticks on and is very easy because the cover is resessed where it is to be installed. In all I think it took me longer to wright this than it did to do the repair.
The facade plate is attached to the ice/water dispenser panel with an adhesive. I used a hair dryer to warm and soften the adhesive. Peeled off the old facade and attached the new facade. Never even had to unplug the old. Fun project!!
David from Pensacola, FL
Difficulty Level:
Really Easy
Total Repair Time:
Less than 15 mins
32 of 36 peoplefound this instruction helpful.
Was this instruction helpful to you?
Thank you for voting!
The "Ice Dispense" button broke.
Unplugged refrigerator; removed two screws with a nut driver; removed front panel; removed circuit board; disconnected two electric connectors. Reversed process to install new panel.
Thanks to parts.com showing the schematic the repair was very easy. Note if the buttons fro dispensing water/ice break you need to order two parts. 1. dispenser Facade and 2. Dispenser facade Insert. To replace do the following. remove the catch tray at the bottom of facade. remove the two screws on the bottom and gently pull bottom of insert out and down. Next unsnap the two wires on the selonoid switch. Next pull down on the harness connector from the printed ckt. Next remove small phillips screw that secures the ckt to the insert and gently pry the six plastic clips that hold the ckt to the insert and remove. Next, install the ckt into the new insert and reconnect the selonoid switch. Next, install the insert back on the door. Next, install the Dispensor Facade sticker over the switch buttons taking care that it is aligned properly. Thats it ready to use.
Ronald from Townsend, DE
Difficulty Level:
Really Easy
Total Repair Time:
Less than 15 mins
Tools:
Nutdriver, Screw drivers
17 of 21 peoplefound this instruction helpful.
Was this instruction helpful to you?
Thank you for voting!
Water - Ice Dispenser not working
Took lower plate out then removed two screws. Unhooked electronic control board and remove board by removing two small screws. Disconnected wires and replaced with new board. Front cover plate was replaced as the "water - crush - cube buttons on face plate had cracked. Replaced front cover with new plate - used a little glue to keep the small buttons in place. Now we can select all three items and it is working fine.
Dispenser buttons for water and ice wouldn't cycle
1.Unplug refrigerator and remove dispenser cup floor plate. 2.Remove two hex head screws. 3.Remove electronics board phillips head screw. 4.disconnect actuator switch from dispenser. 5.Remove electronics board. 6.Reverse the order on the new Facade and attach Facade insert-black
This was a fairly easy and straightforward repair that simply involved removal of the old facade face plate by pealing it off and sticking the new one in it's place. The worst part was removing the adhesive from the old facade before I could stick the new one on in its place. Perhaps you could include some advice on how to remove the adhesive. I used Goof-off, but was concerned about it attacking the plastic surface. It seemed to work OK.
Robert from East Providence, RI
Difficulty Level:
Really Easy
Total Repair Time:
15 - 30 mins
7 of 8 peoplefound this instruction helpful.
Was this instruction helpful to you?
Thank you for voting!
Old facade was cracked from use.
I checked previous installation instructions posted on your website. Since the facade is a peel and stick, I used a hair dryer to soften the old facade and was then able to just peel it off. I applied heat to one side for about 5 minutes. I then applied the new facade.
Harry from KNOXVILLE, TN
Difficulty Level:
Really Easy
Total Repair Time:
Less than 15 mins
2 of 2 peoplefound this instruction helpful.
Was this instruction helpful to you?
Thank you for voting!
The low voltage transformer to under the counter lighting failed.
The first step in making any repair is finding the right replacement part. It took me about 5 minutes in the internet to locate the correct part at PartSelect. Another 5 minutes to order the correct part and receive a confirming email. Replacement installation of the defective part was 5 minutes to install the new part and verify that the problem was solved. The under-the-counter lighting worked once again which made my wife happy, which as you know make everybody's life better. Thanks for the fast shipping.
David from Pensacola, FL
Difficulty Level:
Really Easy
Total Repair Time:
Less than 15 mins
2 of 5 peoplefound this instruction helpful.
Was this instruction helpful to you?
Thank you for voting!
< Prev
1
Next >
Customer Reviews
Average Rating:
★★★★★
★★★★★
12 Reviews
5.0
Filter By Rating:
5 Stars
12
4 Stars
0
3 Stars
0
2 Stars
0
1 Star
0
< Prev
1
2
Next >
Sort by:
Search filter:
Clear Filter
Your search term must have 3 or more characters.
Keep searches simple. Use keywords, e.g. "leaking", "pump", "broken" or "fit".
Sorry, we couldn't find any existing reviews that matched. Try using some different or simpler keywords.
★★★★★
★★★★★
ALAN H - January 30, 2023
Verified Purchase
Perfect fit
Purchase came with video instruction on installation very satisfied.
★★★★★
★★★★★
Sheri N - September 23, 2020
Verified Purchase
Easy repair
Exactly what I needed to fix the problem
★★★★★
★★★★★
Les M - September 15, 2020
Verified Purchase
Easy Install
Video was EXTREMELY helpful!
★★★★★
★★★★★
Barbara A - August 6, 2020
Verified Purchase
Very easy fix!
Was very easy to apply. Just wish it came in white. We searched all websites for a white one since we had a white refrigerator and Maytag said they do not make white any longer. The black is okay and it took care of the purpose. It is fixed but not really happy with appearance. Was hoping to sell refrigerator with the house but that probably won’t happen. Just doesn’t look right.
★★★★★
★★★★★
Charles Z - May 28, 2020
Verified Purchase
Good as advertised. 5 stars.
My part worked as advertised. My refrigerator was good as new in minutes.
★★★★★
★★★★★
Kristine D - September 4, 2019
Verified Purchase
super easy
The part was easy to find to order and just as easy to install
★★★★★
★★★★★
Greg I - June 24, 2019
Verified Purchase
Easy fix
Quick delivery and good quality part. Thanks Easy fix
★★★★★
★★★★★
Philip O - May 30, 2018
Verified Purchase
easy install
Part arrived on time and in perfect condition. Thank you
★★★★★
★★★★★
Leo L - March 3, 2018
Verified Purchase
Easy repair ..
Great delivery time. Refrigerator working now.
★★★★★
★★★★★
Gary J - February 27, 2018
Verified Purchase
easy fix
Easy replacement. Looks just like old one.
< Prev
1
2
Next >
Model Cross Reference
This part works with the following models:
PartSelect Number: PS11743579
Manufacturer Part Number: WP67004151
The Fix App makes it easy to manage all your stuff in one place. Just snap a photo and we'll find and store your user manuals, receipts, and product information in one easy-to-find place!
"Like magic. I took a picture of the model number on my refrigerator, and the app identified it right away … Very convenient. I'm impressed." ★★★★★ - Clever Jeff