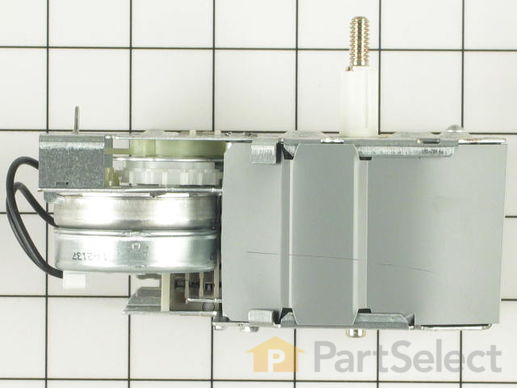
Part Location Diagram of WP3946448 Whirlpool Timer -  Screws NOT Included
See part 9 in the diagram
( Grid squares measure 1x1 inch )
Customer Service Representative

Get in touch, we're here to help!

Daily 8am - 9pm EST

customerservice@partselect.com

Timer - Screws NOT Included WP3946448

★★★★★
★★★★★
1 Review

Rated by 7 customers 

Easy 

15 - 30 mins 

Ratings submitted by customers like you who bought this part.

$ 224.97
  In Stock

Get this part fast! Average delivery time for in-stock parts via standard shipping: 1.8 days.

PartSelect Number PS11741992
Manufacturer Part Number WP3946448
Manufactured by Whirlpool
Product Description

Timer - Screws NOT Included Specifications

The mounting holes must be tapped by using the old screws.
How Buying OEM Parts Can Save You Time and Money

How Buying OEM Parts Can Save You Time and Money

Troubleshooting
This part works with the following products:
Washer.
This part works with the following products:
Whirlpool, Estate.
Part# WP3946448 replaces these:
3361178, 3946448
Back to Top
Customer Reviews
Average Rating:
★★★★★
★★★★★
1 Review
5.0
Filter By Rating:
  • 5 Stars
    1
  • 4 Stars
    0
  • 3 Stars
    0
  • 2 Stars
    0
  • 1 Star
    0
Sort by:
  • 1
Sorry, we couldn't find any existing reviews that matched. Try using some different or simpler keywords.
  • 1
Customer Repair Stories
 Average Repair Rating: 4.2 / 5.0, 7 reviews. What's this?
Sort by:
  • 1
Sorry, we couldn't find any existing installation instruction that matched.
Washer did not spin and drain
I removed the two screws from the panel and rotated the panel up on its hinges. I marked the plug for the timer with tape so I would know how to plug it into the new timer. I unscrewed the knob on the timer while holding the shaft with pliers. Unscrewed the plastic nut, and removed the plastic shield. Then I removed the two screws holding the timer to the panel and removed the old timer. Next I threaded the two screw holes in the new timer with a 10/20 tap and attached the new timer with the same screws I removed earlier. Snapped the plug in place and closed the panel. Secured the panel with two screws and replaced the plastic shield and put the plastic nut on the new shaft. The nut served to "lock" the knob in place on the threaded shaft of the timer. Necessary to get the nut in the right place by trial and error so the knob would lock against it and make it possible to rotate the timer mechanism. Ran the machine and it works perfectly.
  • Eric from Brooklyn, NY
  • Difficulty Level:
    Easy
  • Total Repair Time:
    15 - 30 mins
  • Tools:
    Pliers, Screw drivers
5 of 7 people found this instruction helpful.
Was this instruction helpful to you?
Thank you for voting!
The timer on the machine wasn't working.
Installed the new timer. The screws on the old timer that held it in place did not fit the new timer. It would have been helpful if the new timer shipped with screws that would work with it. I used screws I had on hand to attach the new timer.
  • Thomas from Greenville, SC
  • Difficulty Level:
    Really Easy
  • Total Repair Time:
    Less than 15 mins
  • Tools:
    Nutdriver, Screw drivers
3 of 5 people found this instruction helpful.
Was this instruction helpful to you?
Thank you for voting!
Washer stops on cycle
First unscrew panel and it s an easy access to the timer. Unplug wiring in the timer and put the new one and put panel back. No need for instruction its a one plug wiring. Very easy and a lot of space to work on.
Other Parts Used:
Timer - Screws NOT Included Agitator Repair Kit
  • MARLON from SAN RAMON, CA
  • Difficulty Level:
    Really Easy
  • Total Repair Time:
    15 - 30 mins
  • Tools:
    Screw drivers
15 of 18 people found this instruction helpful.
Was this instruction helpful to you?
Thank you for voting!
Washer wouldn't drain or spin
As mentioned before, replacing this part is easy. The hardest part was finding the right screws to buy, since the old screws didn't fit. The new part is not threaded so I bought some #10 x 3/4" self tapping sheet metal screws and that did the trick. Since the part is not threaded, it takes more force to screw in the screws. Make sure you have the screw lined up perpendicular to the part and you'll be fine.
  • patrick from savage, MN
  • Difficulty Level:
    Really Easy
  • Total Repair Time:
    Less than 15 mins
  • Tools:
    Screw drivers
6 of 7 people found this instruction helpful.
Was this instruction helpful to you?
Thank you for voting!
Mounting holes were not tapped.
I had to tap the mounting holes.
  • Randy from Snellville, GA
  • Difficulty Level:
    Very Difficult
  • Total Repair Time:
    30 - 60 mins
  • Tools:
    Nutdriver, Screw drivers
2 of 5 people found this instruction helpful.
Was this instruction helpful to you?
Thank you for voting!
Washer would not finish the cycle
After emailing PartSelect about the problem they suggested that the timer should be the problem. Checking a few other things I decided that is was in fact the timer that needed to be replace. I order the part and it arrived in record time. Replacing it was two screws and a plug.
One thing I would suggest that PartSelect include the screws to finish the job. I had to buy two self starting screws from the hardware store.
  • Jay from Flint, MI
  • Difficulty Level:
    Really Easy
  • Total Repair Time:
    Less than 15 mins
  • Tools:
    Nutdriver, Screw drivers
6 of 7 people found this instruction helpful.
Was this instruction helpful to you?
Thank you for voting!
The Timer Would No Longer Advance On The Washer
The repair was way to easy. I unscrewed the two screws that held the control panel on top of the washer. I flipped the panel up to reveal the timer. I copied the part number and sent for and recieved the part pronto. Next I took off the control knob , loosened the two screwed that held the timer in place. Next ,I unplugged the timer from its connectionand then plug in the replacement part. Bodda-boom, bodda-bing. Its done. Just reattach the timer by the two screws to the panel and screw in the two panel screws. It worked like a charm
  • aubrey from indianapolis, IN
  • Difficulty Level:
    Really Easy
  • Total Repair Time:
    Less than 15 mins
  • Tools:
    Screw drivers
19 of 23 people found this instruction helpful.
Was this instruction helpful to you?
Thank you for voting!
  • 1
Questions and Answers

Be the first to ask our experts a question about this part!

Model Cross Reference
This part works with the following models:
PartSelect Number: PS11741992
Manufacturer Part Number: WP3946448
Brand
Model Number
Description
Whirlpool
7LSC8244BN0
Washer
Whirlpool
7LSC8244BQ0
Washer
Whirlpool
7LSP8244BN0
Washer
Whirlpool
7TAWS700BN0
Washer
Whirlpool
LLR8245BN0
Washer - Residential, Automatic
Whirlpool
LLR8245BN1
Washer - Residential, Automatic
Whirlpool
LLR8245BW0
Washer - Residential, Automatic
Whirlpool
LLR8245BW1
Washer - Residential, Automatic
Whirlpool
LLV8245BN0
Washer
Whirlpool
LLV8245BW0
Washer
Whirlpool
LSC6244BN0
Washer
Whirlpool
LSC6244BQ0
Washer - Residential
Whirlpool
LSC6244BW0
Washer - Residential
Whirlpool
LSC6244BZ0
Washer
Whirlpool
LSC8244BG0
Washer - Residential, Automatic
Whirlpool
LSC8244BG1
Washer - Residential, Automatic
Whirlpool
LSC8244BN0
Washer - Residential, Automatic
Whirlpool
LSC8244BN1
Washer - Residential, Automatic
Whirlpool
LSC8244BQ0
Washer - Residential, Automatic
Whirlpool
LSC8244BQ1
Washer - Residential, Automatic
Whirlpool
LSC8244BW0
Washer - Residential, Automatic
Whirlpool
LSC8244BW1
Washer - Residential, Automatic
Whirlpool
LSC8244BZ0
Washer - Residential, Automatic
Whirlpool
LSC8244BZ1
Washer - Residential, Automatic
Whirlpool
LSN8244BN0
Washer
Whirlpool
LSN8244BQ0
Washer
Whirlpool
LSN8244BW0
Washer
Whirlpool
LSP6244BN0
Washer
Whirlpool
LSP6244BW0
Washer
Whirlpool
LSP8244BG0
Washer
Customer Service Representative

Get in touch, we're here to help!

Daily 8am - 9pm EST

Contact Customer Service