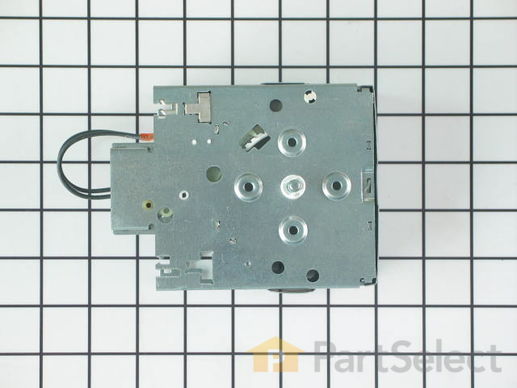
Part Location Diagram of WP22001689 Whirlpool Washer Timer
See part 9 in the diagram
( Grid squares measure 1x1 inch )
Customer Service Representative

Get in touch, we're here to help!

Daily 8am - 9pm EST

customerservice@partselect.com

Washer Timer WP22001689

 Fits your LAT2916ABE Washer!

Rated by 2 customers 

Easy 

15 - 30 mins 

Ratings submitted by customers like you who bought this part.

$ 268.61
  Special Order
 Fits your LAT2916ABE Washer!
PartSelect Number PS11739304
Manufacturer Part Number WP22001689
Manufactured by Whirlpool
Product Description

Washer Timer Specifications

The timer controls most of the operations of the washer: water level, tub filling and emptying, length of cycles, and cycle setting sequences.
How Buying OEM Parts Can Save You Time and Money

How Buying OEM Parts Can Save You Time and Money

Troubleshooting
This part works with the following products:
Washer.
This part works with the following products:
Maytag.
Part# WP22001689 replaces these:
AP6006237, 22001689
Back to Top
Customer Repair Stories
 Average Repair Rating: 3.8 / 5.0, 2 reviews. What's this?
Sort by:
  • 1
Sorry, we couldn't find any existing installation instruction that matched.
Washer would fill, but then not have any agitation. Timer was running, but would skip parts of cycles.
Once I figured out to replace the timer, installation was quite easy. Unplug first, then remove the top back panel by removing top 3 Phillips screws and bottom 2 hex screws. Unplug the master plug from top right of timer. This takes some wiggling and using a small flathead to pry clips. Unplug ground wire. From the front of the machine, pop the cover off the timer knob with small flathead. Then use flathead to remove small clip. The whole knob assembly will then slide off. There is a spring inside, but it's not under tension. Remove 2 hex screws that hold the timer in position. On the new timer, you will have to determine the 2 holes that the hex screws will use (I think there are 4 holes). The hex screws will need to be screwed in prior to installation, to thread the holes. Remove screws and place back into position. Screw hex screws back in through the front, replace ground wire, and replace master plug. Reassemble knob, replacing the small metal clip to hold in place. Replace back cover and you're good to go!
  • CHARLES from MCKINNEY, TX
  • Difficulty Level:
    Easy
  • Total Repair Time:
    Less than 15 mins
  • Tools:
    Nutdriver, Screw drivers
1 person found this instruction helpful.
Was this instruction helpful to you?
Thank you for voting!
Washing Machine stopped after filling with water
I didn't know it was a timer problem, so had called a repair firm. He diagnosed the problem quickly, then said it would 2 weeks to get a part, and then $140 to install it. His part cost was $150.

I asked him to leave it disassembled and looked at buying a new washer. After seeing they cost approximately $1000 I figured it was worth the risk to try to make the repair myself.

The top of the control handle popped off easily with a screwdriver, and the little metal clip came off with a screwdriver to pry it off. I gently removed the other control plastic pieces to ensure the spring did not go flying.

The old timer came off with the use of a socket though a screwdriver woudl have worked, I was worried about stripping the screws.

The new timer came within 5 days, including a weekend, faster than the service company supposedly could get it.

The timer had one part that needed to be inserted into a gear, and the metal clips needed to be bent down a bit to keep it inserted. I had the old timer to look at, this took 2 minutes to figure out, and 15 seconds to accomplish.

I attached the ground wire and then placed the timer where it goes and started to put the screws back in. I removed it again and started the screws on a flat service to get the threading started properly, removed the screws and then attached it easily to the washer.

Putting all the other small parts back only took a couple minutes.

I had not watched the repair person remove the back plate, so figuring out where the screws went took some time as there were 14 holes and 7 screws. If I had taken the back off it would have been trivial.

I plugged it back in and it has run fine for over 20 loads since I replaced the part last week.

I would make sure you mark where the screws go, and keep the old timer until the new one is working. I would also look to see where the ground wire goes before removing the old one.

A cup of coffee, a couple tools, and you are set within 45 minutes of the new part arriving. I also took advantage of moving the machine to clean up around the back and underneath, a little time and a lot of dirt.
  • Matthew from Great Falls, VA
  • Difficulty Level:
    Easy
  • Total Repair Time:
    30 - 60 mins
  • Tools:
    Screw drivers, Socket set
4 of 5 people found this instruction helpful.
Was this instruction helpful to you?
Thank you for voting!
  • 1
Questions and Answers

Be the first to ask our experts a question about this part!

Model Cross Reference
This part works with the following models:
PartSelect Number: PS11739304
Manufacturer Part Number: WP22001689
Brand
Model Number
Description
Maytag
LAT2916AAE
Washer - Residential
Maytag
LAT2916AAM
Washer - Residential
Maytag
LAT2916ABE
Washer - Residential
Maytag
LAT8206AAE
Washer - Residential
Maytag
LAT8206AAM
Washer - Residential
Maytag
LAT8216AAE
Washer - Residential
Maytag
LAT8216AAM
Washer - Residential
Maytag
LAT8226AAE
Washer - Residential
Maytag
LAT8226AAM
Washer - Residential
Maytag
LAT8306AAE
Washer - Residential
Maytag
LAT8306AAM
Washer - Residential
Maytag
LAT9316AAE
Washer - Residential
Maytag
LAT9316AAM
Washer - Residential
Customer Service Representative

Get in touch, we're here to help!

Daily 8am - 9pm EST

Contact Customer Service