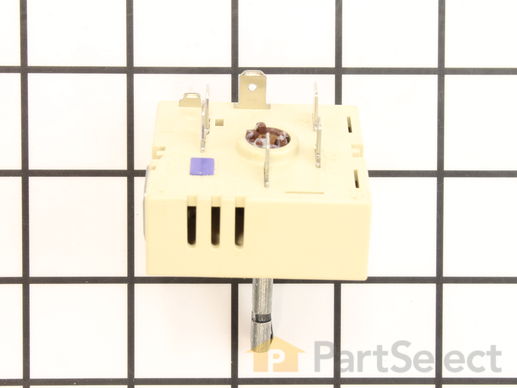
Infinite Control Switch WB24T10119
Rated by 11 customers
Really Easy
30 - 60 mins
Ratings submitted by customers like you who bought this part.
Get this part fast! Average delivery time for in-stock parts via standard shipping: 1.8 days.
Infinite Control Switch Specifications

How Buying OEM Parts Can Save You Time and Money
-
5 Stars 5
-
4 Stars 0
-
3 Stars 1
-
2 Stars 0
-
1 Star 0
- < Prev
- 1
- Next >
- < Prev
- 1
- Next >
- < Prev
- 1
- 2
- Next >
-
Ezekiel from FLORISSANT, MO
-
Difficulty Level:Very Easy
-
Total Repair Time:30 - 60 mins
-
Tools:Nutdriver, Pliers, Screw drivers, Wrench set
0. TURNED OFF CIRCUIT BREAKER !!!
1. Lifted cooktop out of counter cutout. (It wasn't anchored)
2. I had just enough slack in the armored power cable to set the cooktop on the edge of the countertop cutout.
3. Removed black plastic control knobs
4. Removed about a dozen short screws around perimeter of c ... Read more ooktop. I think those were phillips head screws.
5. Lifted glass top straight up. Had to wiggle it a bit, to get the rubber washers on the control shafts, to slide up.
6. The new heater element did not have the 2 alignment brackets. These brackets have holes that slip over metal pins at each end. So, I removed the brackets from the old element, and attached them to the new element.
7. Set new heater element on top of old. Using needle nose pliers, pulled wires off of old element and clipped onto new element - ONE AT A TIME.
8. Slide old element out, and place new element brackets over alignment pins.
9. Now, on to the Infinite control switch. Removed a few screws around the metal housing that the controls are attached to.
10. Removed the 2 screws that hold the control to the metal housing.
11. Switched wires from old control to new - ONE AT A TIME. (Pay attention to the position of the wire blades on the control, and align it to match the old control, so that you will get the wires from the old control, onto the correct blades of the new control.)
12. Attached new control to metal housing, using 2 screws.
13. Re-assemble - Place glass top over control shafts.
14. Attach glass top by installing all of those short screws around the perimeter.
15. Place cooktop back into countertop cutout.
16. Turn on the circuit breaker.
17. Test all heating elements.
-------------
Other notes - I actually removed the entire cooktop, including disconnecting the power connection, so that we could replace our kitchen countertop.
One issue was that the new quartz countertop was 3/8" thinner than the old Formica top. So, the bottom of the cooktop was resting 3/8" lower than before. The shallow drawer below the cooktop was now hitting the bottom of the cooktop. My solution was to cut 3/8" off the back of the drawer. Problem solved.
Good luck y'all.
-
Jim from MILFORD CTR, OH
-
Difficulty Level:Easy
-
Total Repair Time:30 - 60 mins
-
Tools:Pliers, Screw drivers
-
kathleen from Wynantskill, NY
-
Difficulty Level:Really Easy
-
Total Repair Time:30 - 60 mins
-
Tools:Screw drivers, Socket set
-
Gary from CLEARWATER, FL
-
Difficulty Level:Easy
-
Total Repair Time:Less than 15 mins
-
Tools:Nutdriver, Pliers, Screw drivers
-
John from CENTERPORT, NY
-
Difficulty Level:Really Easy
-
Total Repair Time:30 - 60 mins
-
Tools:Pliers
-
Steve from Seattle, WA
-
Difficulty Level:Easy
-
Total Repair Time:15 - 30 mins
-
Tools:Pliers, Screw drivers, Socket set
-
LUIS from CONCORD, MA
-
Difficulty Level:Really Easy
-
Total Repair Time:15 - 30 mins
-
Tools:Nutdriver, Pliers, Screw drivers
-
Rodney from Erath, LA
-
Difficulty Level:Really Easy
-
Total Repair Time:15 - 30 mins
-
Tools:Screw drivers, Socket set
-
Terri from Leesburg, FL
-
Difficulty Level:Really Easy
-
Total Repair Time:15 - 30 mins
-
Tools:Screw drivers
-
Al from Ocala, FL
-
Difficulty Level:Easy
-
Total Repair Time:30 - 60 mins
-
Tools:Nutdriver, Screw drivers
- < Prev
- 1
- 2
- Next >
Ask our experts a question about this part and we'll get back to you as soon as possible!
- < Prev
- 1
- 2
- 3
- Next >


4 people found this helpful.

3 people found this helpful.

3 people found this helpful.

2 people found this helpful.

1 person found this helpful.

1 person found this helpful.

1 person found this helpful.


- < Prev
- 1
- 2
- 3
- Next >
Manufacturer Part Number: WB24T10119

Item is in stock and will ship today if your order is placed before 4:00 PM Eastern Standard Time.
If your order is placed after 4:00 PM EST, the in stock items will ship on the next business day.
Item is not in stock and usually ships 3-5 business days from the time you place your order.
Item is not in stock and usually ships 10-15 business days from the time you place your order.
This item is no longer being made by the manufacturer, and cannot be added to your shopping cart.


