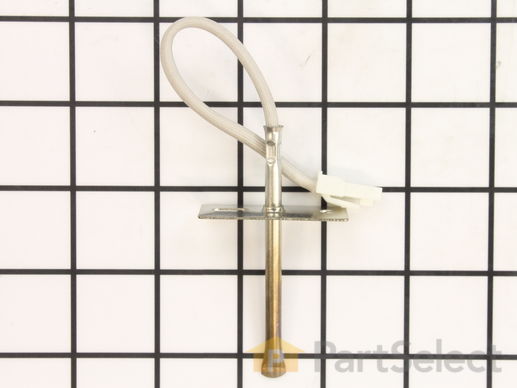
The temperature sensor, also known as the oven temperature sensor assembly is usually found in the back of the oven. The function of the oven temperature sensor assembly is to measure the temperature inside your oven while it is on and send the temperature back up to the electronic control, which adjusts as necessary. If your oven is having difficulty achieving warmer temperatures and/or keeping warmer temperatures up, you may want to test your temperature sensor. Before you make this repair remember to unplug your range from the power source, and turn off the gas shut off valve.
How Buying OEM Parts Can Save You Time and Money
Troubleshooting
This part fixes the following symptoms:
Little to no heat when baking | Oven not heating evenly | Oven is too hot | Element will not heat
This part works with the following products:
Range, Wall Oven, Microwave Oven Combo, Cooktop.
This part works with the following products:
General Electric, Kenmore, Hotpoint.
Part# WB21X22134 replaces these:
AP5953771, WB21T10007, WB21T10017, WB24T10007
Questions and Answers
We're sorry, but our Q&A experts are temporarily unavailable.
Please check back later if you still haven't found the answer you need.
71 questions answered by our experts.
< Prev
1
2
3
Next >
Sort by:
Search filter:
Clear Filter
Your search term must have 3 or more characters.
Keep searches simple. Use keywords, e.g. "leaking", "pump", "broken" or "fit".
Sorry, we couldn't find any existing answers that matched.Try using some different or simpler keywords, or submit your new question by using the "Ask a Question" button above!
Stephen
July 20, 2017
When turning the oven on it starts to warm and then a code f2 appears and oven shuts off
For model number Jb650dt1ww
Hi Stephen, thank you for your question. If your oven is not warming, the oven temperature sensor is likely the problem, and replacing it with this part will solve that. The F2 code means there is a problem with the temperature. If you'd like to do more research before buying a replacement sensor, you can test the sensor with a multimeter (make sure the range is at room temperature, unplugged, and disconnect the sensor first). The sensor should read about 1100 ohms, if it is off, replace the sensor with this part. I hope this helps with your repair!
35 people found this helpful.
Was this helpful?
Thank you for voting!
Betty
March 29, 2018
My electric oven does not heat to the set temperature. I set temperature pre heat to 350 degrees. Display on stove control panel will show 350 degrees after pre heat but the thermometer that I placed inside the oven only reads about 225 degrees.Then I let the oven cool off and set the preheat to 250 degrees display show 250 degrees after preheat but the thermometer that was placed inside oven did not rise at all. Object got warm but I could reach in with bare hand and take it out. Guess I have a problem. What might it be?
For model number JBS55DM2WW
Hi Betty, Thank you for the question. This sounds like an issue with the Temperature Sensor, PartSelect Number: PS10059162.The temperature sensor, also known as the oven temperature sensor assembly is usually found in the back of the oven. The function of the oven temperature sensor assembly is to measure the temperature inside your oven while it is on and send the temperature back up to the electronic control, which adjusts as necessary. If your oven is having difficulty achieving warmer temperatures and/or keeping warmer temperatures up, you may want to test your temperature sensor.Testing the temperature sensor probe on your oven is easy. With the sensor at room temperature, measure the resistance between the two prongs at the end of the sensor connector. The resistance of the sensor should read approximately 1080 – 1090 ohms at room temperature. Hope this helps!
23 people found this helpful.
Was this helpful?
Thank you for voting!
Chris
August 11, 2017
Oven starts warming and gets to about 250 degrees and temp stops climbing (set to 350 degrees). Is it the element or the temperature sensor that may be bad?
For model number J2B918SEK3SS
Hi Chris,
Thank you for the question. If the oven is not reaching the set temperature but the element is still getting hot, you will need to replace the temperature sensor.
Hope this helps!
17 people found this helpful.
Was this helpful?
Thank you for voting!
Carol
February 27, 2019
After setting the temp on the oven, it will indicate it is up to the set temp but is actually 20-60 degrees cooler than indicated. Does this sound like the temperature sensor? Thanks
For model number PT970SM1SS
Hi Carol, thank you for your question. There are a few parts that could cause this issue in your appliance. First I would say test your elements with a multi meter to see if they are working correctly or not. They should be reading between 0 - 50 ohms to be working correctly. The other part you should check would be your oven temperature sensor. That can also be tested with a multi meter and should be reading between 1000 - 1100 ohms. If those three parts are fine however, then the issue may be in your control board. I hope that helps. Good luck with your repair.
10 people found this helpful.
Was this helpful?
Thank you for voting!
James
September 7, 2017
After installing new element. Oven gets to temperature but new bake element overheats and does not shut down
For model number JBP24WOK1WW
Hello James, thank you for contacting us. If the oven temps are not consistent then it could be the temperature sensor sending bad readings to the control board. You can test this with a multi-meter. With the sensor at room temperature, measure the resistance between the two prongs at the end of the sensor connector. The resistance of the sensor should read approximately 1080 – 1090 ohms at room temperature. If you get a reading that is far off from that, you will need to replace the sensor. Hope this helps!
7 people found this helpful.
Was this helpful?
Thank you for voting!
Dawn
November 17, 2017
My oven starts out fine but doesn't maintain heat. Best to replace the sensor or both sensor and heating element?
For model number JB700DN2WW
Hi Dawn,
Thank you for your question. I would actually suggest testing both your element and your temperature sensor first to see which part is malfunctioning. You can test both of those parts with a multi meter. If they are both testing in working condition, then it may be your electronic control board that is the issue. I hope that helps. Good luck with your repair.
7 people found this helpful.
Was this helpful?
Thank you for voting!
SHAUN
December 22, 2017
Hello my oven works when on broil but wont for bake took element had it tested it was fine also my oven light will only work when its on broil otherwise it goes out? How do i test the temperature sensor? Does it sound like thats the problem?
For model number jks06g003b
Hello Shaun, Thank you for your inquiry. You can test the part with a multimeter. If you are unfamiliar with how a multimeter functions, there are YouTube videos available to assist you. Hope this helps!
6 people found this helpful.
Was this helpful?
Thank you for voting!
Don
December 11, 2018
On "bake" as opposed to "convection" the oven will show the set temperature on the display but maintain a constant temperature 30 - 40 degrees cooler. So say if set at 350 degrees it will indicate that it has come to temp. I wai a few minutes and then shut it off and restart it and it will say say its only at 318 and will kick on to raise the temp. We have tried different temps and it consistently does the same thing. We have tried baking things (potatoes) and they take a lot longer than normal. Also tried an independent t-stat in the oven.
For model number ge profile oven
Hello Don, thank you for your question. The most likely cause of this heating issue is the oven temperature sensor. This is the part that senses the internal temperature. It could also be an oven control board issue. There are ways to test the sensor. Please feel free to resubmit the question with the model number of the appliance and we will be happy to help you find the correct part number and testing information. Look forward to hearing from you!
6 people found this helpful.
Was this helpful?
Thank you for voting!
Myra
April 23, 2018
My oven is taking 25 minutes to reheat to the standard 350 degrees. It used to take only about 10 minutes. What part might i need?
For model number JB620DR1BB
Hello Myra, thank you for your question. The most likely issue is the temperature sensor, part number WB21X22134. The function of the oven temperature sensor assembly is to measure the temperature inside your oven while it is on and send the temperature back up to the electronic control, which adjusts as necessary. If your oven is having difficulty achieving warmer temperatures and/or keeping warmer temperatures up, you may want to test your temperature sensor. The resistance of the sensor should read approximately 1080 – 1090 ohms at room temperature. If the sensor is tested and is working okay, the the issue is likely with the electronic control board. I hope this helps. Thank you and have a great day!
5 people found this helpful.
Was this helpful?
Thank you for voting!
Fred
September 16, 2017
Oven won't turn on. Worked last time used
For model number JGS905SEK2SS
Hi Fred,
Thank you for your question. There are a number of parts you may want to check. I would suggest checking your oven sensor and your ignitor. If both of those parts are fine, you may have to look into your electronic control board. I hope that helps. Good luck.
5 people found this helpful.
Was this helpful?
Thank you for voting!
< Prev
1
2
3
Next >
Part Videos
Replacing your General Electric Range Temperature Sensor
Customer Repair Stories
Average Repair Rating: 4.0 / 5.0, 26 reviews.
What's this?
< Prev
1
2
3
Next >
Sort by:
Search filter:
Clear Filter
Your search term must have 3 or more characters.
Keep searches simple. Use keywords, e.g. "leaking", "pump", "broken" or "fit".
Sorry, we couldn't find any existing installation instruction that matched.
Oven would go in to a F2 Error
Removed six 1/4" hex nuts on rear of oven. Then through front/inside removed a single 1/4" hex nut to actually remove sensor. Unplug sensor connector, remove. Reversed steps, push oven back in place and plugged in. Tested oven function.
Peter from stamford, CT
Difficulty Level:
Really Easy
Total Repair Time:
15 - 30 mins
Tools:
Nutdriver
134 of 187 peoplefound this instruction helpful.
Was this instruction helpful to you?
Thank you for voting!
Oven wouldn't preheat above 300 degrees
Unplugged appliance and removed 5 screws on back of stove/oven and removed plate. Disconnected the sensor and unscrewed it on the inside of the oven. Pulled the cord through and replaced with new sensor. Replaced all parts and plugged in the appliance and tested. Worked great.
Gerald from Cape Canaveral, FL
Difficulty Level:
Really Easy
Total Repair Time:
15 - 30 mins
Tools:
Nutdriver
46 of 69 peoplefound this instruction helpful.
Was this instruction helpful to you?
Thank you for voting!
I kept getting An F2 error and the temperature did not seem accurate
1) pull out the stove 2) remove the 7 sheet metal screws holding the back panel on. (the panel that also covers where the cord splits and connects to the oven. 3) Find the small plastic connector located in the middle of the back of the range and unplug it. 4) open the front of the oven and remove the one screw holding in the oven temp sensor. 5) replace the sensor and make sure to "feed" the new cord through as best you can. 6) I had to dig through the insulation a little bit to find the new wiring harness 7) connect the wiring harness and put the back of the range back on
note: this was very simple to do if you think this might be the problem don't hesitate to handle this one yourself.
Chad from Bloomington, IN
Difficulty Level:
Really Easy
Total Repair Time:
Less than 15 mins
Tools:
Screw drivers, Socket set, Wrench (Adjustable), Wrench set
26 of 31 peoplefound this instruction helpful.
Was this instruction helpful to you?
Thank you for voting!
Oven won't get hot, would preheat only -element don't even get hot- only the brioil element got hot.
Repair: unscrewed the back panel- 2 screw and the sensor and bake element from the inside had 2 screws each. Just stuck them through their old hole from inside to the outside, pushed plug back together. Then screwed back into place, screwed back plate back on. Plugged stove in, turned on the oven and within 2 seconds the bake element was blood red and temp. was up to 350 in less then 10 min. Come to find out only needed the oven sensor -$10.00part but I already ordered the bake element so I went a head and replaced it - cost $50.00. Have a great oven again for less then $70.00repair.
Replaced temperature sensor in the oven first ($10 part, always start with least expensive possibility!), but that didn't solve the problem. 5-10 minute repair, not counting moving the range in and out of it's home between cabinets. Next replaced the control board ($90 part) which solved the overheating problem. 15 to 30 minute repair, don't be intimidated by all the wires. Remember to turn off power at the breaker (duh). Order the faceplate graphic ($37 part) because chances are the old one won't peel off cleanly (ours didn't, "I was really careful Honey!!) and the otherwise excellent PartSelect.com website doesn't suggest the part might be needed. Anyway, I saved a minimum of $80 plus Labor by doing it myself. I had the advantage of living about 100 miles from their warehouse and got NEXT DAY delivery from FedEx instead of 3-5 business days. Suggest you order before noon.
Lee from Greenfield, IN
Difficulty Level:
A Bit Difficult
Total Repair Time:
15 - 30 mins
Tools:
Nutdriver
19 of 23 peoplefound this instruction helpful.
Was this instruction helpful to you?
Thank you for voting!
oven would not heat; temperature sensor failed; needed replacement
Replacing the sensor was a snap and not as involved as I feared. 1) open the oven door; 2) remove the one hex screw holding the old sensor to the back of the oven; 3) gently pull the sensor, pulling the wiring out to access the plastic wire connector (carefully guide the plastic wire connector through the opening); 4) loop a small piece of wire (stiff enough to form a hook) around the base of the wire connector to keep the wire from falling into the back wall of the oven; 5) unclip the connector and remove the bad sensor; 6) clip in the new sensor; 7) remove your catch wire; 8) thread the wiring back through the opening; 9)position the new sensor and secure with the hex screw; and 10) turn on the oven and prove to your wife you do know what you are doing!
Roger from MARIETTA, GA
Difficulty Level:
Easy
Total Repair Time:
Less than 15 mins
Tools:
Socket set
15 of 18 peoplefound this instruction helpful.
Was this instruction helpful to you?
Thank you for voting!
Stove not heating properly for baking. Since unit is 13 years old, I decided to replace both heating elements and temperature sensor.
Turned off breaker for stove. Pulled stove from wall and turned it to access back. Unplugged cord for better movement of unit. Took off back panel exposing connecting wires and disconnected them all. Unscrewed element and sensor screws using small socket wrench and removed from oven. Replaced three items and rescrewed. Went to rear of stove and reconnected all wiring. Moved stove to plug back in and turned oven on. Everything worked fine so I let the unit cool for 20 min to 1/2 hour. Replaced back panel and pushed stove back in place. Fairly easy repair. DO NOT lean on oven door! Oven will tilt forward with enough pressure.
My oven bake element melted one day. I had my husband replace it and for a short while it worked. Then it quit but then our broil element would not shut off. My husband said that it might be the heat sensor. We checked here in town and that element cost over $80. Since we have order from Parts Select before we decide to do so again. When we received the heat sensor my husband replaced it taking out the original heat sensor. This did not work as the broil element still would not turn off. I call the repair man and I found out that the initial melt down of the bake element also effected the main circut board that had to e replaced.
Dinah from Juneau, AK
Difficulty Level:
Very Difficult
Total Repair Time:
More than 2 hours
Tools:
Socket set
10 of 13 peoplefound this instruction helpful.
Was this instruction helpful to you?
Thank you for voting!
Oven not holding a consistant temperature. Found the replacement part easily on you website.Thanks to your photo.
First turned off power at breaker box. Pulled stove out to remove the half dozen hex screws on the back panel.(some nuts were stripped)Removed old oven sensor inside oven held by one hex screw and replaced it with the new part. Oven works great now! Repair job was done by husband Mike.
Cindy from Murrells Inlet, SC
Difficulty Level:
Easy
Total Repair Time:
15 - 30 mins
Tools:
Nutdriver
10 of 14 peoplefound this instruction helpful.
Was this instruction helpful to you?
Thank you for voting!
Oven in accurate temp too low.
Open the oven , remove one screw holding the sensor remove the sensor and replace the sensor.
Joseph from LIBERTY HILL, TX
Difficulty Level:
Really Easy
Total Repair Time:
Less than 15 mins
Tools:
Nutdriver
6 of 8 peoplefound this instruction helpful.
Was this instruction helpful to you?
Thank you for voting!
< Prev
1
2
3
Next >
Customer Reviews
Average Rating:
★★★★★
★★★★★
44 Reviews
4.9
Filter By Rating:
5 Stars
40
4 Stars
4
3 Stars
0
2 Stars
0
1 Star
0
< Prev
1
2
3
Next >
Sort by:
Search filter:
Clear Filter
Your search term must have 3 or more characters.
Keep searches simple. Use keywords, e.g. "leaking", "pump", "broken" or "fit".
Sorry, we couldn't find any existing reviews that matched. Try using some different or simpler keywords.
★★★★★
★★★★★
Kevin R - March 31, 2023
Verified Purchase
Easy repair
Part was shipped fast. Website was easy to navigate correct part. The only downside was having to pull the double unit out from in the wall to get it swapped out but easy plug-and-play fix.
★★★★★
★★★★★
Elaine B - March 16, 2023
Verified Purchase
Worked just fine.
Unfortunately it wasn't as easy as the video showed but after installation, it worked just fine. Hopefully, it will keep our stove working for another 10 years. Thanks for great products.
★★★★★
★★★★★
Brenda J - April 24, 2022
Verified Purchase
Easy repair
Very happy . Part came fast and oven is now working great
★★★★★
★★★★★
Heidi F - March 12, 2022
Verified Purchase
Saved me a lot of money!
I thought I'd have to find a repairman to fix my oven, or worse, replace it. I searched the error code and went with the sensor rather than the control board. The video was helpful.
Easy repair. Took me about 10 minutes. Works great!!
The delivery was quick!
Winner!
★★★★★
★★★★★
Kyle L - January 28, 2022
Verified Purchase
Easy replacement
Installation was easy as the website promised. The part took a long time to arrive. This was likely the shippers issue as I received the “just shipped” notice soon after my order and then it was over 2 weeks in shipping.
I will buy from here again.
★★★★★
★★★★★
Robert S - October 1, 2021
Verified Purchase
easy repair
part was exactly the same shipping was very slow!!!!!!!!!!
★★★★★
★★★★★
Michael L - September 3, 2021
Verified Purchase
F2 sensore
The f2 sensor in our oven was making our oven not work. I ordered this part and replace it and now it works like new. It was an easy fix.
★★★★★
★★★★★
Alan D - August 7, 2021
Verified Purchase
Correct part and it works
The part got here fast, was well packed and works great.
★★★★★
★★★★★
John A - July 22, 2021
Verified Purchase
Very easy repair.
Received the part and installed it and it was an easy repair.
★★★★★
★★★★★
Lise W - April 17, 2021
Verified Purchase
Temp sensor
Came promptly and well packaged. Turns out I never got another error code on my ge stove but will keep the part just in case
< Prev
1
2
3
Next >
Model Cross Reference
This part works with the following models:
PartSelect Number: PS10059162
Manufacturer Part Number: WB21X22134
The Fix App makes it easy to manage all your stuff in one place. Just snap a photo and we'll find and store your user manuals, receipts, and product information in one easy-to-find place!
"Like magic. I took a picture of the model number on my refrigerator, and the app identified it right away … Very convenient. I'm impressed." ★★★★★ - Clever Jeff