This an authentic OEM 40-Watt replacement light bulb, used in a number of household appliances. It is specially designed to withstand extreme temperatures, which is why these replacement bulbs are mos...
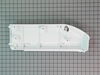
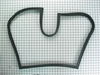
This pantry drawer lid is also known as a pantry drawer door or pantry drawer cover. This is a genuine OEM part, and is sold individually. This part helps keep everything inside the drawer. It acts as...
The crisper drawer in your refrigerator is used for storing various items. If you notice that your current crisper drawer is damaged, you may need to replace it. You may notice that your refrigerator ...
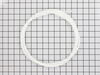
The pantry end cap is also known as a drawer support or a door shelf trim. This specific piece is sold individually and is meant for the left side of your refrigerator. It snaps into place on the door...
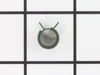
This light switch may also be known as a refrigerator door switch or a light switch kit, and is compatible with your refrigerator. The function of the refrigerator door switch is to turn on the light ...
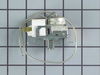
This refrigerator ice maker fill cup dispenses the water into the ice cube mold during the fill cycle. Replacing the water fill cup is a possible solution if you notice that the ice maker is leaking, ...
This is the replacement water tube kit for your refrigerator. This tubing is made of plastic, is 1/4 inch in diameter, and comes with 2 inserts. This tube may be longer than the original tube, and may...
If your refrigerator or freezer is too warm, or making noises, you may need to replace the fan blade. The fan blade attaches to the evaporator motor, which is in the freezer section, to help circulate...
I removed the ice maker from the refrigerator, by removing one screw on the underside bracket and loosening the two screws at the top side, then lifting the ice maker off the loosened screws. I then unplugged the electrical harness that supplies power from the refrigerator to the ice maker. I then disassembled the ice maker by removing
... Read morethe front cover which is snapped in place, then removing two recessed screws at the front. I removed the broken part, I then reassembled the ice maker with the new part. I replaced the two recessed screws at the front and snapped on the cover. Then I reinstalled the ice maker in the refrigator by plugging in the harness, slipping the ice maker over the loosened screws in the refrigerator and replacing the screw that was removed from the underside bracket. Tightening all the screws completed the project.
I used a flat-head screwdriver to pop out the old light rocker switch. Then, I unplugged the wires, plugged them into the new light rocker switch, and then popped the new switch into the hole. That's it! Lights began working again.
Removed shelf drawer. Then removed plastic coverings from back panel of freezer. Squeezed tabs of ice maker connector to push it behind the back panel. With nut driver, removed the four screws holding the panel and removed the panel. Used a hair dryer to remove frost from upper right area that contains the defrost thermostat. Cut out t
... Read morehe thermostat and removed the connector on the right from the defrost heater. Removed brown wire from a few of the clips. Attached orange wire from new thermostat to orange wire leading to connector removed from defrost heater and the brown wires to each other using the pliers and supplied crimpable wire nuts. Wrapped the connections with self fusing tape. Reconnected the wiring to the defrost heater and clipped the new defrost thermostat to where the defective one was removed. Used the hair dryer to melt the ice that was covering the drain, then a turkey baster to unclogg the drain. Put everything back together.


.gif "SUPPLEMENTAL INFORMATION Diagram and Parts List for PXRBS017BB1 Amana Refrigerator")