Enter the code DIYDAD10 at checkout to apply your discount. Discount will be applied at checkout when the code is entered & applies to all parts. Cannot be combined with any other coupon or special offer & cannot be applied to a previously placed order. Not valid toward tax or shipping & handling. Discount has no cash value. Discount expires on June 17 at 11:59pm EST.
You've Got 10% Off Your First Order!Save 10% with code at checkout *click to copy coupon code
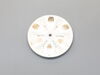
This is a pulsator assembly, also known as an agitator, for your washing machine. This pulsator sits at the bottom of your washer and is what is used as the main driving force to wash your clothes. Th...
$179.52
In Stock
Order within the next 11 hrs and your part ships today!
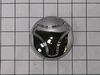
This part is known as a pulsator cap or washplate cap, and is designed for your LG washer. It fits over the washplate mounting bolt and prevents clothes from getting caught on the washplate during a w...
$30.07
In Stock
Order within the next 11 hrs and your part ships today!
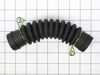
This is a drain hose assembly for top-load models of LG washing machines. This hose specifically is used to allow water to drain from the tub to the drain pump of the washer. This hose is made of plas...
$32.23
In Stock
Order within the next 11 hrs and your part ships today!
This drain hose is a genuine OEM replacement part supplied by LG for use in their washing machines. It is a light gray pipe with a diameter of 1.25 inches. The drain hose is connected to the drain pum...
$36.17
In Stock
Order within the next 11 hrs and your part ships today!
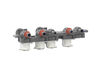
This water-level pressure switch in your wash monitors and regulates the water levels throughout the fill, wash, and rinse cycles. You will usually find it inside the control panel or near the tub. It...
$49.36
In Stock
Order within the next 11 hrs and your part ships today!
This part is the replacement switch assembly for your top-load washer. It contains the switch mechanism and the connecting wire that hooks the door latch to the electrical system of the washer. The li...
$127.26
In Stock
Order within the next 11 hrs and your part ships today!
Order within the next 11 hrs and your part ships today!
Questions And Answers for WT7100CW
Ask our experts a question about this model and we'll get back to you as soon as possible!
3 questions answered by our experts.
Sort by:
< Prev
1
Next >
Search filter:
Clear Filter
Your search term must have 3 or more characters.
Keep searches simple. Use keywords, e.g. "leaking", "pump", "broken" or "fit".
Sorry, we couldn't find any existing answers that matched.Try using some different or simpler keywords, or submit your new question by using the "Ask a Question" button above!
Cara
October 11, 2023
Husband took apart our LG washing machine model number WT7100CW /01
because he is an idiot and thought it would be good for it to assist in drying it out despite my disapproval as we had a major flood. Now it's broke, we can't afford a repair. It's displaying E6 code not attached to water if that matters?
What should I do?
For model number WT7100CW
Hello Cara, thank you for contacting us.The E6 error code indicates an error with the clutch. Sometimes an alarm can be false, so you need to start with a reboot. Unplug the cord, allow the machine to stand for about 10 minutes, turn on the power again. If the electronics fail, everything will be solved by itself and the E6 error will disappear. An E6 error can occur when a coin or foreign object is stuck between the pulsator and the tub. To resolve the issue, first remove every item from the washtub. Use a flashlight and visually check the bottom of the washer drum. Look for the seam that is between the pulsator and the drum. Check to see if objects are jammed in the seam and causing the washer to not spin. Many times there will be a nail, a coin, or paperclip jammed in between them. If you see an object jammed between the drum and pulsator, remove it with a tool such as a pair of pliers or needle nose. Once the object is removed, do a test wash to see if the washer is now working and the error code is cleared. If this does not help, you may need to replace the diverter motor, part number PS3579314, maybe because the clutch is not changing position. Good luck with this repair!
Washer has growling sound. Is this likely the pulsator?
For model number WT7100CW
Hi Greg, thank you for your inquiry. Based on our understanding of the issue, before replacing the pulsator, we would suggest checking the gearcase, part number PS12749932, to solve the problem. Glad to be of assistance!
I had a hard time removing the agitator, had to get thin prybar to get a hold of washplate. After I removed washplate, I found that the shaft that the washplate attaches to was actually worn out. What used to be a spline was smooth. So I ordered a new clutch assembly. There are a lot of bolts that hold the clutch assembly on to the
... Read more basket. There are a lot of videos on Utube that will walk you through step by step. The only problem I encountered with this was removing the nut that holds the basket to the tub. One video said it was reverse thread, which it wasn’t. You can check the thread on new clutch assembly to see which way is correct. After I put back together. Works like new.
Removed the center cover cap carefully on top of the agitator with a small screw driver. There are 3 (on mine) little slots around the edge of the bottom of the cap where it meets the agitator. Insert the small flat blade screwdriver and gently twist at each one till the cap pops loose and comes off.
There was a 10MM bolt under
... Read more the cap on mine that you need to remove. I used an cordless impact driver but you could use a socket wrench as well. Remove the bolt and the agitator comes off. May take a little wiggling or it may come right off.
The teeth on the agitator were wore all the way down and gone on mine so it came off easy and this was the issue I had why it was spinning freely. I took the small flat blade screwdriver and used the edge and corner of the blade to clean the teeth on the shaft where the agitator attaches and wiped it down before installing the new part as there was quite a bit of metal shavings from the damaged part.
I just reversed the order of removal to install the new part. Took about 15 min. I ran a rinse and spin cycle to remove any additional metal shavings and to check to see if it all worked properly. THATS IT! TOO EASY!
raised the front of washer by hand (literally) and placed two 2x4 blocks under front lip for support. reached up inside washer cabinet and unscrewed the broken leg piece upwards into the cabinet. this was the only way I could get the broken piece out without some specialized tool to reach it from the underside. replacement with the new
... Read more leg was a breeze.


 LG Washer")
 LG Washer")
 LG Washer")