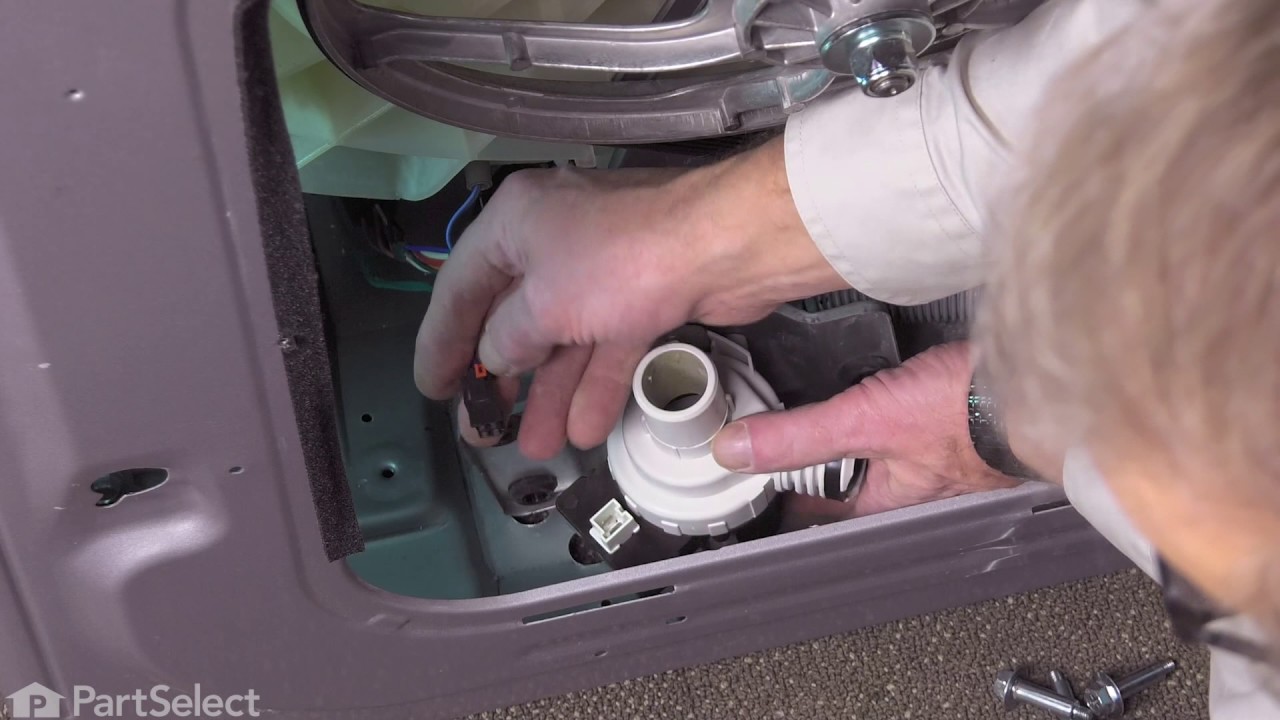
This is a 120 volt, 60 hertz drain pump assembly for a washing machine. It is a genuine OEM part. This pump helps expel water from the washing machine, and is activated after the spin speed is maintai...
$181.80
In Stock
Order within the next 12 hrs and your part ships today!
This is an individually sold front shock absorber designed for use with Samsung dryers. Shock absorbers are used to distribute the weight of the dryer drum evenly and ensure that the different bumps a...
$73.05
In Stock
Order within the next 12 hrs and your part ships today!
This is a door switch assembly designed for Samsung washing machines. This door switch assembly is used to latch and lock the door shut before the washing cycle commences and communicates with the con...
$34.13
In Stock
Order within the next 12 hrs and your part ships today!
This is an outer seal clamp for the washer door boot of your Samsung washing machine. This clamp tightly seals the boot of the drum within the door of the washer to prevent leaks. This clamp is made o...
$17.35
In Stock
Order within the next 12 hrs and your part ships today!
Shipping bolts are installed through the back of the washing machine, and hold the wash tub and basket in place while your washer is being transported. The tub suspension holds the tub correctly in pl...
$65.12
In Stock
Order within the next 12 hrs and your part ships today!
This drain cap is a genuine replacement part made for Samsung washers. It is a small plastic cap, approximately 1.5 inches long, that fits onto the end of the washing machine drain hose. The cap is re...
$4.18
In Stock
Order within the next 12 hrs and your part ships today!
Questions And Answers for WF520ABP/XAA
Ask our experts a question about this model and we'll get back to you as soon as possible!
2 questions answered by our experts.
Sort by:
< Prev
1
Next >
Search filter:
Clear Filter
Your search term must have 3 or more characters.
Keep searches simple. Use keywords, e.g. "leaking", "pump", "broken" or "fit".
Sorry, we couldn't find any existing answers that matched.Try using some different or simpler keywords, or submit your new question by using the "Ask a Question" button above!
Jack
December 3, 2019
Is it possible to change the door swing direction on the wf520abp/xaa?
For model number WF520ABP/XAA
Hello Jack, thank you for your question. Sadly the door cannot be reversed on this model washer, due to the location of the internal door switch.
1 person found this helpful.
Was this helpful?
Thank you for voting!
Anita
February 8, 2024
it says dc31-00054a replaces dc31-00016a does this come with a wire because my16a has two prongs for juice and54 has one meaning 54 has 2 tabs in one square where as16a has 2 tabs in different place so my wire wont work
For model number WF520ABP/XAA
Hello Anita, thank you for getting in touch. According to our research, the drain pump, part number PS4204638, is compatible with your model. It does not come with a wire. We have attached a relevant video that will help you in replacing the drain pump. The video may not be of the same exact model but will help you with the process. We hope this information helps!
Watched the video, procedure was simple and as depicted on the video. Started by using a wet shop Vac to the discharge hose and sucked as much dirty wash water out as possible. Removed the pump,and found the motor did not turn freely. Removed the motor (3 screws) and replaced the motor with new part. Reassembled the washer, everything wor
... Read moreked as it should. After about 3-4 loads of laundry, the "Not Draining" code / problem returned. Again, sucked out the water with the Shop Vac. Checked the Filter /Cleanout and found it completely packed with MUD. Cleaned that out, and again disassembled the washer. The pump was removed and the remaining muddy gunk was cleaned from the impeller. The 3 drain lines that attached to the pump were inspected for blockage/obstruction and flushed of any muddy residue. Reassembly was quick and easy, and the washer has worked well since. I have no idea how the dirt got into the system with enough dirt to gunk up the system. Recommend keeping more frequent inspections of the cleanout trap.
First unplug or turn off thee circuit breaker. Then remove the two screws to the top cover. Slide the cover back about three inches then remove the cover. Next take out the screw to the old sensor. Then unplug the electrical connection by squeezing and the pulling to disengage. Now set the old unit aside. You then grad your eight inch wi
... Read morere tie and hold the with flat side to the right and just to the right of the screw hole for the bracket is a square hole. Feed to wire tie into the square hole with your left hand then loop down left side of the end of new sensor and back up threw the square hole and tighten with the pliers. Your new sensor will be positioned just like it was mounted to the metal bracket. And pretty ridged. Now connect the vacuum hose and electrical connector.
Removed the rear top two Phillips screws, pull off top cover. Unscrew two phillips screws that hold the outside front lock trim, unclip (one left of housing) plastic housing. Remove one phillips screw 11 o'clock from housing, about 6" away, with door button above it, which releases the door lock housing from inside the machine. From right
... Read more side (facing machine) look down into left front of machine, you will see a black cover, which does a goid job hiding the white part, but it protects the part from water, I guess. Unclip 3-4 plugs, push spinning loader away to pull out the complete part easily. Swap back covers (a bit annoying to place wiring harness back in such a tight place, and cover on. You can try another method if you have a simpler way, like place the harness onto part first, before plugging in and placing cover. But, I kept dropping the part into the machine, which equals a little pita). Then screw the 11pm screw to hold part and the two other screws (small housing and cover), place remaining 2 screws, and lid. Pretty much undo the above procedure. Done.


;WF218,PO")