This drawer slide rail is for the right side of your refrigerator. The drawer slide rail attaches horizontally to the refrigerator wall and supports the drawer so it can easily slide in and out. If th...
This is a manufacturer-approved drawer slide rail for your refrigerator. This slide rail is for the left side of the fridge. All you need to complete this repair is a Phillips screwdriver. Remove the ...
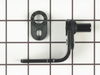
The interior light of your refrigerator is controlled by a switch that is activated when the door is opened and closed. If your refrigerator light will not turn on, there could be an issue with the sw...
This 40-Watt light bulb is sold individually and is a genuine OEM replacement option for your home appliances. It is specially designed to withstand extreme temperatures, so this bulb is compatible wi...
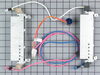
This part assembly has 2 functions: The defrost heater keeps the cooling coils from frosting over and the thermostat senses that the heat near the cooling coils has reached the desired temperature. Us...
This is a package of twelve Phillips-head screws. They can be used as replacement screws in refrigerators, ice makers, or freezers. Be sure to check that your appliance model is compatible with these ...
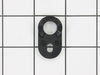
This clip on refrigerator defrost thermostat clips on to your refrigerator's evaporator. It will cut out at 60 degrees Fahrenheit and kick back in when the temperature drops to 32 degrees Fahrenheit.
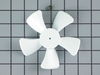
This kit features a 5-blade plastic evaporator fan blade that rotates CCW and measures 4.5-inches in diameter and has a 3/8-inch-tall shaft. This kit also has a metal compression ring that secures the...
I applied some tips learned by reading other reviews. So before I started I grabbed my trusty vise grip pliers and a small screw driver. I locked onto the switch actuator, the part that the refrigerator door pushes in, with the vise grips and pulled on it just hard enough to get the screw driver inserted in the right side to push in the c
... Read moreatch clip so the switch could be pulled out further each time the catch clip was depressed to the next detent. Then I used the screw driver on the left site to encourage the switch past the detents on the left and very quickly the switch was out of the mount. The wires from the refrigerator pulled out with the old switch. I unplugged the old switch from the wires and plugged in the new switch and shoved the new switch back into the mount, wiggled it a couple of times to make sure it was secure and the job was done. Once I applied the vise gripes at first, the whole job took less than a minute.
First I took a beer out and opened it then took a sip. Then I went into my garage and searched for my Black and Decker power drill with a phililps head on it. Failure to locate a phillips head bit i took another sip of beer and took out one of those old fashion screw drivers. I went back into the kitchen and much to my dismay the fridg
... Read moree didnt fix itself. After another sip of beer I took the old slide out and took it to the outside garbage. On my way around the house my neighbor started to mock my home fix-it skills and his back yard became the new home for the broken slide. I put the new slide in, reinstalled the drawer, and filled it with beer.
Disconnected the power to the refrigerator/freezer. Removed the shelving in the freezer. Had to remove the light cover (1 screw in center top of light, slide to left and cover is removed) located in the top of freezer to obtain access to the screw in the back panel. Removed the back panel (using nut driver). Four screws (2 at the top
... Read moreand 2 at the bottom). Used a heat gun to defrost the coils enough to remove the screws and wiring harness. I started at the bottom unit by removing 2 screws with a #2 phillip screwdriver to remove the lower defrosting element. Carefully pulling the wiring forward from the sides of the cooling coils until I reached the next defrost coil. Repeat removing 2 screws to remove the next defrost element. Continue to carefully pull wiring harness toward yourself. Remove the Thermostat (just clipped on the upper left side of coil. Remove the plug. Carefully reverse the process to complete the process.