


Models
>
PRTS18SAALS
PRTS18SAALS Haier Refrigerator - Overview
Sections of the PRTS18SAALS
[Viewing 1 of 1]
Keep searches simple, eg. "belt" or "pump".

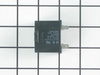
Run Capacitor
PartSelect #: PS11764031
Manufacturer #: WR55X24064
This part helps the compressor kick on and off while maintaining a constant temperature to keep things frozen in your freezer. This part has been updated by the manufacturer and may appear different t...
$108.60
In Stock


IM DEFROST CABLE
PartSelect #: PS12172944
Manufacturer #: WR55X27420
This defrost thermostat and cable assembly prevents ice buildup on the evaporator coils. During the defrost cycle, they conduct heat to melt any accumulated ice. The thermostat senses the coil tempera...
$61.78
In Stock

Fan Blade
PartSelect #: PS12688349
Manufacturer #: WR60X29904
This fan blade is compatible with different makes and models of freezers and is sold as an individual part. This fan blade attaches within the freezer compartment near the condenser coils and is respo...
$33.44
In Stock


Questions And Answers for PRTS18SAALS
We're sorry, but our Q&A experts are temporarily unavailable.
Please check back later if you still haven't found the answer you need.
Common Symptoms of the PRTS18SAALS
[Viewing 8 of 8]Will Not Start
Fixed by
these parts
these parts
Show All
Fridge too warm
Fixed by
these parts
these parts
Show All
Freezer section too warm
Fixed by
these parts
these parts
Show All
Fridge and Freezer are too warm
Fixed by
these parts
these parts
Show All
Clicking sound
Fixed by
these parts
these parts
Show All
Too warm
Fixed by
these parts
these parts
Show All
Fridge runs too long
Fixed by
these parts
these parts
Show All
Noisy
Fixed by
these parts
these parts
Show All

Keep searches simple. Use keywords, e.g. "leaking", "pump", "broken" or "fit".
Freezer not getting cold enough to freeze ice cream
I took the advice off of your website about the only thing that will fix
the problem is change the run capacitor. I felt assured that I would
have a working refrigerator freezer after making this change. I was
pretty disheartened when it didn`t solve anything. I was not going to
take the new part back out after the sma ... Read more ll challenge of putting it in.
The next day I found out how to test the old capacitor and it was still
good. I will just have to eat the $49. I did learn not to take advice from
a website even if it seems like a sure thing
Read less
Parts Used:

-
Gary from ROSETO, PA
-
Difficulty Level:A Bit Difficult
-
Total Repair Time:30 - 60 mins
-
Tools:Screw drivers
6 of 7 people
found this instruction helpful.
Was this instruction helpful to you?
Thank you for voting!
Refrigerator to warm
Instructions say run capacitor is by motor, but on this frige its in the refrigerator compartment. The capacitors looks different, one square and the other long
Parts Used:
-
Lloyd from PITTSBURG, CA
-
Difficulty Level:Easy
-
Total Repair Time:15 - 30 mins
-
Tools:Screw drivers
5 of 5 people
found this instruction helpful.
Was this instruction helpful to you?
Thank you for voting!
The lights were on inside however the the water/ice dispenser did not work and the fridge and freezer side was not cooling
Simply take off the back panel. Remove the old run capacitor which is attached to the compressor by a white part. It pulls right off. You will have to unplug two wires. I took a pic to ensure I plugged the wires back up the correct way. Then I attached the new capacitor to the white part and put on the sleeve that was included, plugge
... Read more
d it back into the compressor and zip tied the excess part of the sleeve. Once done plug fridge back up (always unplug electric devices when doing maintenance) to check before replacing back panel. It may take a few minutes before it kicks on.
Read less
Parts Used:
-
Rickey from DUMAS, AR
-
Difficulty Level:Really Easy
-
Total Repair Time:30 - 60 mins
-
Tools:Socket set
4 of 5 people
found this instruction helpful.
Was this instruction helpful to you?
Thank you for voting!