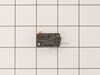
This door switch, also known as a safety switch, is a genuine OEM replacement part for microwaves. It is a safety mechanism that sends signals to the microwaves control system, telling it when the doo...
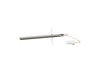
This is a range temperature sensor, used to detect the interior temperature of your oven when it is baking or cooking. If you notice your oven is baking unevenly or at inconsistent temperatures, will ...
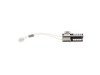
This is an oven burner igniter made for use with Samsung ovens. This oven burner igniter is designed to ignite the gas that flows into it, to produce heat. However, over time and with further frequent...
This rubber cushion is supplied by the original manufacturer and has a shaft approximately 1 inch long. The cushion acts as a layer of protection between the oven door and oven frame/cavity. It preven...
This oven cavity floor coating or bottom floor panel is an authentic OEM part supplied by Samsung to ensure compatibility with various models of Samsung ranges. It is a protective layer that sits on t...
Ask our experts a question about this model and we'll get back to you as soon as possible!
8 questions answered by our experts.
Sort by:
< Prev
1
2
Next >
Search filter:
Clear Filter
Your search term must have 3 or more characters.
Keep searches simple. Use keywords, e.g. "leaking", "pump", "broken" or "fit".
Sorry, we couldn't find any existing answers that matched.Try using some different or simpler keywords, or submit your new question by using the "Ask a Question" button above!
Glenn
January 29, 2020
Oven will not heat up. Replaced the igniter and the safety valve assembly. Still doesn't work. What else can I check?
For model number NX58H9500WS
Hi Glenn,
Thank you for your question. If the oven is not heating correctly, then the issue is likely with the oven sensor, sometimes called the oven thermostat, and you will need to check it with a multi-meter. When testing the sensor with a multi-meter, the sensor should be tested at room temperature and it should be unplugged from the oven. You will need to measure the resistance between the two prongs at the end of the sensor connector. Replace the oven sensor if the reading is less than 900 Ohms or more than 1200 Ohms. If this checks out fine, you will need to check the electronic control board. If it shows any signs of wear, damage or burn marks, it will need to be replaced. We hope this helps. Thank you and have a great day.
4 people found this helpful.
Was this helpful?
Thank you for voting!
Teresa
November 11, 2021
My broiler works but the bottom oven doesn't. Would this be the ignitor for the bottom of the oven/bake
For model number NX58H9500WS
Hello Teresa, Thank you for the question. We suggest testing the Bake Igniter. On a good igniter, there should be between 40 & 400 OHMS. A bad igniter will show no resistance or continuity. We hope this helps!
Symptom - I was finished cooking and went to turn the burners off. When I turned the front right burner off there was a loud "pop" and all the other burners' flames turned green. The range lost power and the display went blank. Neither the GFCI or breaker tripped. Outlet still has power and range has 120v going in but nothing is functioning.
For model number NX58H9500WS
Hi Woody,
Thank you for your question. A popping sound can be contributed to a couple of things. If the there was a recent spillover or if you recently cleaned the burners, moisture may have gotten in them and you will need to let them dry out. If the burner caps are not aligned properly, you may hear a popping noise. If you hear a popping noise, it may also be the result of an improper air mixture, or you may have a dirty orifice, tube or pilot flame. If the range will not start, you will need to check the switch harness, the spark module, the igniter, the electronic control board and the temperature sensor. You should also check the gas line as well. You may need a professional if there is an issue with the gas line. If you have any questions, please let us know. We are open 7 days a week. We look forward to hearing from you!
Was this helpful?
Thank you for voting!
Peggy
November 18, 2022
I am looking for the light housing to go over the bulb in the oven.
For model number NX58H9500WS
Hi Peggy, thank you for reaching out to PartSelect.The bulb housing is not sold separately and is only sold as a part of the lamp assembly, part number PS4241698. Please reach out to customer service if you need help placing an order, anyone will be happy to assist you. We hope that helps.
When I’m convection gets to about 200 and won’t get hotter, broiler works and the oven does light on other settings. Rosat seems to work best. Convection fan never comes op but I am assuming because the temp isn’t coming up. Flame is yellow in the the burner
For model number NX58H9500WS
Hi Fred, thank you for reaching out. Based on the description that you have provided, we would recommend checking the temperature sensor, part number PS4240743, as it is the most likely cause of this issue. We hope this solves your problem!
The Samsung stove I have has had the igniter replaced several times. It seems to wear out over a couple years time. I did the repair with a Philips #2 screw driver. Open the oven door, remove the grates. unscrew the bottom cover and expose the heat shield. Unscrew the heat shield. This exposes the burner. Unscrew the burner from the c
... Read moreenter of the plate/lower heat shield. Unscrew the burner from the front and back of the oven. Carefully lift up the burner to expose the igniter and clip. Unscrew the igniter from the burner and set the burner aside. Unclip the igniter from the power cable. If it falls below, it won't go far just reach in a lift it back up to fasten the new igniter to the power clip. Refasten to the burner with new clips and screws provided. Re-insert the burner to the gas jet that is below the bottom plate which will not be visible to you unless you place your head towards the rear of the stove and look down. Once the Jet is back into the hole of the burner, re fasten it to the middle back and front of the stove. Replace the covers and grates. Close the oven and test it. A new igniter does wonders. You can remove the stove door for a less intrusive install, but I found it unnecessary to do so and saved a step and time. I was done well under 30 minutes.
I initially thought I needed a new touch control panel but after a bit of research on the web and numerous videos and articles on replacing the control panel, I found an obscure video and forum where they mentioned that this thermostat fuse has been known to overheat and shut down the oven (touch controls) for safety reason. By the way,
... Read moremy unit is 3 years old and the warranty expired one month ago! I took the top off, found the fuse and tested it with a Multi-meter (again, thanks to some very helpful youtube videos out there). Dead. I figured it was worth a try and ordered the $20 part as opposed to the much more expensive control.
> remove all of the gas burners on the stove (a total of about a dozen screws) > then remove the top back vent and the screws that hold the top metal piece in place > you will see the thermostat fuse towards the back in the middle. > loosen one screw and replace > put back together in reverse order.
*** You do NOT have to remove the front piece as some videos and articles mention. The total time should be about 20 minutes. With a little patience and pre-homework, it's easy and you'll save a couple hundred in labor costs.


;NX583G0 – Part Number: DG62-00076B")