


Models
>
NE58R9311SS
NE58R9311SS ((AC)(0001)) Samsung Range - Overview
Sections of the NE58R9311SS
[Viewing 1 of 1](0001) Samsung Range")
Keep searches simple, eg. "belt" or "pump".

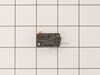
Micro Door Switch
PartSelect #: PS4131192
Manufacturer #: 3405-001034
This door switch, also known as a safety switch, is a genuine OEM replacement part for microwaves. It is a safety mechanism that sends signals to the microwaves control system, telling it when the doo...
$37.08
In Stock

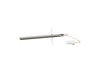
Range Oven Temperature Sensor
PartSelect #: PS4240743
Manufacturer #: DG32-00002B
This is a range temperature sensor, used to detect the interior temperature of your oven when it is baking or cooking. If you notice your oven is baking unevenly or at inconsistent temperatures, will ...
$130.08
In Stock


Thermostat
PartSelect #: PS4226434
Manufacturer #: DE47-20037A
This is a high limit thermostat designed for microwaves, ranges and ovens. Made of plastic and metal, this thermostat is designed to open the electrical circuit for your appliance when it reaches a sp...
$28.98
In Stock

Rubber Cushion
PartSelect #: PS4241222
Manufacturer #: DG73-00003A
This rubber cushion is supplied by the original manufacturer and has a shaft approximately 1 inch long. The cushion acts as a layer of protection between the oven door and oven frame/cavity. It preven...
$6.59
In Stock

Wire Rack
PartSelect #: PS12721757
Manufacturer #: DG75-01001D
This stainless steel wire rack is a sturdy platform for baking or roasting food, making sure heat circulates evenly. It measures approximately 7/16 inches by 24 3/4 inches and is usually found inside ...
$265.94
In Stock

Range Dual Surface Element Control Switch
PartSelect #: PS11771631
Manufacturer #: DG44-01006B
The control switch turns the surface element on and off and controls how much heat the element produces.
$163.86
In Stock

HEATER RADIANT-SINGLE;AC
PartSelect #: PS11720669
Manufacturer #: DG47-00060A
The surface element supplies the heat to a cooking area on top of the range.
$191.14
In Stock

Assembly BRACKET SUB;NE58F97
PartSelect #: PS8764979
Manufacturer #: DG94-00870B
This is an anti-tip bracket made for use with Samsung ranges. Anti-tip brackets are a part used to ensure an appliance does not tip or move in an undesired direction and are normally installed as a pr...
$81.12
In Stock

Assembly-TERMINAL BLOCK;FCQ*
PartSelect #: PS4241550
Manufacturer #: DG96-00173A
This terminal block assembly is designed for use within various models of ranges and is sold as an individual OEM part without any other hardware included. Terminal blocks are responsible for receivin...
$85.05
In Stock

Range Oven Door Switch
PartSelect #: PS4240750
Manufacturer #: DG34-00006A
The oven door switch shuts the oven light off when you close the oven door.
$67.21
In Stock

HEATER RADIANT-DUAL AC240V, 6 Inch/9 Inch, 1400W/3
PartSelect #: PS11729065
Manufacturer #: DG47-00063A
$274.02
In Stock
Questions And Answers for NE58R9311SS
We're sorry, but our Q&A experts are temporarily unavailable.
Please check back later if you still haven't found the answer you need.
Common Symptoms of the NE58R9311SS
[Viewing 5 of 5]Doesn’t shut off
Fixed by
these parts
these parts
Show All
Little to no heat when baking
Fixed by
these parts
these parts
Show All
No heat
Fixed by
these parts
these parts
Show All
Won’t turn on
Fixed by
these parts
these parts
Show All
Door won’t open after self cleaning cycle
Fixed by
these parts
these parts

Show All


Keep searches simple. Use keywords, e.g. "leaking", "pump", "broken" or "fit".
Oven shut off during self clean cycle and door stayed locked.
I took off the back cover after I looked at youtube similar problems. Then removed the little thermostat and un hooked the 2 wires. I looked up the part and after is was delivered couple days later I connected the 2 wies and after putting the back cover on the oven was back to normal. Was such an easy repair and the part was only $11.
Parts Used:
-
Uwe from FORT COLLINS, CO
-
Difficulty Level:Very Easy
-
Total Repair Time:15 - 30 mins
-
Tools:Screw drivers
11 of 20 people
found this instruction helpful.
Was this instruction helpful to you?
Thank you for voting!
Oven would not heat consistently
My barely 4 year old Samsung range/oven began not heating consistently. Even though it said 350, for example, we had to increase to 465 to get it to bake. Thought it was the temperature sensor. Ordered and installed new one easily. That didn't solve the problem. So, rather than throw more money at parts that may not have resolved the
... Read more
issue, I got a new Amana range. Samsung appliances go to my 'do not buy' list along with LG!
Read less
Parts Used:
-
Steven from CHEYENNE, WY
-
Difficulty Level:Easy
-
Total Repair Time:15 - 30 mins
-
Tools:Screw drivers
6 of 12 people
found this instruction helpful.
Was this instruction helpful to you?
Thank you for voting!
The microwave would not turn on or would run with the door open
Other tools that are usefull long needle nose pliers, long thin blade screw driver and small magnetic flashlight. Place the microwave on a work bench and remove the case it cover 3 sides. Place the microwave on a chair so it can stand with the controls up. You are replacing the lower door microswitch. The switch is located behind the
... Read more
control panel in the lower part of the area. The switch is several inches inside this area and your hands will not fit. Take care when moving wires and a couple of sensors. Use the thin blade screwdriver to release a tab holding the switch in place. Do not break this tab. Take the needle nose pliers and remove the switch. Put the wires on the new switch, open the door a short distance so a door lever moves enough to put the microswitch back into the bracket.
Read less
Parts Used:
-
Raymond from TROY, OH
-
Difficulty Level:Easy
-
Total Repair Time:1- 2 hours
-
Tools:Screw drivers
5 of 10 people
found this instruction helpful.
Was this instruction helpful to you?
Thank you for voting!