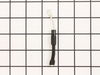
This 40w light bulb is a replacement bulb constructed of glass and metal. It is an easy-to-install electrical part which produces 40w of light. If the bulb won't light up then it may be broken and sho...
This is a microwave air filter that is located on the bottom side of an over-the-range appliance. No tools are needed for this repair, simply pull back on the tab to lift the existing filter out, and ...
This part is the replacement halogen lamp for your range hood. The bulb is 35 watts and 130 volts. The halogen lamp lights up the area under the range hood so you can see the cooktop more effectively ...
In your microwave, the diode allows current to flow one-way only, converting alternating current to direct current. If you notice that your microwave does not heat properly, you may need to replace th...
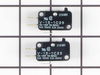
This part is a genuine manufacturer door interlock switch kit, also known as primary micro switch or microwave switch kit, for a microwave. The function of this part is to sense when the door of the m...
This is the replacement charcoal filter for your microwave. It is black in color and measures approximately 11 inches by 2 ½ inches. The charcoal filter removes cooking odors from the air that circul...
The nightmare was that this microwave is installed under the cabinet....in order to get to the light bulb I had to pull out my stove then squeeze into the space between the stove and counter....my old microwave light bult was much easier to change.....Shame on Whirlpool for making this so difficult.....must be a better way to cover the li
... Read moreght bulb so that we do not need a screwdriver to remove the door to get to the light bulb
Remove top grille (2 screws), undo control panel (1 screw). Tilt down control panel, switches are on the left. There are actually three switches that are involved with the door, two horizontally mounted, one vertically mounted. This would be an EASY REPAIR, but it took me a while to figure out which of the three switches was bad, and a
... Read morelso took a while to figure out that there is a plastic rod that inserts through the hole in the switch body. Once i figured this out went like a breeze. Lower horizontal switch was the bad one, but since the kit came with two switches i went ahead and replaced the upper horizontal one as well. IT appears that the horizontal switches are probably more likely to fail than the vertical switch based on the position of the switch and force angles. Works great now!


.gif "SUPPLEMENTAL INFORMATION Diagram and Parts List for Maytag Microwave")