This is a bottom-mounted air filter manufactured for a microwave. The microwave air filter filters the air flowing in and out of the microwave, and traps grease from the exhaust. A dirty or clogged fi...
This high-voltage diode is designed for use within various makes and models of microwaves and is a genuine OEM part that converts alternating current (AC) into direct current (DC). If you notice your ...
This is a mounting bracket for a microwave. The part is fitted between your microwave and wall to allows you to secure your appliance safely to the wall studs and install it above your range. It is ma...
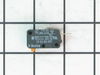
This is a micro switch, which is also known as a door switch for your microwave. The main reason for needing to replace this part is if you are not getting heat to your appliance. The door switch is l...
This is a high limit thermostat designed for use within various models of microwaves. The purpose of a high limit thermostat is to open the circuit of the appliance when the internal temperature reach...
The microwave light, or surface light lens, keeps the bulb in your microwave protected from getting cracked, scratched, and damaged. If your lens is defective or broken, or the bulb in your appliance ...
This vent damper is a genuine OEM replacement part that is compatible with various models of Samsung over-the-range microwaves with ventilation systems. It is responsible for regulating the airflow in...
This part, known as the latch-body or door latch housing is designed for use in your microwave. The function of this part is to enclose the door switches and door latch. If your microwave door is not ...
$23.53
In Stock
Questions And Answers for MMV1163DS00
Be the first to ask our experts a question about this model!
✖
Ask a Question
Ask our experts a question on this model and we'll respond as soon as we can.
I r/r the bulb cover, I then removed the burned out bulbs w/ a rag in case they broke they wouldn't have cut my fingers. You turn the bulbs lefty loosy. Installation is just the reverse. Install each bulb and turn righty titey, just snug the bulbs into place. Replace Glass cover and insert one phillips screw in plate and re-tighten
Removed control panel, discharged HV capacitor. Removed old diode, tested to confirm failure. Replaced part. Other than the removal of the panel swapping the part was almost as easy as replacing a light bulb.
The high voltage tired was shorted. I replaced it with a new one, but that did not solve the problem.
You can test the high voltage tired with a voltmeter and a 9 V battery. Search Search for it on YouTube.
You can also test the high voltage capacitor, the high-voltage transformer, and the magnetron with a multi met
... Read moreer. Search for the procedures on YouTube.
I tested all these high-voltage components with a low-voltage multi meter, and they all checked out OK (after replacing the diode). However the microwave still did not heat food.
When working on a microwave it is important to unplug it and also discharge the high voltage capacitor. The capacitor has a 10 megaohm resister to automatically discharge itself, but it may have failed – – so discharge it manually.