Models > MDG21PRAWW-

MDG21PRAWW- Maytag Dryer - Overview

Sections of the MDG21PRAWW-

[Viewing 2 of 2]
Keep searches simple, eg. "belt" or "pump".
Door Catch Kit – Part Number: LA-1003
Door Catch Kit
★★★★★
★★★★★
(20)
PartSelect #: PS2162263
Manufacturer #: LA-1003
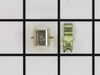
This door catch kit is designed for use in dryers. This is an authentic OEM replacement part. This catch assembly ensures the door of your appliance will close, and remain closed. It allows your appli...
$32.34
  In Stock
Door Switch Kit – Part Number: W10169313
Door Switch Kit
★★★★★
★★★★★
(19)
PartSelect #: PS1964648
Manufacturer #: W10169313
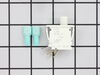
This part replaces two terminal switches in a dryer and prevents the dryer from running when the door is open. This includes two connectors. If your dryer will not shut off, start, or does not tumble,...
$29.94
  In Stock
Door Strike - male – Part Number: WP33001761
Door Strike - male
★★★★★
★★★★★
(4)
PartSelect #: PS11741066
Manufacturer #: WP33001761
This male door strike is just under an inch long. It is made of metal.
$8.00
  In Stock
Terminal Block – Part Number: WP33001244
Terminal Block
★★★★★
★★★★★
(2)
PartSelect #: PS11741048
Manufacturer #: WP33001244
This terminal block assembly does not come with any hardware. It it three inches long and made of plastic and metal.
$11.34
  Special Order
Hinge Hole Cover – Part Number: WP33001764
Hinge Hole Cover
★★★★★
★★★★★
(1)
PartSelect #: PS11741068
Manufacturer #: WP33001764
This hinge hole cover is sold individually and white in color. Two are required per appliance.
$37.81
  In Stock
Hex Nut – Part Number: WP112432
Hex Nut
PartSelect #: PS11738304
Manufacturer #: WP112432
This 10-32-inch hex nut works with multiple appliances in your home as a fastener. This specific model is sold individually. Hex nuts usually have 6 even sides and together they are used with bolts an...
$8.04
  In Stock
Door Strike Bracket – Part Number: WP33001793
Door Strike Bracket
★★★★★
★★★★★
(1)
PartSelect #: PS11741072
Manufacturer #: WP33001793
This door strike bracket is an inch long. It is made entirely of metal and is used with male door strikes of clothes dryers.
$7.59
  In Stock
Screw – Part Number: WP489128
Screw
PartSelect #: PS11742733
Manufacturer #: WP489128
This screw is sold individually.
$13.17
  In Stock
Door Seal – Part Number: WP33002094
Door Seal
★★★★★
★★★★★
(2)
PartSelect #: PS11741087
Manufacturer #: WP33002094
$79.97
  In Stock
Inner Door with Seal - White – Part Number: 33001750
Inner Door with Seal - White
PartSelect #: PS2035577
Manufacturer #: 33001750
  No Longer Available
Screw – Part Number: WP98006631
Screw
PartSelect #: PS11747473
Manufacturer #: WP98006631
Sold Individually.
$5.36
  In Stock
Hinge Screw – Part Number: WP22002012
Hinge Screw
PartSelect #: PS11739321
Manufacturer #: WP22002012
Sold Individually.
$5.36
  In Stock

Questions And Answers for MDG21PRAWW-

Be the first to ask our experts a question about this model!

Common Symptoms of the MDG21PRAWW-

[Viewing 3 of 3]
Door won’t close
Fixed by
these parts
Fixing Fixing Fixing
Show All
Won’t Start
Fixed by
these parts
Fixing
Show All
Noisy
Fixed by
these parts
Fixing
Show All
Keep searches simple. Use keywords, e.g. "leaking", "pump", "broken" or "fit".
Switch sticking in on position
FIRST unplug dryer from electrical source, CAUTION, the top of this dryer does not open with clips, do not pry on top to open! On the front of the dryer look under the lower panel, and find two screws, one on the left side, and one on the right, remove these screws, and pull slightly down on panel to remove. Behind this panel find two screws holding the door panel, one on the left, and one on the right, remove the left, and support the door panel while removing the right side. Gently pull the bottom of door panel outward, and the clips on top of door panel will unhinge from top, carefully rotate left side of door panel to floor, and note the wire connections on switch, and orientation of switch, then unplug wires, and move door panel to a comfortable working positon. Door must be open to remove switch, then depress the two plastic retaining keepers on each side of switch, and push switch through toward door. Replace with new switch, reconnect the wires, and reassymble in reverse order. Remember, door assymbly must be inserted in dryer top at an angle, and then bottom rotated downward, and bottom panel nylon guildes inserted into door panel bottom.
Parts Used:
Door Switch Kit
  • Don from Jacksonville, FL
  • Difficulty Level:
    Really Easy
  • Total Repair Time:
    15 - 30 mins
  • Tools:
    Nutdriver
99 of 133 people found this instruction helpful.
Was this instruction helpful to you?
Thank you for voting!
catch mounted on door broke
The door had always opened with the wrong swing and it wasn't til I needed to repair this that I noticed you could change the swing. I changed the swing of the door and then noticed that the clip was included on both sides so i did not need to repair the catch. I still have the part so when it breaks again, I can just pop it in.
Parts Used:
Door Catch Kit
  • Paul from Mt. Pleasant, SC
  • Difficulty Level:
    Really Easy
  • Total Repair Time:
    Less than 15 mins
  • Tools:
    Screw drivers
93 of 123 people found this instruction helpful.
Was this instruction helpful to you?
Thank you for voting!
Door Catch was broken
I just inserted the door catch, which by the way fit in perfectly. Thanks. Took 5 seconds to repair.
Parts Used:
Door Catch Kit
  • Inocencio from Edinburg, TX
  • Difficulty Level:
    Really Easy
  • Total Repair Time:
    Less than 15 mins
14 of 15 people found this instruction helpful.
Was this instruction helpful to you?
Thank you for voting!