The range thermostat is also commonly known as a stove, oven, cooktop, or range thermal fuse. This thermostat protects your oven from excessive heating, and will shut the oven heat off if excessive he...
$20.30
In Stock
Order within the next 12 hrs and your part ships today!
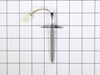
This temperature sensor, also known as a thermistor, is compatible with various makes and types of appliances. This thermistor uses electrical currents to detect the interior temperature of the applia...
$87.56
In Stock
Order within the next 12 hrs and your part ships today!
The fuse-time delay may also be known as a line fuse or a microwave fuse, and it is a piece for your microwave. The function of this part is to shut off the microwave if there is a power surge, in ord...
$7.73
In Stock
Order within the next 12 hrs and your part ships today!
This is a genuine OEM leveling leg for various models of LG ranges. This leg is used to stabilize and support the range, and if damaged, broken, or missing, will cause your range to rock back and fort...
$18.00
In Stock
Order within the next 12 hrs and your part ships today!
This part is the replacement A/C fan motor or convection fan motor for your range. It is used to spin the fan blade, which circulates hot air through the oven, and ensures even heating. If you notice ...
$109.31
In Stock
Order within the next 12 hrs and your part ships today!
Order within the next 12 hrs and your part ships today!
Questions And Answers for LRE3083ST
We're sorry, but our Q&A experts are temporarily unavailable.
Please check back later if you still haven't found the answer you need.
5 questions answered by our experts.
Sort by:
< Prev
1
Next >
Search filter:
Clear Filter
Your search term must have 3 or more characters.
Keep searches simple. Use keywords, e.g. "leaking", "pump", "broken" or "fit".
Sorry, we couldn't find any existing answers that matched.Try using some different or simpler keywords, or submit your new question by using the "Ask a Question" button above!
Gregg
December 26, 2019
I set the oven temp to 350 degrees, but it only heats too 325 or so. Adjusted the thermostat up 30 degrees but didn't make that much of a difference. What's could be causing this issue? Thanks in advance!
For model number LRE3083ST
Hello Gregg, Thank you for the question. I suggest testing the Temperature Sensor, PartSelect Number PS6883927. Testing the temperature sensor probe on your oven is easy. With the sensor at room temperature, measure the resistance between the two prongs at the end of the sensor connector. The resistance of the sensor should read approximately 1080 – 1090 ohms at room temperature. Hope this helps!
I have an LG electric oven that wil not get to the proper temperature when set , I have replaced the temperature probe INSIDE the oven ,, it did not fix the problem ,, is there another thermostat somewhere that controls temperature in OVEN ?? thank you
For model number LRE3083ST
Hi Ken, thank you for reaching out. We have researched and found that the issue is with the control board, part number PS11773404. It monitors the temperature and controls the oven heat. We would recommend replacing the control board to fix the issue. Glad to be of assistance!
Hello and thank you for writing.
It certainly sounds like it could be a faulty element (left front)PS7795472 and/or element PS7795471 (right front) and /or element PS7795470 (right back )you should check the part(s) for signs of damage or test with a multimeter, and replace the part(s) as needed. We hope this helps. Please contact us anytime if you require further assistance.
Oven not heating, warming zone on glass top not heating, changed the temp sensor and the thermal fuse, not heating still. What's next?
For model number LRE3083ST
Hello Dave, Thank you for the question. Normally this is an indication the Main PCB Board is defective and may need to be replaced. We hope this helps!
Hello Sharlene, thank you for your question. We have researched your model and found that the issue is probably with the Surface Element. Your model comes with two surface elements on the front side: the right surface element, part number PS7795472, and the left surface element, part number PS7795471. If that does not take care of the issue, then the problem is most likely to be related to the main control board, part number PS11773404. If you require assistance to place an order, please contact customer service. We hope that helps!
Go onto youtube, such as https://www.youtube.com/watch?v=-ITkrwhDNMQ and watch similar videos for DYI. The process is very similar to other models.
Once the door is removed, place oven door on a towel or soft place so it does not scratch the door. Unscrew the screws and make sure you notice where each screw goes, so you know
... Read morethe process of where each screw goes when you re-assemble.
Once the inner cover is removed, remove the insulation, too so you don't damage it. Use Wet/Dry Shop Vac to clean the shattered glass. (WORD OF ADVICE: I did not remove the insulation and the suction of the Shop Vac removed part of the insulation, so now instead of a quick turn around repair turns into a few weeks repair, because the insulation is on back order 10-14 days from the supplier. DON"T MAKE THE SAME MISTAKE!)
Once the glass has been removed, the new inner glass is replaced, begin by re-assemble the oven door with the correct screws and attached the oven door to the range.
Dropped a hammer on the range while removing a ceiling light. Viewed a How-To video on Google. Ordered the needed parts. Followed the steps from the How-To video. Reinstall was a bit tricky by myself - could have used an extra set of hands. I have a few words of caution: 1) Put something between the range top and range - like a
... Read moresheet or drop cloth - to prevent a dropped screw from falling into a crevice in the stove. I dropped a screw and was unable to retrieve it, even with a magnet. 2) Makes sure you remove all bumpers, screws, clips, etc. from the item being replaced and put them on the new item if the new item does not come with replacement bumpers, screws, etc.
Checked element no reading. Took off back panel and removed element. Took 5 days to get element. Put in new one. Took 20 minutes. Did not have to cut panel as video had shown. It had screws and was easy to get out and put the new one in. The new element was exactly the same as the old one. I checked all elements before ordering. Wa
... Read mores satisfied with everything but the delivery time