This freezer door key is designed for use with most upright and chest freezers. It is an authentic OEM replacement part. Your appliance has a lid or door that locks and unlocks, this key controls that...
$11.23
In Stock
Order within the next 7 hrs and your part ships today!
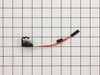
This refrigerator defrost thermostat is a genuine OEM part and is sourced directly from the manufacturer. Located on the back wall of the freezer section in the refrigerator, the defrost thermostat is...
$23.14
In Stock
Order within the next 7 hrs and your part ships today!
This gasket is used to seal the freezer door when closed to keep the cool air inside and the warm temperature surrounding the freezer from getting in. It is white in color. If you notice that your fre...
$158.73
In Stock
Order within the next 7 hrs and your part ships today!
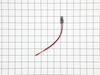
This part helps the compressor kick on and off while maintaining a constant temperature to keep things frozen in your freezer. The run capacitor is attached to the compressor. This part is 120 volts a...
$51.77
In Stock
Order within the next 7 hrs and your part ships today!
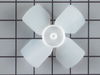
This evaporator fan blade is a genuine OEM part that is sourced directly from the manufacturer. The evaporator fan blade circulates air through the refrigerator to control the amount of cold air goes ...
$47.83
In Stock
Order within the next 7 hrs and your part ships today!
Sold individually.
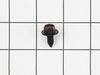
This is a genuine part. The handle mounting shoulder screw (no.10 ab) is made for use with many refrigerators. The metal screw helps to fasten the handle assembly to the outer do...
$21.58
In Stock
Order within the next 7 hrs and your part ships today!
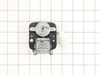
This evaporator fan motor is 115V. If you notice that your freezer is noisy or is too warm, you may need to replace the evaporator fan motor. This package comes with the evaporator fan motor itself, a...
This gasket retainer clip kit is for freezers. There are 24 pieces in this kit. The clips are what secure the gasket and liner to the freezer lid. The clips are white in color and made of plastic. If ...
$56.11
In Stock
Order within the next 7 hrs and your part ships today!
This part could be found underneath a fridge, dryer, or freezer. The original foot may be cracked, broken, or perhaps missing altogether. If you notice the appliance is uneven to the floor or wobbling...
$25.82
In Stock
Order within the next 7 hrs and your part ships today!
Order within the next 7 hrs and your part ships today!
Questions And Answers for LFFH21F7HWB
We're sorry, but our Q&A experts are temporarily unavailable.
Please check back later if you still haven't found the answer you need.
1 question answered by our experts.
Sort by:
< Prev
1
Next >
Search filter:
Clear Filter
Your search term must have 3 or more characters.
Keep searches simple. Use keywords, e.g. "leaking", "pump", "broken" or "fit".
Sorry, we couldn't find any existing answers that matched.Try using some different or simpler keywords, or submit your new question by using the "Ask a Question" button above!
Jimmy
March 24, 2020
I opened the freezer door and light bulb blinks a lot and sounds like compressor cut on and off . Put foot on light lever and blinking and compressor cutting on and off stops. Then 3 days later everything melted. What is wrong ?
For model number LFFH21F7HWB
Hi Jimmy,
Thank you for your question. If the light bulb is blinking, check and make sure that it is screwed in tightly. If it is and the lights and the compressor are still going on and off, try unplugging the freezer for a few minutes and plugging it back in to see if this resets it. If it does not, the issue may be with the electronic control board. Check the board for signs of damage, wear or burn marks. If it shows any of these signs it should be replaced. We hope this helps. Thank you and have a great day.
This freezer has many screws that hold the cover on the back of the door and assist clamping the edge of the gasket in place. Be sure to just loosen the screws 3/4 the way out, use a flat head screw driver to pry the cover from the door in case over time it is stuck to the door. The new gasket will come in a creative box trying not to kin
... Read morek the gasket itself, but there will be some distortion of the gasket when you get it. Put it in the sun or in hot water. I put it in my dryer for 10 minutes. Remove the old gasket, and start at the top of the door to replace the gasket. TIPS: If the screws are backed out enough, there should not be any problem sliding the back part of the gasket under the cover. When on the sides, do not pull the gasket down to make it easier to slide the gasket underneath the cover. This will distort and lengthen the gasket so it will not fit and thin it out so it will not function well. Once the gasket is in place, tighten the screws being sure to feel along the outside edge of the gasket for any bulging that would indicate that portion of the gasket is NOT under the cover properly.
I accidently threw away both freezer keys to our upright Gibson and G.E. Freezers!!!! I had no luck finding replacements locally, so I got on the internet and came across PartSelect.com. I called them on the telephone; and after giving the model numbers of my freezers, the keys were on their way!! I received the keys very quickly and bot
... Read moreh worked perfectly. I would highly recommend Partselect.com. Charlotte M. Bishop
The repair was as easy as removing three phillip head screws for each slide rail and removing and replacing the broken slide rail. However, over the years, the walls of the freezer had bowed making the drawer a bit short to ride on the new rails -- causing the drawer to fall off the slide rails since the span between each rail was now wi
... Read moreder than the basket. To remedy this problem. I used washers and placed them on the back side of each rail where the screws are located . This was the perfect solution compensating for the extra width resulting from the slightly bowed walls in the freezer. This solution allowed the basket to fit on each slide rail without falling off .