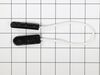
This dishwasher door hinge cable assembly connects the door to the spring. The door hinge cable and the door spring apply tension to the door to prevent it from dropping open too quickly. This part co...
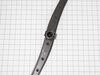
The door spring, used in dishwashers, adds tension to the door through the door hinge to keep it from opening too fast. If you have a door latch failure or your washer door drops too quickly when open...
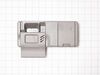
On a washer, this part is used for circulating the water. On a dishwasher, it is used for draining the water during operation. If you notice your appliance is not draining properly, the circulation pu...
This is a door gasket for a dishwasher. It creates a watertight seal between the dishwasher door and tub to prevent leaking while the appliance is in use. The gasket is approximately 76 inches long an...
This nozzle assembly, commonly referred to as a sprayer head or spray arm, is an authentic replacement part supplied directly by LG for use in LG dishwashers. The nozzle assembly can be found at the b...
The dishwasher roller assembly connects to the dishrack, and is located in the lower level of the dishwasher. It allows the dishrack to easily slide in and out. If the lower rack keeps falling off the...
Replacement dishwasher drain hose. Per the manufacturer if the drain hose being replaced does not have the vent tube going to the water inlet assembly a new water inlet will be needed.
This diverter motor, or stepper motor, controls the movement of the spray arms in your dishwasher. It directs water between the drain pump and the spray arms by turning a check valve inside the pump, ...
This is the lower dishrack assembly for various models of LG dishwashers. This dishrack is an OEM part that is designed to hold dishes and cutlery during the wash cycle of the dishwasher. This dishrac...
$202.68
In Stock
Questions And Answers for LDS5040ST
We're sorry, but our Q&A experts are temporarily unavailable.
Please check back later if you still haven't found the answer you need.
1 question answered by our experts.
Sort by:
< Prev
1
Next >
Search filter:
Clear Filter
Your search term must have 3 or more characters.
Keep searches simple. Use keywords, e.g. "leaking", "pump", "broken" or "fit".
Sorry, we couldn't find any existing answers that matched.Try using some different or simpler keywords, or submit your new question by using the "Ask a Question" button above!
Avery
February 21, 2024
Dishwasher doesn't complete last rinse cycle
For model number LDS5040ST
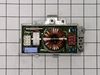
Hi Avery, thank you for reaching out. Based on our understanding, we would recommend checking the water inlet valve first. If it is fine, the issue could be with the control board, part number PS7792747. It manages the functions of the dishwasher, such as washing, draining and drying. We hope this solves your problem!
Simple, removed screws securing machine in the cabinet, then pull the unit out of the cabinet space about 10 inches. Springs are accessible within this extension. You need strong hands to extend the springs and attach them. Once attached, push machine back in place and re-install the anchor screws. In my situation, only one spring was bro
... Read moreken, so the attached side revealed the correct slot to place the hook on the top position, the bottom position has a plastic lead for the spring, and that lead is attached to a rope to the door hinge. Note: Replace BOTH springs, even if only one is broken.
Pull the dishwasher out from underneath the countertop took 2 minutes unscrewed the panel on the side one minute put the connector on one minute screwed the panel back on 1 minute put the dishwasher back underneath the counter two minutes very easy job
Turn off the power at breaker box. Disconnect the power at dishwasher since I needed to pull the unit all the way out of the cabinet to get to screws on the back side for this model. Find and remove the screws to the cover. Remove cover. In my case, the rope on the connector assembly had snapped. I replaced spring and connector identicall
... Read morey to functioning side. Did need a pair of pliers to provide enough tension on spring to install. Reconnected cover and power and moved back into the cabinet. Easy repair and my wife wondered why I hadn't done it sooner.


 LG Dishwasher")
 LG Dishwasher")
 LG Dishwasher")
 LG Dishwasher")
 LG Dishwasher")
 LG Dishwasher")