This ceramic microwave fuse is just over an inch in length. It is white in the center, and metal on both ends. This is a 20-amp fuse, and is used to power your microwave. If the touch pad on the micro...
$10.58
In Stock
Order within the next 4 hrs and your part ships today!
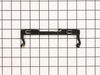
This is the replacement damper bracket for your microwave. It is made of plastic and is approximately 11 inches wide and 3 inches long. The damper bracket attaches to the outer cabinet and directs air...
$8.54
In Stock
Order within the next 4 hrs and your part ships today!
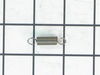
This part is the replacement high-voltage diode for your microwave. It is approximately 3 inches long and is sold individually. The high voltage diode is an electrical current control device inside yo...
$8.54
In Stock
Order within the next 4 hrs and your part ships today!
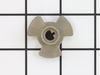
This part is the replacement plastic rivet, or stirrer fan cover clip for your microwave. It is made of white plastic and is approximately ¼ inch in diameter, and ½ inch long. The plastic rivet holds ...
$9.49
In Stock
Order within the next 4 hrs and your part ships today!
This mounting plate, also known as a bracket, is crucial for keeping your microwave mounted to the wall, when placed above the stove. This OEM part is sold separately from the screws that are needed t...
Order within the next 4 hrs and your part ships today!
Questions And Answers for JVM2052SN2SS
Ask our experts a question about this model and we'll get back to you as soon as possible!
5 questions answered by our experts.
Sort by:
< Prev
1
Next >
Search filter:
Clear Filter
Your search term must have 3 or more characters.
Keep searches simple. Use keywords, e.g. "leaking", "pump", "broken" or "fit".
Sorry, we couldn't find any existing answers that matched.Try using some different or simpler keywords, or submit your new question by using the "Ask a Question" button above!
Paul
June 14, 2023
Most of the numbers on touch pad don't work ex 1,2,3, don't work light and fan won't work
For model number JVM2052SN2SS
Hello Paul, thank you for reaching out. Based on the description that you have provided, we would recommend replacing the door control, part number PS2353620, to fix the problem. We hope this solves your problem!
I have an issue where microwave does not start. I can enter the time and push Start, but it does not start heating. Only the inside light comes on and the count down starts, but that's it. Hope you can help.
For model number JVM2052SN2SS
Hello Frank, thank you for contacting us. According to our research, the issue is most probably with the high voltage diode, part number PS16219547. It is an electrical current control device inside the microwave. It provides high voltage that powers the magnetron. If the diode is faulty, it will cause heating issues in the microwave. You may need to replace it to fix the issue. We hope this information helps!
Microwave oven bottom light need to know type of light light model number for replacement
For model number JVM2052SN2SS
Hello Gern, Thank you for contacting us. We have researched the model you have provided and have found the part you are looking for is PartSelect Number PS1481517. The Bulb is 125V, 30W. We hope this helps!
Hello Robin, thank you for reaching out. This microwave glass tray, part number PS2355893, is 5 x 1.4 x 3.2 inches in size. If you need help placing an order for it, please feel free to give us a call. We look forward to hearing from you!
Was this helpful?
Thank you for voting!
Frank
December 29, 2023
For the no-heat issue with my GE microwave JVM2052SN2SS, I was informed here that the diode part (#PS16219547) most likely needs to be replaced. Thank you! Would you be able to point me to any docs on how to replace this part?
For model number JVM2052SN2SS
Hi Frank,
Thank you for your question. Here is some information from our website that you may reference on how to replace a microwave diode. The first thing you must do to replace your microwave's diode is unplug the unit from the wall outlet. Next you will have to discharge the high voltage capacitor. A capacitor stores large amounts of electricity even when the unit is unplugged. It is necessary to discharge the high voltage capacitor in order to avoid receiving an electrical shock. Here is a link from our website that you may reference on how to discharge it, https://www.partselect.com/Microwave+discharge-capacitor+repair.htm. Diode replacement is relatively straightforward because most high voltage diodes have a press fit, also known as Fast-On, or they have ring lugs. If your replacement diode can be installed either way, make sure you get the right polarity. Remember that a diode will conduct an electrical current when a forward voltage is applied, but when a reverse voltage is applied, there is no conduction. Remove the diode from your microwave and replace it with the new one. You may be able to crimp the new diode onto the wire leads, without welding or soldering them together. If you do crimp the diode onto the leads, be sure not to apply too much pressure, as this may cause connection problems either now or in the future. We hope this helps!
Was this helpful?
Thank you for voting!
< Prev
1
Next >
✖
Ask a Question
Ask our experts a question on this model and we'll respond as soon as we can.
Turned out the issue was easily solved by replacing a single, inexpensive fuse.
First off, UNPLUG THE MICROWAVE.
The fuse is located under the plastic grill at the top of the microwave. It's held on by two screws. Once you've removed the screws and taken off the plastic grill, you go to the right side of the mic
... Read morerowave and remove another screw that holds a small metal grill in place. Removing the small metal grill is probably the toughest part of this repair. You kind of have to rock it back and forth a bit to get it to release. Once that's off, you can get to the fuse. I removed the burnt out one with a pair of needle nose pliers. I also put a small piece of cardboard under the fuse when I did this so I didn't accidentally drop it into the innards of the microwave. I did the same thing when I replaced the new fuse. I then plugged the appliance back in and made sure it worked. Once that was confirmed, I replaced both grills.
Remove microwave outer cover. Turn on side & locate the upper & lower door switches. Better to replace in pairs even if one is ok. Remove the wire harness to each switch. Then replace switch and re connect the wire harness. Re attach outer cover and test to see if that solved the problem. If so then well done!!