The oven rack is sold individually. It is chrome in color and measures approximately 24 inches wide by 17-1/2 inches deep. The rack is used to hold cookware in the oven and slides back and forth for e...
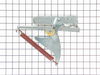
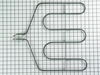
The metallic clip, or also known as a broil element support, is for a oven element on a range. This part holds the broil element in place on top of the oven. If your support clip is broken then this r...
This part is the replacement oven bulb lens cover. It is made of glass and is approximately 3 inches in diameter. The lens cover is rigid and protects the oven light bulb from being damaged. The main ...
The light housing is also known as a lamp holder and is a part for the oven in your range. The function of this piece is to hold the bulb that will light up the inside of your oven. As per the manufac...
This large broiler pan is found in the bottom of your oven and is used to catch drippings from broiling foods. This part includes the grate and bottom pan and is made of porcelain. The grate measures ...
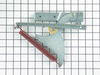
This screw is black in color and sold individually.
$8.77
In Stock
Questions And Answers for JT950SA2SS
Ask our experts a question about this model and we'll get back to you as soon as possible!
1 question answered by our experts.
Sort by:
< Prev
1
Next >
Search filter:
Clear Filter
Your search term must have 3 or more characters.
Keep searches simple. Use keywords, e.g. "leaking", "pump", "broken" or "fit".
Sorry, we couldn't find any existing answers that matched.Try using some different or simpler keywords, or submit your new question by using the "Ask a Question" button above!
Patrick
February 16, 2020
Set oven for self clean. Short time later got "f2" error code that required throwing the breaker to stop and reset display. Functioning fine now. Thoughts?
For model number JT950SA2SS
Hello, Thank you for your question. The "F2" fault code indicates the oven got too hot. Let the oven cool down before reconnecting the power cord. If "F2" displays when cold, this could indicate a faulty electronic oven control board or a faulty oven temperature sensor probe. We hope this helps.
Was this helpful?
Thank you for voting!
< Prev
1
Next >
✖
Ask a Question
Ask our experts a question on this model and we'll respond as soon as we can.
After turning off the breaker to cut power to the oven, I opened the oven door and, using the PartSelect exploded diagram as a guide, I removed 3 screws from the underside of the control panel - I was then able to slide the panel up and out to remove it. Leaving all of the control wires (especially the ribbon) connected to control panel,
... Read moreI saw the fan assembly mounted to the rear of the control box.
I noted the position of the two attached wires - black on top (or left), white on bottom (or right). Using a nutdriver with an extension bar, I unscrewed 4 screws holding the assembly in place. I removed the old fan and installed the new fan in its place. It was necessary to bend the new fan's legs out a bit to get them to line up with the holes. I reconnected the wires as mentioned above, then reinstalled the control panel.
I tested the oven by turning the breaker back on and letting the oven heat up to 450 degrees. The fan turned on as expected. After the oven cooled off, I reinstalled the 3 screws to secure the control panel.
removed two phillips screws. Unplugged electrical connections replaced unit from PartSelect. They sent holder cover and new bulb (surprise). Great store with great directions.