This 40-Watt light bulb is sold individually and is a genuine OEM replacement option for your home appliances. It is specially designed to withstand extreme temperatures, so this bulb is compatible wi...
This ceramic terminal block kit includes one ceramic block and terminal assembly with mounting bracket. Terminal blocks generally provide an easy solution for connecting individual wires.
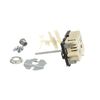
This part is the replacement light socket for your oven. The oven light socket provides power to the light, and at the same time holds the light bulb in place.
This large broiler pan is found in the bottom of your oven and is used to catch drippings from broiling foods. This part includes the grate and bottom pan and is made of porcelain. The grate measures ...
These are replacement screws designed to fit your range. They are made of metal and are approximately ¼ inch long. They come in a package of 12. These are OEM parts sourced directly from the manufacturer.
$9.12
Special Order
Questions And Answers for JBV42G*H1
Be the first to ask our experts a question about this model!
✖
Ask a Question
Ask our experts a question on this model and we'll respond as soon as we can.
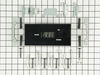
There are about 12 wires behind the panel...and this was the second time I've replaced the electronic clock in the past four years. I replaced the analog clock four years ago with the digital version because the analog was no longer available, so I knew what I was in for. There are four screw (top of the frame and lower frame) to remove b
... Read moreefore the frame holding the clock will come out. First DISCONNECT the power! You've have to remove the clock control knobs, and the plastic lever on the self cleaning handle. The first time I ordered this replacement part from PartsSelect there was a diagram included on which wire goes where. This time there wasn't! So it gets a little complicated. Make sure you label all the wired before you disconnect the old clock panel. Anyway, remove the four nuts holding the old clock in place; put the new clock panel in; replace the four nuts. I'll be glad to talk anyone through the rest and I have photos of the whole repair.
Followed the instruction provided except had to add a NEUTRAL LEAD which on the old part had been provided by the frame as it was metal/ electrical vs plastic/electronic . Used one of the extra Wire Extensions provided, drilled a hole in the clip connection and attached it to the metal frame holding in the replacement clock. The need for
... Read morea NEUTRAL LEAD was not discussed in the instructions.
This digital timer, GE Part # WB19X10006 (PartSelect PS233996) is called out by GE as the current replacement for the mechanical timer in the JB500G*J1 range. I had tried to get one some time ago from another dealer but was told it was discontinued and no longer available, so I was pretty happy to come across it in the PartSelect catalog.
... Read more
It comes with a number of mounting brackets and instructions to use the brackets that resemble the old parts, but when I did that the control buttons did not line up with the holes in the glass and were offset about 1/4" to the left. It was impossible to simply slide the timer over that far because it bumped into the underlying metal frame. I ended up using a longer set of brackets which lifted the timer about 1/2" off the glass, thereby avoiding interference with the frame, and bent the brackets sideways to line up with the holes in the glass. But then a transformer on the new timer stuck out about 1/4" too far in back to get the rear cover back on. I made two vertical cuts in the rear cover from the edge down past the timer and bent the resulting flap around the transformer. The resulting installation looks like it was made that way and works great.