The temperature sensor, also known as the oven temperature sensor assembly is usually found in the back of the oven. The function of the oven temperature sensor assembly is to measure the temperature ...
$38.48
In Stock
Order within the next 4 hrs and your part ships today!
This 40-Watt light bulb is sold individually and is a genuine OEM replacement option for your home appliances. It is specially designed to withstand extreme temperatures, so this bulb is compatible wi...
$11.04
In Stock
Order within the next 4 hrs and your part ships today!
The function of the oven sensor is to detect the temperature within the oven cavity. If you notice that the oven is too hot or too cold, or it is not heating evenly, you may need to replace the oven s...
$36.75
In Stock
Order within the next 4 hrs and your part ships today!
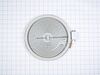
This is a replacement haliant element for your cooktop or range. It is used with flat top ranges, and is found under the glass top of the range. This element is approximately 12 inches in diameter and...
$176.85
In Stock
Order within the next 4 hrs and your part ships today!
This part is the replacement oven bulb lens cover. It is made of glass and is approximately 3 inches in diameter. The lens cover is rigid and protects the oven light bulb from being damaged. The main ...
$11.53
In Stock
Order within the next 4 hrs and your part ships today!
This is a dual ceramic surface burner for ranges. This burner, also known as a heating element, is used within electric ranges to act as a stovetop burner. This burner measures approximately 10 inches...
$131.99
In Stock
Order within the next 4 hrs and your part ships today!
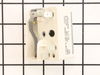
The light housing is also known as a lamp holder and is a part for the oven in your range. The function of this piece is to hold the bulb that will light up the inside of your oven. As per the manufac...
$28.99
In Stock
Order within the next 4 hrs and your part ships today!
This window pack assembly, also known as inner door glass, is supplied directly by the manufacturer for use in range ovens. It has measurements of approximately 22 inches by 14 inches. The inner door ...
$423.27
In Stock
Order within the next 4 hrs and your part ships today!
Questions And Answers for JB860EJ5ES
We're sorry, but our Q&A experts are temporarily unavailable.
Please check back later if you still haven't found the answer you need.
2 questions answered by our experts.
Sort by:
< Prev
1
Next >
Search filter:
Clear Filter
Your search term must have 3 or more characters.
Keep searches simple. Use keywords, e.g. "leaking", "pump", "broken" or "fit".
Sorry, we couldn't find any existing answers that matched.Try using some different or simpler keywords, or submit your new question by using the "Ask a Question" button above!
Carol
September 23, 2022
My clock won't reset. After a power outage, when the power was restored, the clock display is blinking. When trying to reset the clock, I hold the '-' button 3 seconds, it beeps, but I'm unable to enter the correct time. It continues to blink. I've tried unplugging it for a while and plug it back in, but same issue. What should I do?
For model number JB860EJ5ES
Hi Carol, thank you for contacting us. To reset controls on your washer, shut off the circuit breaker or fuse to the washer, or unplug the washer for 3-4 minutes. Turn it on and see if the display is still blinking. If the touchpad is still not responsive your washer control panel, part number PS12716513, is not working and needs to be replaced. The power outage might have damaged it internally. Remove the control panel and see if there are any signs of burn-outs. Check the wiring near the control panel assembly and replace it if you find any damaged wires. Please contact us anytime if you require further assistance.
My lower oven does not heat to required temperature.
For model number JB860EJ5ES
Hello Judy, thank you for contacting us. We would recommend checking the temperature sensor, part number PS10059162, to fix the issue. We hope this solves your problem!
Removed six 1/4" hex nuts on rear of oven. Then through front/inside removed a single 1/4" hex nut to actually remove sensor. Unplug sensor connector, remove. Reversed steps, push oven back in place and plugged in. Tested oven function.
I had to remove the oven from the wall because the sensor plug connction is behind the unit. Two screws hold the sensor inside the oven and then I disconnected the lead and pulled the sensor out from the front. I installed the new sensor, tightened the two screws holding it in and connected the lead. Then reinstalled the oven into the wal
... Read morel. Overall, a very easy repair once you get the oven out.
The existing terminal block on my Ge oven/Range had melted due to a loose wire causing sparking and starting the plastic casing of the terminal block on fire and melting it, Part select made the part easy to find and had it at my house in 2 days. All I had to do was remove six screws to take the back sheet metal cover off of the oven. U
... Read morenscrew the terminal connections remove two mounting screws that held the terminal on to the oven body. This was a little trickier than it should have been because the melted plastic had reformed making it very hard to access the mounting screws. i then mounted the new piece and plugged the oven in, it took 15 minutes and was very easy. definitely saved me at-least a $100 for the service call i would have made if finding the part wasn't so convenient