


Models
>
J500XD2
J500XD2 General Electric Range - Overview
Sections of the J500XD2
[Viewing 1 of 1]
Keep searches simple, eg. "belt" or "pump".

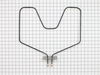
Bake Element - 220V 2300W
PartSelect #: PS249466
Manufacturer #: WB44X5082
This bake element goes in the bottom of your range and is 220 volts and 2300 watts. This closed hinged style element with screw-in terminals measures at 15-1/4 inches long and 18-1/4 inches wide. The ...
$66.52
On Order

Broil Element
PartSelect #: PS249411
Manufacturer #: WB44X173
The broil element is located at the top of the oven and gives off heat in order to bake evenly. If you notice that the element is not heating up or is not cooking evenly it could be because it is brok...
$31.03
In Stock

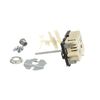
INFINITE HEAT SWITCH KIT
PartSelect #: PS16216966
Manufacturer #: WB21X36771
The infinite switch controls the stove top surface burner. This switch will work with most of the electrical range models with coil burner elements.
$51.36
In Stock

8 Inch Surface Burner Element
PartSelect #: PS244001
Manufacturer #: WB30X219
This part fits most ranges where a ceramic terminal block is used.
$71.31
In Stock


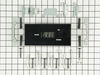
Electronic Clock and Timer Kit
PartSelect #: PS233996
Manufacturer #: WB19X10006
This electronic clock replaces the mechanical clocks with a more reliable digital timer. As per the manufacturer, this part should be installed by appliance repair person.
$505.17
In Stock

Self Cleaning Dual Range Thermostat
PartSelect #: PS236059
Manufacturer #: WB21X5320
You won't find an "off" position on this dual range thermostat because the "off" function of this thermostat is controlled by the selector switch. This thermostat operates on a range of 150 degrees to...
No Longer Available

Questions And Answers for J500XD2
We're sorry, but our Q&A experts are temporarily unavailable.
Please check back later if you still haven't found the answer you need.
Common Symptoms of the J500XD2
[Viewing 7 of 7]Little to no heat when baking
Fixed by
these parts
these parts

Show All
Element will not heat
Fixed by
these parts
these parts
Show All
Little to no heat when broiling
Fixed by
these parts
these parts
Show All
Oven not heating evenly
Fixed by
these parts
these parts
Show All
Oven is too hot
Fixed by
these parts
these parts
Show All
Will Not Start
Fixed by
these parts
these parts
Show All
Timer will not advance
Fixed by
these parts
these parts
Show All
Keep searches simple. Use keywords, e.g. "leaking", "pump", "broken" or "fit".
element quit working
Unhooked electrical wiring from unit and rehooked new unit to electrical wiring.
Parts Used:
-
Wilbur from Taylorville, IL
-
Difficulty Level:Really Easy
-
Total Repair Time:15 - 30 mins
-
Tools:Screw drivers
529 of 569 people
found this instruction helpful.
Was this instruction helpful to you?
Thank you for voting!
Bottom heating element went out
This repair took between 15 and 30 minutes BUT ONLY because my 10 year old son did the repair. He couldn't wait for his father to come home from work. His only complaint was the tight fit to reach the back of the oven (he wanted to take the oven door off but I said no). He removed the 2 screws that held the element in place and then pu
... Read more
lled it from the oven until he could remove the screws that held the wires in place. He was concerned that a little of the insulation came out with the wires, but this was no issue. The new element hooked right up (we figured out that we had to use the 2 new screws for the wires because the old ones did not fit very well). We used the same 'old' screws to attach the element back to the oven. Plugged the oven back in and it works fine. My son was so proud and I didn't have to help any more than shining a flashlight for him.
Read less
Parts Used:
-
Michael from Saint Paris, OH
-
Difficulty Level:Really Easy
-
Total Repair Time:15 - 30 mins
-
Tools:Screw drivers, Wrench (Adjustable)
464 of 486 people
found this instruction helpful.
Was this instruction helpful to you?
Thank you for voting!
Oven heating element was broken.
The heating element in the lower oven of my 18 year-old GE double oven broke into two pieces and would not heat. Because of the age of the oven, a replacement part was unavailable through GE. I came across PartSelect.com through an Internet search and ordered the part online. Total cost was $33.50, counting s/h. FedEx delivered the new
... Read more
element less than 48 hours after I placed the order online.
IMPORTANT: FLIP the BREAKER to stop electricity from going to the oven. Replacing the heating element is a two step process: 1. Remove the old element. 2. Install the new element in its place. (NOTE: This job is much simpler if you lift and remove the oven door BEFORE you begin. NOTE also: There are no slots in the screws, so you must use a small socket wrench--not a screwdriver-- to remove the screws.) STEP 1: Two screws go through the small metal plate attached to the element prongs. These screws hold the element to the back oven wall. Remove the screws, then pull the element forward a few inches to gain access to two screws which hold the element prongs to wires that come through the back oven wall. (One wire and one screw for each of the two prongs.) Remove the two screws. Remove and discard the old element. STEP 2: Install the new element by doing Step 1 in reverse. Oven is now repaired! (It took more time to type these instruction than it took to repair the oven.)
IMPORTANT: FLIP the BREAKER to stop electricity from going to the oven. Replacing the heating element is a two step process: 1. Remove the old element. 2. Install the new element in its place. (NOTE: This job is much simpler if you lift and remove the oven door BEFORE you begin. NOTE also: There are no slots in the screws, so you must use a small socket wrench--not a screwdriver-- to remove the screws.) STEP 1: Two screws go through the small metal plate attached to the element prongs. These screws hold the element to the back oven wall. Remove the screws, then pull the element forward a few inches to gain access to two screws which hold the element prongs to wires that come through the back oven wall. (One wire and one screw for each of the two prongs.) Remove the two screws. Remove and discard the old element. STEP 2: Install the new element by doing Step 1 in reverse. Oven is now repaired! (It took more time to type these instruction than it took to repair the oven.)
Read less
Parts Used:
-
Phyllis from Fisk, MO
-
Difficulty Level:Really Easy
-
Total Repair Time:Less than 15 mins
-
Tools:Socket set
325 of 405 people
found this instruction helpful.
Was this instruction helpful to you?
Thank you for voting!