


Models
>
J361*R2
J361*R2 General Electric Range - Overview
Sections of the J361*R2
[Viewing 1 of 1]
Keep searches simple, eg. "belt" or "pump".

INFINITE HEAT SWITCH KIT
PartSelect #: PS16216966
Manufacturer #: WB21X36771
The infinite switch controls the stove top surface burner. This switch will work with most of the electrical range models with coil burner elements.
$51.36
In Stock

8 Inch Surface Burner Element
PartSelect #: PS244001
Manufacturer #: WB30X219
This part fits most ranges where a ceramic terminal block is used.
$71.31
In Stock


Timer Kit
PartSelect #: PS233998
Manufacturer #: WB19X10008
This kit replaces some mechanical clocks. ***Please NOTE: The wiring of this part may be difficult and it is best to have it installed by appliance repair person.
$383.97
In Stock

Self Cleaning Dual Range Thermostat
PartSelect #: PS236059
Manufacturer #: WB21X5320
You won't find an "off" position on this dual range thermostat because the "off" function of this thermostat is controlled by the selector switch. This thermostat operates on a range of 150 degrees to...
No Longer Available

Questions And Answers for J361*R2
We're sorry, but our Q&A experts are temporarily unavailable.
Please check back later if you still haven't found the answer you need.
Common Symptoms of the J361*R2
[Viewing 1 of 1]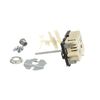


Keep searches simple. Use keywords, e.g. "leaking", "pump", "broken" or "fit".
Large burner would operate on high setting only.
1. Removed the back panel.
2. Disconnected the wires from the old switch while connecting wires to the new switch one at a time.
3. Installed the new switch and broke off the excess metal on the post which fits into the burner knob on front of the range.
4. Replaced the burner knob and replaced the back panel.
2. Disconnected the wires from the old switch while connecting wires to the new switch one at a time.
3. Installed the new switch and broke off the excess metal on the post which fits into the burner knob on front of the range.
4. Replaced the burner knob and replaced the back panel.
Parts Used:
-
Ernest from Bellevue, NE
-
Difficulty Level:Really Easy
-
Total Repair Time:15 - 30 mins
-
Tools:Pliers, Socket set
20 of 24 people
found this instruction helpful.
Was this instruction helpful to you?
Thank you for voting!
Swicth Stem Broken
Disconnect power. . . Remove control panel, pull wire connectors,[note location] remove old switch, install new, install wires, snip stem to length, set knob . . . Turn on power - works. [Note this is a live part even when not connected]
Parts Used:
-
FRANK from COPAKE, NY
-
Difficulty Level:Easy
-
Total Repair Time:30 - 60 mins
-
Tools:Screw drivers
8 of 12 people
found this instruction helpful.
Was this instruction helpful to you?
Thank you for voting!
Right front burner out.
Ever the optimist, I'd replaced the burner on this relic of another time to no effect. That left the switch. You guys should know that when a burner element goes bad it can take out the switch. I should have put a meter on it. Wehn I looked for a replacement a few months ago there were still factory parts available, but they were $80 or s
... Read more
o and I wasn't inclined to risk that on a 40 year old range. I offered to replace the raange for my daughter as a Christmas present but she like this old thing. It was an unusual size with a pan storage compartment on the left. I went on line and found this universal replacement for about $25 delivered. What the heck. I ordered it and it arrived within a week. I pulled the stove out, killed the breaker, pulled the knob off, used a nut driver to take ther rear panel off, two phillips screws under the knob hold the switch in. The terminals on the old switch are in a slightly different order but are clearly marked L1, L2, H1, H2 and P. The P is the power and has a smaller terminal so you can't put it on the wrong one. Just examine the old switch ( it was marked the same way) take off the L1 and put in on the L1 of the new switch and so on, make sure you use the correct knob adapter to fit your old knob and break the switch stem to the correct length. It will break easilly if you hold it with one pliers and break it with another. Screw the new switch in place with he old screws. At this point, I closed the breakers and tested it. It worked fine. I turned the breakers off again. Buttoned it up and slid the stove back into place. 20 minutes tops. Great product. Good for another forty years.
Read less
Parts Used:
-
Larry from Prairie Village, KS
-
Difficulty Level:Really Easy
-
Total Repair Time:15 - 30 mins
-
Tools:Nutdriver, Pliers, Screw drivers
7 of 11 people
found this instruction helpful.
Was this instruction helpful to you?
Thank you for voting!