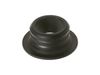
This lid lock, also known as a door lock, is a genuine OEM replacement part for your washing machine. The lid lock keeps your washer lid closed during the washing cycle. If this part is broken, your w...
This drain pump assembly is for washers. Drain pump assembly removes water from the washer during the drain portion of the cycle. The assembly may include multiple parts; refer to your parts diagram f...
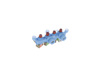
This is an inlet valve for models of compatible washing machines. Inlet valves are electrically controlled solenoid valves that open and close as needed during the washing cycle, to allow water into t...
Ask our experts a question about this model and we'll get back to you as soon as possible!
6 questions answered by our experts.
Sort by:
< Prev
1
2
Next >
Search filter:
Clear Filter
Your search term must have 3 or more characters.
Keep searches simple. Use keywords, e.g. "leaking", "pump", "broken" or "fit".
Sorry, we couldn't find any existing answers that matched.Try using some different or simpler keywords, or submit your new question by using the "Ask a Question" button above!
LARRY
June 19, 2023
Start/pause button just blinks. Washer want start. Can't get it to do anything. Replaced lid lock switch but still want start. Unplugged to reset but when push power button it comes on but pause button starts blinking but nothing happens when pushed. Want power off. Can't get error codes.
For model number GTW720BPN0DG
Hello Larry, thank you for the question. Since you have replaced the lid lock switch, we recommend you replace the lid lock striker, part number PS11766684, as the lid is not locking in place. We hope this solves your problem!
Can I wash a 90x90 inch quilt in this washing machine?
For model number GTW720BPN0DG
Hello Dawn, thank you for your question. This has a 4.8 Cu. Ft. Capacity. Also, 12 pounds of laundry is appropriate for a standard top-load machine. We found a link to the manual for your model to find additional information. https://www.manua.ls/ge/gtw720bpndg/manual?p=2. We hope this helps.
Was this helpful?
Thank you for voting!
Dan
March 27, 2024
The washer works good until the spin cycle. It will never stop draining. If I turn it off and back on and put it to drain and spin it will finish
For model number GTW720BPN0DG
Hello Dan, thank you for your inquiry. According to our understanding, the issue is most probably with the main control board, part number PS16542665. It manages the washer's functions such as filling, washing, draining and spinning. You may need to replace it to fix the issue. We hope this sorts out your problem!
My washer controls are locked up i can change settings the display shows control locked symbol. I tried resetting by unpluging for about 10 minutes but when plugged back in it remains frizen
For model number GTW720BPN0DG
Hello Richard, thank you for getting in touch. To unlock the washer controls, press and hold the extra rinse and warm rinse buttons for 3 seconds. We hope that helps!
Was this helpful?
Thank you for voting!
Justin
January 13, 2022
This washer does not spin and drain. I checked the drain lines and they are clear, it does drain the basket but just does not spin and no matter the load size it seems to be out of balance and stops spinning leaving the laundry extremely wet.
For model number GTW720BPN0DG
Hello Justin, Thank you for the question. If the tub is not balanced it can interrupt the spin/drain cycle. We suggest checking the Suspension Rods for wear or damage that could be throwing it off balance. We hope this helps!
Drain all the water out of the tub with a shop vac Remove rear drain hose and drained rest of water into a bucket Remove small rear panel (bottom left hand corner) where the drain hose connects Tipped washer up about 45 degrees to get underneath it - Supported it with a few paint cans Remove internal drain hose/clamps
... Read morefrom pump - w/ pliers Remove belt cover (gray plastic) with socket - 3 bolts Remove wire assembly plug from socket Remove old drain pump with socket - 3 bolts Install new drain pump - 3 bolts - plug wire assembly into socket Reinstall belt cover - 3 bolts Reinstall hose to drain pump (note panel will be inside washer) Feed drain hose panel through hole and reinstall - 1 nut Re attached drain hose to exterior drain plug You are done !
Very simple to repair. Be sure to drain the tub outside or into the sump pump then lay the washer on its side. The pump is right there on the bottom of the basket with 3 bolts. You will also need to remove the belt cover to get to the plug. So simple and saves you hundreds off repair man prices.
Use putty knife to unlock top panel from base. Remove 2 bolts from back of washer holding control section. Don't take completely off. 2 bolts needs to be removed to unsecure top from base. Lastly 2 screws hold lid in place. Remove lid. Slide top panel to left just to access lid lock. Unplug sensor. 1 screw and tabs hold lock in place. Wat
... Read morech position coming out so you don't get confused putting new lock in. Squeeze tabs, replace screw. plug in sensor. Reverse procedure to put top section back together.


 – Part Number: WH08X24179")