The interior light in your refrigerator is controlled by a switch that is activated when the door is opened and closed. If your refrigerator light will not turn on, or stays on when the door is closed...
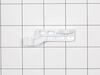
This lower holder cover is also known as a toe grille clip, or a kickplate clip. It is designed for use with refrigerators. The main purpose of this part is to hold the molding at the base of your ref...
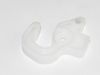
This is a genuine replacement switch. It is a push button style switch that is designed for use in your refrigerator. When the door of your appliance is opened the switch is released, and the light co...
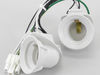
This part is a replacement light socket for your refrigerator. This model is white in color, and it has two sockets that will fit two separate light bulbs. The light socket connects to the power sourc...
Video makes it look easy. Kenmore refrigerator does not have "groove" along the right hand side of switch that allows for pushing down on release. Used a thin screwdriver to get under to push while holding switch edge with pliers. Kept slipping. Tape sides to avoid scratching inside of refrigerator.
the first part of the repair involved figuring out exactly which part needed to be replaced. this proved to be more difficult that the actual repair. Sadly, the parts diagram on PartSelect is useless. this is true for every aftermarket part supplier because they all use the manufacturer's parts diagrams. The solution to the puzzle was, of
... Read more course, YouTube! Just lookup something close to your problem and YouTube will most likely have a video of the repair. In my case the YouTube video actually named the part I needed and showed exactly how to replace it. It took a bit more digging and cross-referencing on PartSelect but I was able to order the correct parts and the purchase & shipping process was flawless.
Check YouTube, but no one shows all the details. Need to swap hinges and spring from old retainer to new retainers by removing screw at bottom of hinge, then removing rod with small screwdriver to poke the rod out. I laid the old and new side by side and did swap to ensure proper orientation. Attach cams before sliding gasket retainer bac
... Read morek into gasket, I used a few drops of liquid soap as lubricant on the retainer to help it slide in. Very important to ensure the edge of the retainer is tucked behind the door edge or else things will not fit correctly. I did it a few times before I got it right, but didn’t break anything else. Good luck.