If you notice that your refrigerator or freezer is noisy or too warm, you may need to replace the evaporator fan grommet. This part is red in color, and is about 1 inch in diameter. The evaporator fan...
This glass shelf is a genuine OEM replacement part is specially designed for refrigerators. It has a length of approximately 23 inches and a width of 13.5 inches. The glass shelf provides a wide surfa...
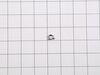
The lid bumper or evaporator fan motor bumper in your refrigerator prevents the fan motor from scraping against the side bracket. If your refrigerator/freezer is noisy, the bumper could be worn down o...
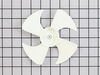
The condenser fan blade assembly helps to regulate the temperature in your refrigerator or freezer. This fan assembly has 4 blades, but other fans may have 3 blades, so be sure to check the number of ...
This is the replacement hinge washer for your refrigerator. The hinge washer is mounted on the top of the door hinge pin, and supports the refrigerator door, allowing it to open and close easily. The ...
This crisper drawer is for refrigerators. Crisper drawer stores fruits and vegetables at a humidity level that helps keep them fresh longer. Follow the instructions in the owner's manual when installing this part.
This is a manufacturer-made rail for the snack pan in various models of refrigerators. This rail is designed to allow users to easily pull their snack pan in and out of the refrigerator. If this rail ...
The glass must be forced under the white plastic drawer housing. Otherwise it will appear to be too long at the back. A gentle nudge will seat it properly.
Do not uninstall the old gasket until you have read all of these instructions. Upon receipt of the new gasket, compare the model number of the GE refrigerator to the paperwork included. Unpack the gasket by hand to ensure not to damage the new gasket. There is no specified top or bottom, left or right to the gasket but there is a front si
... Read morede (to the freezer face) and a back side (attaches to freezer door). Hold the new gasket up to the installed old gasket to ensure the size is identical (close in size WILL NOT work). Once the size is verified, pull the old gasket from the door, starting at any corner. The front side of the gasket is broader than the back side which presses into the door slot. Make sure that the door slot is clean to ensure a perfect fit. Recommend the new install begin at a top corner. Gently press the new gasket into the slot along the top. Do a side next, working the gasket in along the bottom to the last corner. Ensure the freezer face is clean for the best seal. Make sure the new gasket is dry, a wet gasket may freeze and pull the new gasket out! A good seal is verified by the "suction" when trying to open the door. A good seal is also indicated by no moisture/condensation the following day.