Models > GDT565SSN2SS

GDT565SSN2SS General Electric Dishwasher - Overview

Sections of the GDT565SSN2SS

[Viewing 6 of 6]
Keep searches simple, eg. "belt" or "pump".
LOWER RACK ROLLER – Part Number: WD12X26146
LOWER RACK ROLLER
★★★★★
★★★★★
(20)
PartSelect #: PS16217024
Manufacturer #: WD12X26146
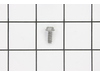
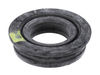
This is a lower rack roller for your dishwasher. It attaches in the lower roller assembly on the bottom of your rack to allow the rack to smoothly slide in and out. This replacement part is 1.5 inches...
$13.13
  In Stock
BASKET ASM SILVERWARE – Part Number: WD28X24469
BASKET ASM SILVERWARE
★★★★★
★★★★★
(70)
PartSelect #: PS12703061
Manufacturer #: WD28X24469
This basket is part of a silverware basket that has 3 sections. This is the middle section of the basket.
$33.80
  In Stock
Door Latch – Part Number: WD21X10490
Door Latch
★★★★★
★★★★★
(49)
PartSelect #: PS6447681
Manufacturer #: WD21X10490
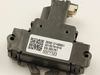
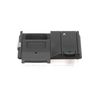
This is replacement door latch for your dishwasher. The door latch is attached to the tub frame, and connects to the door strike to keep your dishwasher door closed during operation. If you have a bro...
$44.23
  In Stock
Lower Dishrack with Wheels – Part Number: WD28X26099
Lower Dishrack with Wheels
★★★★★
★★★★★
(96)
PartSelect #: PS12743260
Manufacturer #: WD28X26099
Note: This "Service Rack" fits numerous models. Per factory, on some models, it may be necessary to move the silverware basket to the inside of the rack along the right side.
$89.96
  In Stock
LOWER SPRAY ARM – Part Number: WD22X33499
LOWER SPRAY ARM
★★★★★
★★★★★
(24)
PartSelect #: PS17137081
Manufacturer #: WD22X33499
$19.72
  In Stock
Upper Rack Assembly – Part Number: WD28X30219
Upper Rack Assembly
★★★★★
★★★★★
(40)
PartSelect #: PS16618975
Manufacturer #: WD28X30219
This dishrack is for dishwashers. The dishrack holds the dishes in place during the dishwashing cycle. Follow the instructions in the manual when installing this part.
$82.29
  In Stock
END CAP – Part Number: WD12X10426
END CAP
★★★★★
★★★★★
(22)
PartSelect #: PS7783360
Manufacturer #: WD12X10426
This is an end cap for a dishwasher rack. This part is about 2.5 inches long, is black, and is made of plastic. You may need to replaced this part if it is broken, or if your dishwasher rack continuou...
$14.28
  In Stock
Countertop Bracket – Part Number: WD01X21740
Countertop Bracket
★★★★★
★★★★★
(5)
PartSelect #: PS11700868
Manufacturer #: WD01X21740
This mounting bracket is manufactured to secure your dishwasher to your countertop. Mounting brackets should be installed so the dishwasher doesn’t tip forward. You can fit the bracket to either the c...
$7.49
  In Stock
Screw 8-16 hxw 1/2 Stainless Steel – Part Number: WD02X10067
Screw 8-16 hxw 1/2 Stainless Steel
★★★★★
★★★★★
(2)
PartSelect #: PS258461
Manufacturer #: WD02X10067
Sold Individually.
$8.54
  In Stock
DETERGENT MODULE – Part Number: WD12X32798
DETERGENT MODULE
★★★★★
★★★★★
(31)
PartSelect #: PS17137025
Manufacturer #: WD12X32798
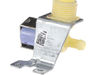
The detergent dispenser in your dishwasher stores the detergent until it is ready to be dispensed. If your dishes are not coming clean, or you notice the detergent is still in the dispenser at the end...
$38.14
  In Stock
MID SPRAY ARM – Part Number: WD22X33498
MID SPRAY ARM
★★★★★
★★★★★
(10)
PartSelect #: PS17137080
Manufacturer #: WD22X33498
$16.88
  In Stock
Rack Carrier Kit - Right or Left side – Part Number: WD28X27241
Rack Carrier Kit - Right or Left side
★★★★★
★★★★★
(5)
PartSelect #: PS16219735
Manufacturer #: WD28X27241
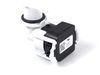
This part is the replacement carrier roller for your dishwasher. It is also known as the wheel support. It is made of gray plastic and is approximately 5 inches by 2 inches. The carrier roller support...
$14.71
  In Stock

Questions And Answers for GDT565SSN2SS

Be the first to ask our experts a question about this model!

Common Symptoms of the GDT565SSN2SS

[Viewing 10 of 10]
Not cleaning dishes properly
Fixed by
these parts
Fixing Fixing
Show All
Will Not Start
Fixed by
these parts
Fixing Fixing Fixing
Show All
Leaking
Fixed by
these parts
Fixing Fixing Fixing
Show All
Door latch failure
Fixed by
these parts
Fixing Fixing
Show All
Noisy
Fixed by
these parts
Fixing Fixing
Show All
Will not dispense detergent
Fixed by
these parts
Fixing
Show All
Door won’t close
Fixed by
these parts
Fixing Fixing
Show All
Not draining
Fixed by
these parts
Fixing Fixing
Show All
Will not fill with water
Fixed by
these parts
Fixing Fixing
Show All
Not drying dishes properly
Fixed by
these parts
Show All
Keep searches simple. Use keywords, e.g. "leaking", "pump", "broken" or "fit".
Door latch not functioning
1. Turn off breaker supplying power to dishwasher in electrical panel
2. Open dishwasher door
3. Unscrew the screws that secure the dishwasher to the counter.
4. Tip dishwasher forward. Identify the non-functioning door latch. It looks exactly like the replacement. Unclip the wire harness from the door latch.
5. On the inside of the dishwasher, there are 2 screws directly under the door latch. Unscrew them and carefully set aside.
6. Remove old door latch.
7. Set new door latch in place. Holding securely, replace screws removed in step 5. Toward the end they get a little tougher to screw in.
8. Plug wire harness into new door latch.
9. Re-align dishwasher and re-secure to counter in previous position.
10. Test latch to make sure it closes properly.
11. Turn on breaker in electrical panel.
The dishwasher should now function properly.
Parts Used:
Door Latch
  • James from ALBRIGHTSVLLE, PA
  • Difficulty Level:
    Really Easy
  • Total Repair Time:
    Less than 15 mins
  • Tools:
    Screw drivers
24 of 37 people found this instruction helpful.
Was this instruction helpful to you?
Thank you for voting!
The detergent tray wouldn't open during wash cycle
1. Pull out dishwasher (not all the way) 2. Open the door. 3. Remove the white rope holding the door hinge (both sides) 4. Remove the door by pulling up when the door is open about 4-8 inches. 5. Lay the door on the floor ( put something under the door so not to scratch the front. 6. Remove the small bolt at the bottom of the door (both sides). 7. Slide the hinge back, up, then out. 8. Where the hinges were are another set of bolts, remove those (both sides) 9. Grab the top part of the door (the part with the buttons) and slide apart. 10. Remove the styrofoam carefully. 11. Disconnect the wiring harness. 12. Remove the 6 screws holding the Despenser tray in place. 13. Put in new Despenser tray and put everything back together.
Parts Used:
DETERGENT MODULE
  • Dennis from LAS VEGAS, NV
  • Difficulty Level:
    Easy
  • Total Repair Time:
    15 - 30 mins
  • Tools:
    Nutdriver, Screw drivers
26 of 46 people found this instruction helpful.
Was this instruction helpful to you?
Thank you for voting!
order #16343054 Complete service rack
this was ordered 4-9-21 and I have yet to receive it. Its difficult to explain the installation when you haven't received the main part. I paid for this but you have not shipped it. Very poor customer service.
Parts Used:
Rack Carrier Kit - Right or Left side LOWER RACK ROLLER Lower Dishrack with Wheels Rack Carrier Kit - Right or Left side Rack Carrier Kit - Right or Left side Rack Carrier Kit - Right or Left side
  • Teri from LAGUNA NIGUEL, CA
  • Difficulty Level:
    Really Easy
  • Total Repair Time:
    30 - 60 mins
20 of 28 people found this instruction helpful.
Was this instruction helpful to you?
Thank you for voting!