


Models
>
FDB664RB0
FDB664RB0 Frigidaire Dishwasher - Overview
Sections of the FDB664RB0
[Viewing 1 of 1]
Keep searches simple, eg. "belt" or "pump".

BASKET
PartSelect #: PS16218301
Manufacturer #: 5304509753
This is a basket for your dishwasher. It sits in the lower dishrack and holds small utensils during a washing cycle. This basket has six smaller sections where you can separate your cutlery into speci...
$28.64
In Stock

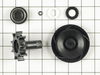
Wash Impeller
PartSelect #: PS452583
Manufacturer #: 5300809918
This electrically operated propeller causes water to flow through your dishwasher's pump. This impeller is located above the dishwasher's mascerator blade.
$85.12
In Stock

Motor Shaft Seal Kit
PartSelect #: PS452574
Manufacturer #: 5300809909
This motor shaft seal kit does not include a macerator blade, but does come with wash and drain impellers(upper and lower).
$55.78
Special Order

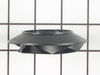
Timer Knob
PartSelect #: PS419762
Manufacturer #: 154090006
This black knob accepts a D-shaped shaft.
$92.12
Special Order

Lower Tower Assembly
PartSelect #: PS419978
Manufacturer #: 154156901
This tower helps force the water being propelled by the pump and motor assembly up to the spray arms for continuous water pressure during the wash cycle.
$62.29
In Stock

Water Shield
PartSelect #: PS452334
Manufacturer #: 5300809366
This part protects the motor assembly from water damage.
$3.51
Special Order


Pump Gasket
PartSelect #: PS452408
Manufacturer #: 5300809586
The gasket works in conjunction with the pump housing to provide a seal against water leakage.
$66.88
In Stock

Questions And Answers for FDB664RB0
We're sorry, but our Q&A experts are temporarily unavailable.
Please check back later if you still haven't found the answer you need.
Common Symptoms of the FDB664RB0
[Viewing 3 of 3]Not cleaning dishes properly
Fixed by
these parts
these parts
Show All
Leaking
Fixed by
these parts
these parts
Show All
Not draining
Fixed by
these parts
these parts
Show All

Keep searches simple. Use keywords, e.g. "leaking", "pump", "broken" or "fit".
Water leaking from motor shaft under dishwasher
DISASSEMBLY
- Switch off circuit breaker for dishwasher.
- Remove lower front covers from washer to observe motor (for later steps) and to clean-up water.
- Remove top and bottom dishracks.
-You may want to take pics of the placement/orientation of components in the following steps as you d ... Read more isassemble them for reference during reassembly.
- Remove spray-arm base from pump housing.
- Remove and discard impeller— put a screwdriver in the impeller grooves to prevent it turning as you loosen the screw.
- Remove impeller, O-ring, and blade. Discard impeller and O-ring, but keep blade (I couldn’t find the O-ring; it had probably disintegrated).
- Remove pump housing, pump plate, and gasket.
- Use two flat-head screwdrivers on opposite sides of the rotor to pry it off the motor shaft. Be cautious not to damage the area around the motor shaft—wood can be used to protect the area and provide better leverage. If the rotor can’t be removed, a chisel or hacksaw can be used to split it before prying it up— be cautious of the motor shaft when splitting the rotor. Discard the rotor.
- Locate the upper seal, note its orientation (cup-side-down), remove it, and discard it (my upper seal was in the recess in the bottom of the rotor).
-Drive the shaft-key (small metal tab) out of the shaft groove using a hammer and flat-head screwdriver and discard it— the new rotor has a molded-in tab that will slide into the groove in place of the shaft-key.
- Remove ceramic ring from motor shaft and discard it (my leak was caused because the ceramic ring was broken in half).
- Use a flat-blade screwdriver to pry loose the lower seal—before removing it from the shaft, note its orientation (wide-side-down). Be caution not to damage the area around the motor shaft—wood may again be used for protection and leverage.
CLEANING/PREP
- Clean shaft with wire brush, white vinegar, and a rag (you may not need the wire brush if the shaft is in good shape, but my motor shaft was heavily corroded/rusted and I needed to smooth it to prevent it damaging the seals). Clean groove in motor shaft with flat-head screwdriver and rag.
- Use a rag and white vinegar to clean motor shaft recess and pump housing seat. The bottom of the motor shaft recess must be clean and smooth for the lower seal to seat properly.
- Clean pump plate, gasket, blade, pump housing, and screws with white vinegar and a plastic-bristled brush.
ASSEMBLY
-Wet new rubber seals, new ceramic ring, and new rotor with water to help them slide into place.
-Refer to pics taken during disassembly as needed for the following steps.
- Place new lower seal (wide-side-down) over motor shaft in bottom of recess.
-Push new upper seal (cup-side-down) into recessed area in the bottom of the new rotor.
-Push new ceramic ring into upper seal (cup-side) in bottom of rotor.
-Align groove on motor shaft with tab in rotor (a mark on the outside of the rotor shows the tab’s location) and seat rotor on the motor shaft by hand. Verify that the motor turns when the rotor is turned by hand. If not, remove the rotor and reposition it so that its tab slides into the groove in the motor shaft.
-Place gasket, pump plate, and pump housing in position. Start pump housing screws, but leave them loose.
- Place blade and new O-ring on rotor.
- Place new impeller on rotor and insert screw. Tighten moderately — overtightening could cause leaks. Hold the impeller by hand to prevent it turning as the screw is tightened— do not use a screwdriver to prevent the impeller turning.
- Finish tightening pump housing screws.
- Seat spray-arm base on pump housing and insert/tighten its mounting screws.
- Switch on circuit breaker for dishwasher.
- Start washer and watch motor to verify that shaft seal is not leaking. Run a full cycle to rinse the new parts and remove debris and vinegar residue. Continue to observe motor shaft area for leaks during cycle.
-Replace lower front covers.
Read less
Parts Used:
-
Trevor from LOGAN, UT
-
Difficulty Level:A Bit Difficult
-
Total Repair Time:30 - 60 mins
-
Tools:Screw drivers, Socket set
2 of 2 people
found this instruction helpful.
Was this instruction helpful to you?
Thank you for voting!
No problems encountered
There were 4 zip ties holding old silverware basket on to bottom rack snip them, remove basket install new basket with zip ties both ends 2 more in middle about 1-2” apart. Try to install ties about 1/2 way up on basket so it doesn’t get top heavy.
Parts Used:
-
Calvin from LOVINGTON, NM
-
Difficulty Level:Very Easy
-
Total Repair Time:15 - 30 mins
2 of 2 people
found this instruction helpful.
Was this instruction helpful to you?
Thank you for voting!
heard a noise while dishwasher was in operation, opened door and noticed the dishes were dry, no water was spraying out and dishwasher was making a whirling noise.
After I received the Motor Shaft Kit I removed the spray arm tower and removed all screws, the center screw would not come out of the impeller, was stripped. Used a hammer and chisel to split the center of impeller and was able to remove. Also had to split the bottom impeller because it would not come out. All the parts that came in kit
... Read more
fit perfectly. Thank you Very much.
Read less
Parts Used:
-
Joe from Arvada, CO
-
Difficulty Level:A Bit Difficult
-
Total Repair Time:More than 2 hours
-
Tools:Nutdriver, Pliers, Screw drivers, Wrench set
1 of 2 people
found this instruction helpful.
Was this instruction helpful to you?
Thank you for voting!