Models > EI30IF40LSB

EI30IF40LSB Electrolux Range - Overview

Sections of the EI30IF40LSB

[Viewing 5 of 5]

Manuals & Care Guides for EI30IF40LSB

Click to download
Keep searches simple, eg. "belt" or "pump".
Temperature Sensor – Part Number: 316490000
Temperature Sensor
★★★★★
★★★★★
(46)
PartSelect #: PS1528542
Manufacturer #: 316490000
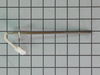
This genuine OEM oven probe is also known as an oven temperature sensor or range probe. This part is manufactured for a range, stove, or oven to detect the temperature within the oven cavity. The prob...
$47.25
  In Stock
Oven Rack – Part Number: 316496201
Oven Rack
★★★★★
★★★★★
(15)
PartSelect #: PS1765356
Manufacturer #: 316496201
This part is found inside your oven. This oven rack comes in the color chrome and measures 24 inches in width and 16 inches in length. This is an extremely simple repair that requires no tools. The pa...
$121.67
  In Stock
Anti-Tip Kit – Part Number: 316112005
Anti-Tip Kit
★★★★★
★★★★★
(4)
PartSelect #: PS3655242
Manufacturer #: 316112005
The anti-tip bracket kit comes with one metal bracket and two installation screws, and is sourced directly from the genuine manufacturer. It prevents the freestanding oven, range, or stove from tippin...
$11.25
  In Stock
LEVELING LEG ASSY – Part Number: 5304509869
LEVELING LEG ASSY
★★★★★
★★★★★
(3)
PartSelect #: PS12364627
Manufacturer #: 5304509869
Sold Individually. These legs should be adjusted to make your appliance level on uneven flooring.
$7.70
  In Stock
Terminal Block Kit – Part Number: 5303935271
Terminal Block Kit
★★★★★
★★★★★
(4)
PartSelect #: PS2333392
Manufacturer #: 5303935271
$50.24
  In Stock
SCREW – Part Number: 316021109
SCREW
PartSelect #: PS436929
Manufacturer #: 316021109
Sold Individually.
$11.77
  In Stock
Leveling Leg – Part Number: 316272900
Leveling Leg
PartSelect #: PS977569
Manufacturer #: 316272900
This part is sold individually. The leveling leg is black in color and measures approximately 2 inches in length. It is made of plastic. The leveling leg is found underneath your range and may crack o...
$21.79
  In Stock
Broil Element - 4000W – Part Number: 316430900
Broil Element - 4000W
★★★★★
★★★★★
(4)
PartSelect #: PS978285
Manufacturer #: 316430900
This broil element is found on the roof of the oven.
$189.80
  In Stock
Door Trim Kit – Part Number: 5303935377
Door Trim Kit
PartSelect #: PS10064749
Manufacturer #: 5303935377
$46.00
  In Stock
MOTOR – Part Number: 5304528973
MOTOR
PartSelect #: PS16555576
Manufacturer #: 5304528973
$42.23
  In Stock
Door Seal – Part Number: 316405000
Door Seal
PartSelect #: PS977704
Manufacturer #: 316405000
$143.38
  In Stock
Oven Door Light Switch – Part Number: 316445500
Oven Door Light Switch
PartSelect #: PS1146807
Manufacturer #: 316445500
$49.89
  In Stock

Questions And Answers for EI30IF40LSB

Ask our experts a question about this model and we'll get back to you as soon as possible!

2 questions answered by our experts.
Sort by:
  • 1
Sorry, we couldn't find any existing answers that matched.Try using some different or simpler keywords, or submit your new question by using the "Ask a Question" button above!
Jayne
April 21, 2023
Stove top burns not working
For model number EI30IF40LSB
PartSelect logo
Hello Jayne, thank you for contacting us. According to our research, you may need to check the electronic control board, part number PS11703706, to fix the issue. We hope this helps!

Was this helpful?
Thank you for voting!
Related Parts:
Rafael
November 14, 2023
error 68
For model number EI30IF40LSB
PartSelect logo
Hello Rafael, Thank you for your inquiry. F68 typically means that the range may be experiencing an issue with the incoming line voltage. Try resetting the power to the range by unplugging it for 10 minutes and plugging it back it. If the error code persists, it may be an issue with the electrical outlet, the terminal block assembly, or the control board. Good luck with your repair.

Was this helpful?
Thank you for voting!
Related Parts:
  • 1

Common Symptoms of the EI30IF40LSB

[Viewing 8 of 8]
Oven is too hot
Fixed by
these parts
Fixing
Show All
Little to no heat when baking
Fixed by
these parts
Fixing
Show All
Oven not heating evenly
Fixed by
these parts
Fixing
Show All
Element will not heat
Fixed by
these parts
Fixing Fixing
Show All
Will Not Start
Fixed by
these parts
Fixing Fixing
Show All
Little to no heat when broiling
Fixed by
these parts
Fixing
Show All
Door won’t open after self cleaning cycle
Fixed by
these parts
Fixing
Show All
Gas igniter glows, but will not light
Fixed by
these parts
Fixing
Show All
Keep searches simple. Use keywords, e.g. "leaking", "pump", "broken" or "fit".
Oven wouldn't operated. Error code F9
I called a repair place. They charged $54 to diagnose, (said it needed a new latch motor) then wanted $220 to complete the repair. I checked online prices and did it myself for about 15 minutes work and the latch motor itself ($44?).

Was necessary to uplug the range, pull it away from the wall and remove the back panel sheet metal, then 3 screws that mount the motor. Replace motor, reattach sheet metal. Plug in. Done. Ready to bake cookies.
Parts Used:
MOTOR
  • Richard from Centennial, CO
  • Difficulty Level:
    Really Easy
  • Total Repair Time:
    Less than 15 mins
  • Tools:
    Nutdriver
57 of 67 people found this instruction helpful.
Was this instruction helpful to you?
Thank you for voting!
oven did not heat up
Replaced the probe because that's what this site recommended.The oven still does not heat up.
Parts Used:
Temperature Sensor
  • Tim from ASHAWAY, RI
  • Difficulty Level:
    Really Easy
  • Total Repair Time:
    15 - 30 mins
  • Tools:
    Socket set
68 of 103 people found this instruction helpful.
Was this instruction helpful to you?
Thank you for voting!
anti-tip bracket not installed
I was selling my home and did not realize that the anti-tip bracket was not originally installed. A home inspection caught the problem and the buyers required that I install one. I could not find the original and obviously the installer never put it in place to begin with. The buyers wanted this resolved within a week so I had to act fast. I could not find one locally so I found what I needed on your website. It arrived in a couple of days and was easy to install. I used the template provided in the kit and drove the screws through the bracket into the wood plate behind the drywall. Pushed the range back in place and that's it. Couldn't get any easier.
Parts Used:
Anti-Tip Kit
  • Brian from Panama City Beach, FL
  • Difficulty Level:
    Really Easy
  • Total Repair Time:
    Less than 15 mins
33 of 45 people found this instruction helpful.
Was this instruction helpful to you?
Thank you for voting!