


Models
>
DVG54M8750V
DVG54M8750V ((A3-00)) Samsung Dryer - Overview
Sections of the DVG54M8750V
[Viewing 6 of 6] Samsung Dryer")
 Samsung Dryer")
 Samsung Dryer")
 Samsung Dryer")
 Samsung Dryer")
 Samsung Dryer")
Keep searches simple, eg. "belt" or "pump".

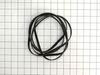
Drive Belt
PartSelect #: PS4133825
Manufacturer #: 6602-001655
The drum belt attaches to the motor pulley and causes the drum to spin as the motor is rotating. The drum belt is made of black rubber. This is an easy repair and should only take a few minutes. This ...
$44.87
In Stock

Thermistor
PartSelect #: PS4204984
Manufacturer #: DC32-00007A
This is a thermistor, also known as a dryer thermistor. The thermistor is attached to the blower housing, it will help regulate and oversee the temperature within the dryer. The most common symptom of...
$35.53
In Stock

Drum Support Roller & Axle
PartSelect #: PS4221885
Manufacturer #: DC97-16782A
The drum support roller and axle, which includes the roller shaft and mounting clips, is used in dryers. This part holds the drum as it rotates on the support wheels. When the roller begins to wear ou...
$41.80
In Stock

Thermal Fuse
PartSelect #: PS4205213
Manufacturer #: DC47-00016A
This thermostat is a genuine OEM part and is manufacturer-approved for electric dryers. The thermostat is responsible for monitoring and maintaining the temperature inside the dryer during the drying ...
$25.28
In Stock

Moisture Sensor
PartSelect #: PS4206812
Manufacturer #: DC61-02627A
This moisture sensor plate is specifically designed to fit with your Samsung dryer. It is made of stainless steel and measures approximately 5 inches long. It is designed to detect the amount of moist...
$19.29
In Stock


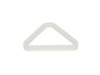
Dryer Leveling Leg
PartSelect #: PS4206963
Manufacturer #: DC61-03128A
Leveling leg supports the dryer. Adjust the height of the leveling leg to make the dryer level.
$21.16
In Stock

Assembly CASE FILTER;ORCA-DR
PartSelect #: PS4221839
Manufacturer #: DC97-16742A
No Longer Available


High Limit Thermostat - L230-50F
PartSelect #: PS4205216
Manufacturer #: DC47-00017A
$89.16
In Stock

Questions And Answers for DVG54M8750V
We're sorry, but our Q&A experts are temporarily unavailable.
Please check back later if you still haven't found the answer you need.
Common Symptoms of the DVG54M8750V
[Viewing 2 of 2]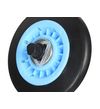


Keep searches simple. Use keywords, e.g. "leaking", "pump", "broken" or "fit".
The dryer turned on but the drum did not move when you pressed start even though It started it cycles.
I YouTube it and there’s a step by step process on how to do it, took maybe 30 mins. If I can so can you
Parts Used:
-
Christopher from SUGARLOAF, CA
-
Difficulty Level:Really Easy
-
Total Repair Time:15 - 30 mins
-
Tools:Screw drivers
23 of 40 people
found this instruction helpful.
Was this instruction helpful to you?
Thank you for voting!
Loud noise like boots being ran through the dryer
YouTube, YouTube, YouTube. I YouTubed many videos on how to take a dryer apart to reach the drum support roller and axle. After watching numerous videos, I settled on one that had my exact model of dryer. For my dryer, previous inputs said I needed two rollers to for my model. That is not the case. My model actually has 4 rollers, 2 in th
... Read more
e front and two in the back. I ordered 2 initially but only needed 1 thankfully since only one roller was bad. Keep it simple stupid is how I got it done. Dryer's are pretty simple machines mechanically. Don't trash your noisy dryer. We bought ours in 2014 and it only recently started giving us issues. This is after 2 moves and being run daily for a family of 6. I'm glad I found partselect.com. They saved me a ton of money.
Read less
Parts Used:

-
Tad from MINOT AFB, ND
-
Difficulty Level:Easy
-
Total Repair Time:30 - 60 mins
-
Tools:Screw drivers, Socket set, Wrench set
14 of 17 people
found this instruction helpful.
Was this instruction helpful to you?
Thank you for voting!
Dryer getting warm but turning off before clothes dry
Cleaned the sensors from inside the drum with alcohol and that did not work. Ordered two sensors. Lift top cover. Remove screws on each of the front side that secures front cover. Unplug door sensor and pull front cover towards you and lift at same time removing from frame. I own dogs and immediately noticed dog hair and surprisingly
... Read more
lint all over the place. Remove the screws from the lint trap. (Theres one you access from inside the drum.) Unplug your sensor wires. Remove lint trap. The sensors simply push in/out. While I was in there I removed the cover for the lint tube and cleaned it out good. Lint had started to gather around the fan. Reverse your process and your done. TIP: Keep your screws orderly as you unscrew them. If you have this problem, just a good cleaning of hair, lint, dirt may do the trick as it essentially packs around the plug of the sensors. I had already ordered my sensors so I just put them in. I took my time and cleaned good and it was about an hour. It could be done in 15-30 minutes easily.
Read less
Parts Used:
-
Eric from CHAMBERSBURG, PA
-
Difficulty Level:Easy
-
Total Repair Time:30 - 60 mins
-
Tools:Screw drivers
4 of 6 people
found this instruction helpful.
Was this instruction helpful to you?
Thank you for voting!