


Models
>
DVG52A5500V
DVG52A5500V ((A3-00)) Samsung Dryer - Overview
Sections of the DVG52A5500V
[Viewing 7 of 7] Samsung Dryer")
 Samsung Dryer")
 Samsung Dryer")
 Samsung Dryer")
 Samsung Dryer")
 Samsung Dryer")
 Samsung Dryer")
Keep searches simple, eg. "belt" or "pump".

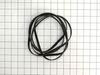
Drive Belt
PartSelect #: PS4133825
Manufacturer #: 6602-001655
The drum belt attaches to the motor pulley and causes the drum to spin as the motor is rotating. The drum belt is made of black rubber. This is an easy repair and should only take a few minutes. This ...
$44.87
In Stock

Thermistor
PartSelect #: PS4204984
Manufacturer #: DC32-00007A
This is a thermistor, also known as a dryer thermistor. The thermistor is attached to the blower housing, it will help regulate and oversee the temperature within the dryer. The most common symptom of...
$35.53
In Stock

Idler Pulley Assembly
PartSelect #: PS11771601
Manufacturer #: DC93-00634A
This idler pulley assembly is sourced from the original manufacturer for use in dryers. The assembly includes the pulley wheel and bracket. It is found near the motor where it provides tension to the ...
$62.67
In Stock

Thermal Fuse
PartSelect #: PS4205213
Manufacturer #: DC47-00016A
This thermostat is a genuine OEM part and is manufacturer-approved for electric dryers. The thermostat is responsible for monitoring and maintaining the temperature inside the dryer during the drying ...
$25.28
In Stock
;BIG-BANG – Part Number: DC61-02610A")
CASE-FILTER(U);BIG-BANG
PartSelect #: PS4206806
Manufacturer #: DC61-02610A
This lint screen case, or lint filter case is specially designed for Samsung dryers. It is responsible for securing the lint screen inside the lint screen housing and preventing it from falling out. T...
$45.69
In Stock

Dryer Leveling Leg
PartSelect #: PS4206963
Manufacturer #: DC61-03128A
Leveling leg supports the dryer. Adjust the height of the leveling leg to make the dryer level.
$21.16
In Stock

Assembly CASE FILTER;ORCA-DR
PartSelect #: PS4221839
Manufacturer #: DC97-16742A
No Longer Available


Questions And Answers for DVG52A5500V
We're sorry, but our Q&A experts are temporarily unavailable.
Please check back later if you still haven't found the answer you need.
Common Symptoms of the DVG52A5500V
[Viewing 2 of 2]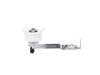


Keep searches simple. Use keywords, e.g. "leaking", "pump", "broken" or "fit".
The dryer turned on but the drum did not move when you pressed start even though It started it cycles.
I YouTube it and there’s a step by step process on how to do it, took maybe 30 mins. If I can so can you
Parts Used:
-
Christopher from SUGARLOAF, CA
-
Difficulty Level:Really Easy
-
Total Repair Time:15 - 30 mins
-
Tools:Screw drivers
23 of 40 people
found this instruction helpful.
Was this instruction helpful to you?
Thank you for voting!
Tension/Dead Man Wheel Broke/Shattered
Dryer would not start but electronics were working.
Pulled top of dryer off; noticed the belt was loose but not broken.
Went in through the back (1 screw and removed the exhaust pipe/plate); noticed the wheel was broken and thus the belt had fallen off.
Ordered replacement wheel/arm.
One screw to remove ol ... Read more d one, one screw to install new one...tentioned the belt. Dryer was good as new.
Read less
Parts Used:
-
Noah from OXFORD, KS
-
Difficulty Level:Really Easy
-
Total Repair Time:Less than 15 mins
-
Tools:Screw drivers
11 of 20 people
found this instruction helpful.
Was this instruction helpful to you?
Thank you for voting!
Broken drum belt
After viewing many instructions on how to replace a broken drum drive belt on UTUBE and the video you sent me the project was completed with no problems and with ease.
However, I did discover large amounts of lint caked to the bottom of the lint screen housing just beyond the filter screen. There was minimal lint on the lint ... Read more exhaust fan blades and no lint in the exhaust ducts.
I didn't recall seeing any video instructions drawing attention to potential lint issues, it just made good sense to clean the entire system while it was apart . At first I saw no major lint problem.
However, after removing the lint screen and placing a vacuum cleaner wand to the bottom of the lint screen housing (the bottom is not easy to see) my vacuum cleaner hose became clogged three times. I realized there was a major lint issue isolated to this area.
Many of the on line complaints focused on parts not properly fitting their dryer. they had to modify the parts in some way to fit or operate or they had to return them for other parts. Just think of the time wasted and the lack of use of their dryer.
I called and talked to a tech. Gave them my model number and the tech located the correct OEM parts for my dryer. I paid the extra money for OEM parts because I wanted my dryer fixed and restored to service in the least amount of time.
Outside the discovery of the not so obvious lint issue, the repair project was easy and the dryer was restored to full service with minimal down time.
Thanks for all your help and fast delivery service.
Read less
Parts Used:
-
John from OCEANSIDE, CA
-
Difficulty Level:Really Easy
-
Total Repair Time:30 - 60 mins
-
Tools:Screw drivers
3 of 4 people
found this instruction helpful.
Was this instruction helpful to you?
Thank you for voting!