


Models
>
DPGT750EC1PL
DPGT750EC1PL Dryer - Overview
Models starting with DPGT750EC1PL
Click on the best match to narrow your results.
Keep searches simple, eg. "belt" or "pump".

Dryer Lint Filter Assembly
PartSelect #: PS3527575
Manufacturer #: 5231EL1001C
The lint filter sits in your dryer, and collects loose lint when the machine is operating. Sometimes the lint filter will become clogged or damaged, and in this case, you will need to replace your cur...
$35.51
In Stock

High Limit Thermostat and Thermistor Kit
PartSelect #: PS16878105
Manufacturer #: AGM30045804
This dryer thermistor temperature sensor helps monitor and regulate the temperature inside a dryer. This part includes the wire harness. If your dryer overheats, does not produce enough heat, or takes...
$89.47
In Stock

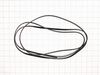
Dryer Drum Belt
PartSelect #: PS11705916
Manufacturer #: 4400EL2001F
The belt wraps the length of the dryer drum, secured by a tension pulley and then loops around the motor pulley. If you find that the drum is not turning properly or at all while your dryer is in succ...
$31.27
In Stock

COVER,GUIDE
PartSelect #: PS12368455
Manufacturer #: 3550EL1005C
This is an OEM lint filter guide cover made for LG dryers. This is one of three pieces in the entire lint filter assembly, along with the lint filter guide and filter itself, which are both sold separ...
$16.82
In Stock
 – Part Number: AGM75510755")
PARTS ASSEMBLY, SVC (2 Pack)
PartSelect #: PS16763594
Manufacturer #: AGM75510755
The drum roller for your dryer holds the drum in place while the drum turns on the support wheels. The drum roller is round with a bearing in the middle and measures approximately 3 inches in diameter...
$87.42
In Stock

LOCKER,HOOK
PartSelect #: PS7795716
Manufacturer #: MFG62959101
This is a door strike for your dryer. When you shut your dryer door, the door strike connects to the door catch and keeps the door closed. If the door strike is damaged, your door will not stay shut, ...
$21.61
On Order

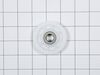
Drum Support Roller with Axle
PartSelect #: PS959905
Manufacturer #: WE03X10008
This part is the replacement drum support roller for your dryer. The roller is approximately 3 inches in diameter and is sold individually. The main reason to replace the drum support roller is if the...
$63.70
In Stock


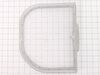
Felt Seal
PartSelect #: PS3522851
Manufacturer #: 4036EL3001A
This genuine OEM felt gasket provides a cushioned seal between the inner tub of your electric dryer and the rear panel. It prevents your clothes from getting snagged and helps in heat retention. You w...
$33.91
In Stock

Leg
PartSelect #: PS3523560
Manufacturer #: 4778EL3001B
This plastic adjustable dryer leg is used to support the weight and adjust the height of your dryer to keep it level. To install the leg, tip the dryer back and screw it into the bottom of your dryer ...
$10.94
In Stock


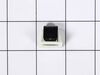
Door Catch
PartSelect #: PS3522845
Manufacturer #: 4027EL2001A
This is a genuine dryer door catch replacement. This is the part that catches and holds the strike on the door of your appliance. The catch and the strike work together to ensure the door remains clos...
No Longer Available
Common Symptoms of models starting with DPGT750EC1PL
[Viewing 4 of 4]Noisy
Fixed by
these parts
these parts

Show All
Door won’t close
Fixed by
these parts
these parts

Show All
Drum Not Spinning
Fixed by
these parts
these parts
Show All
Marks left on clothes
Fixed by
these parts
these parts
Show All
")


Keep searches simple. Use keywords, e.g. "leaking", "pump", "broken" or "fit".
Dryer making a thumping and squealing noise when running
Had to replace front drum support rollers. Removed screws underneath top in back that held bracket that keeps top in place. Slid top towards rear and lifted up. Removed 4 screws that hold plastic front panel in place (inside..2 on each corner) Unplugged front panel electric plugs to remove panel. Opened door..removed 2 screws at bottom of
... Read more
door opening. Removed screws on top of front panel. Unplugged door switch plug. Removed front panel. Removed right front roller with 9/16th wrench for nut. Adjustable for back of stud. Lifted up on drum to get roller out. Reversed to install. Left roller a bit harder to get to stud. Removed and installed same as right side. Did not attempt to replace rear rollers. Have them if needed but very much more involved to replace.
Read less
Parts Used:
-
Mark from WAVERLY, OH
-
Difficulty Level:Easy
-
Total Repair Time:30 - 60 mins
-
Tools:Screw drivers, Wrench (Adjustable), Wrench set
80 of 99 people
found this instruction helpful.
Was this instruction helpful to you?
Thank you for voting!
There was a grinding noise while the dryer was being used.
We removed the top and front of the dryer and found that the drum roller bearings had gone out on one side. All this happenend on a weekend with no reair store open. We googled the cut sheet for the dryer, found the part number we needed and ordered the parts (we went ahead and replaced both rollers) from partselect.com. For $70 and our o
... Read more
wn labor, we completed the repair by Wednesday evening. I feel certain we saved at least $100 if not more by doing the work ourselves.
Read less
Parts Used:
-
Dan from Mineola, TX
-
Difficulty Level:Easy
-
Total Repair Time:30 - 60 mins
-
Tools:Screw drivers, Socket set
35 of 54 people
found this instruction helpful.
Was this instruction helpful to you?
Thank you for voting!
No hot air being produced
Once I figured out how to get into the bottom end of the dryer, it went really smooth.
1. Remove 4 screws from the top panel at the rear of the machine. This allows the top section of the dryer to be lifted up.
2. Under the top section is a plastic cover which covers the drum, this does not need to be removed. There are two sc ... Read more rews in the top which hold the front panel in place, one at the front left top and one at the front right top. remove these two screws. Keep screws seperated, as there are several different types which need to be removed so remeber which go where.
3. Open the dryer door there are four screws which need to be removed. Once these are removed the front panel can be tipped out and the door switch wiring needs to be unplugged to remove the front panel and set aside.
4. Remove the left nylon guide at the bottom front of machine, it is in the way to remove the blower duct.
5. Remove blower housing cover.
6. Reach behind blower housing and disconnect the thyrmister and temperature limit wiring.
7. Remove the blower wheel by removing center nut. It is removed by turning nut clockwise while bracing the wheel with a screw driver so it won't turn.
8. Remove three screws that are behind the the blower wheel.
9. Remove the two base screws that hold the housing to the bottom of the machine.
10. Now you can remove the plastic duct from the machine.
11. remove two screws at the right side og the blower motor.
12. Disconnect wire harness from motor.
13. Lift up on right side of motor bracket and slide to the right. You can now remove the motor and bracket.
14. Remove two clips that hold the motor to the bracket.
15. Install new motor in bracket and replace clips.
16. You can now install the motor and bracket assembly by reversing the order of these steps.
Read less
Parts Used:

-
Brad from Riverton, UT
-
Difficulty Level:A Bit Difficult
-
Total Repair Time:1- 2 hours
-
Tools:Screw drivers, Socket set
22 of 23 people
found this instruction helpful.
Was this instruction helpful to you?
Thank you for voting!