


Models
>
DLGX7701VE
DLGX7701VE LG Dryer - Overview
Sections of the DLGX7701VE
[Viewing 3 of 3]


Keep searches simple, eg. "belt" or "pump".
 – Part Number: AGM75510755")
PARTS ASSEMBLY, SVC (2 Pack)
PartSelect #: PS16763594
Manufacturer #: AGM75510755
The drum roller for your dryer holds the drum in place while the drum turns on the support wheels. The drum roller is round with a bearing in the middle and measures approximately 3 inches in diameter...
$87.42
In Stock

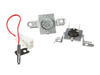
High Limit Thermostat and Thermistor Kit
PartSelect #: PS16878105
Manufacturer #: AGM30045804
This dryer thermistor temperature sensor helps monitor and regulate the temperature inside a dryer. This part includes the wire harness. If your dryer overheats, does not produce enough heat, or takes...
$89.47
In Stock

Blower Thermostat
PartSelect #: PS8747887
Manufacturer #: 6931EL3002M
The thermostat is a part for your dryer, and it is roughly 1 inch long by roughly 1.5 inches wide. The purpose of the thermostat is to measure the temperature of the air inside your dryer drum. As the...
$45.92
In Stock

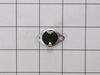
High Limit Thermostat
PartSelect #: PS3530484
Manufacturer #: 6931EL3003C
This part is the replacement high-limit thermostat, or simply the thermostat for your dryer. It is approximately 2 inches wide from tip to tip. The center, rectangular portion of the thermostat is app...
$20.31
Special Order


Leg
PartSelect #: PS3523560
Manufacturer #: 4778EL3001B
This plastic adjustable dryer leg is used to support the weight and adjust the height of your dryer to keep it level. To install the leg, tip the dryer back and screw it into the bottom of your dryer ...
$10.94
In Stock

FILTER ASSEMBLY, LINT
PartSelect #: PS11732672
Manufacturer #: ADQ74233201
This dryer lint filter, also known as a lint trap, is a genuine OEM replacement part made for use with LG dryers. It includes the filter and plastic framing. It fits into a slot on the bottom portion ...
$67.87
In Stock

Conversion Kit - Liquid Propane to Natural Gas
PartSelect #: PS3524507
Manufacturer #: 4948EL4001B
$24.17
In Stock

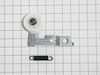
HINGE
PartSelect #: PS11711929
Manufacturer #: MEF62782201
This silver hinge supports your dryer door on the front panel. These hinges are located on both sides of the dryer door and help it open and close smoothly. Over time, with frequent use, the hinges ca...
$76.42
In Stock


Questions And Answers for DLGX7701VE
We're sorry, but our Q&A experts are temporarily unavailable.
Please check back later if you still haven't found the answer you need.
Common Symptoms of the DLGX7701VE
[Viewing 3 of 3]Noisy
Fixed by
these parts
these parts


Show All
Not Heating
Fixed by
these parts
these parts
Show All
Door won’t close
Fixed by
these parts
these parts

Show All
")


Keep searches simple. Use keywords, e.g. "leaking", "pump", "broken" or "fit".
Dryer making a thumping and squealing noise when running
Had to replace front drum support rollers. Removed screws underneath top in back that held bracket that keeps top in place. Slid top towards rear and lifted up. Removed 4 screws that hold plastic front panel in place (inside..2 on each corner) Unplugged front panel electric plugs to remove panel. Opened door..removed 2 screws at bottom of
... Read more
door opening. Removed screws on top of front panel. Unplugged door switch plug. Removed front panel. Removed right front roller with 9/16th wrench for nut. Adjustable for back of stud. Lifted up on drum to get roller out. Reversed to install. Left roller a bit harder to get to stud. Removed and installed same as right side. Did not attempt to replace rear rollers. Have them if needed but very much more involved to replace.
Read less
Parts Used:
-
Mark from WAVERLY, OH
-
Difficulty Level:Easy
-
Total Repair Time:30 - 60 mins
-
Tools:Screw drivers, Wrench (Adjustable), Wrench set
84 of 104 people
found this instruction helpful.
Was this instruction helpful to you?
Thank you for voting!
Screeching during operation
Found disassembly video and watched several times. Suspected that one of the drum wheels had seized up. Found extreme volume of lint and hair inside unit as well as a dryer sheet melted on top of heating unit. Front left drum wheel was worn down from lint and hair jamming its movement. Video made it easy, not a really complicated piec
... Read more
e of machinery. Replaced all 4 wheels due to normal wear on other three. Wanted to be sure drum evenly balanced on all 4. Parts came quickly and were easy to install. My sister and I did this together. Would not recommend doing it alone. Took time to vac and wipe down entire unit. Now it runs so quiet we have to look to see if it is operating. Got a brand new machine out of it, saved a couple of hundred dollars in repair bills, and found 11 cents inside the machine. For your own piece of mind, if you have had your dryer for several years, you need to open it up and clean it out. Its not hard... added note, we are both in our 60's... so if we can do it so can you.... Such a feeling of accomplishment, can't buy that in a store....
Read less
Parts Used:
-
CAROL from NAMPA, ID
-
Difficulty Level:Really Easy
-
Total Repair Time:More than 2 hours
-
Tools:Pliers, Screw drivers
35 of 46 people
found this instruction helpful.
Was this instruction helpful to you?
Thank you for voting!
Gas Dryer not getting hot
I noticed the flame would start, then quit after about 15 seconds. I checked the flame detector, and found the lenze cracked. I replaced it, and it's as good as gold.
It looked like a hard job to take the drum out to get at the part. But the top was off with 3 screws, the front about 6 I think. Then the front frame, only 4 s ... Read more crews. I think setting the belt tentioner was the hardest thing to do.
Done in 45 minutes, both the job, then the next load of laundry.
Read less
Parts Used:

-
Terry from Goose Creek, SC
-
Difficulty Level:Easy
-
Total Repair Time:30 - 60 mins
-
Tools:Screw drivers
22 of 38 people
found this instruction helpful.
Was this instruction helpful to you?
Thank you for voting!