


Models
>
D7003K*429
D7003K*429 General Electric Dryer - Overview
Sections of the D7003K*429
[Viewing 3 of 3]


Keep searches simple, eg. "belt" or "pump".

Rear Drum Bearing Kit
PartSelect #: PS267529
Manufacturer #: WE25M40
This rear drum bearing kit includes a shaft, ground strap, bearing, seven screws, and installation instructions. The bearing plate comes with a slot in it for the ground strap. This part helps keep yo...
$88.17
In Stock

Idler Pulley Wheel
PartSelect #: PS265721
Manufacturer #: WE12X83
A dryer's idler pulley wheel serves to help the belt to rotate the drum.
$34.79
In Stock

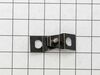
Door Latch
PartSelect #: PS3502777
Manufacturer #: WE1M1011
This door latch is designed for your dryer, and is mounted to the dryer frame. The door latch holds the door of your dryer closed while the machine is operating. If your dryer door is not catching on ...
$11.38
In Stock

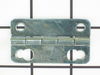
Door Strike
PartSelect #: PS266893
Manufacturer #: WE1X1192
TThe door strike for your dryer is mounted on the dryer frame that the door shuts onto. It fits into the door catch on the door and keeps the door closed. If the door strike is damaged or missing, the...
$8.54
In Stock


Bearing Retainer
PartSelect #: PS266696
Manufacturer #: WE1M300
There is a slot in it for a ground strap.
$43.43
In Stock


Screw
PartSelect #: PS258453
Manufacturer #: WD02X10057
This screw is sold individually. Size: 10-16x1/2
$8.06
In Stock


Questions And Answers for D7003K*429
We're sorry, but our Q&A experts are temporarily unavailable.
Please check back later if you still haven't found the answer you need.
Common Symptoms of the D7003K*429
[Viewing 3 of 3]Noisy
Fixed by
these parts
these parts


Show All
Door won’t close
Fixed by
these parts
these parts


Show All
Marks left on clothes
Fixed by
these parts
these parts
Show All


Keep searches simple. Use keywords, e.g. "leaking", "pump", "broken" or "fit".
dryer door wont stay shut
pulled out door striker anddoor latch out with pliers and just pushed in new parts. works like new in under a min.
Parts Used:
-
robert from mount joy, PA
-
Difficulty Level:Really Easy
-
Total Repair Time:Less than 15 mins
-
Tools:Pliers
80 of 119 people
found this instruction helpful.
Was this instruction helpful to you?
Thank you for voting!
belt broken, pulley worn out
Removed 4 screws from top of control panel , remove 2 from back to lossen top of dryer. Removed rear lower access cover,6 screws on back of dryer exposing pulley and tensioner, remove broken belt and vaccuumed out a ton of lint , removed pulley and tensioner and replaced. From the front remove 4 screws and take off front of dryer, disconn
... Read more
ecting several wires, again vaccumed out lint, lifter drum evough to replace belt. Reassembled
Read less
Parts Used:
-
Anthony from Mpls, MN
-
Difficulty Level:Easy
-
Total Repair Time:1- 2 hours
-
Tools:Socket set
68 of 102 people
found this instruction helpful.
Was this instruction helpful to you?
Thank you for voting!
Squeaking Dryer - Rear Drum bearing gone bad
First, I loosened the the top control panel and then loosened the top flat roof panel which allowed me access to the inside of the dryer. Then, I removed the front panel which allowed access to the drum. I was amazed at the amount of lint that was inside the dryer itself. Most of my time was spent in the disassembly and cleaning of the in
... Read more
ternal cavity around the drum. I reached below the drum and removed the belt from the pulley wheels and then unscrewed the drum (from the inside) from the back of the dryer and bearing kit. I removed the diffuser and cleaned it thoroughly. Then I replaced the entire drum bearing kit - the old one was almost completely dissentigrated. I probably should have applied some kind of non-flammable lubricant to the new bearing kit - the instructions did not include this step but after about 3 loads a slight squeak (different). I put everything back together - applying the new drum kit will require 2 sets of hands (my 9-year old daughter did great at this). I re-assembled the dryer and it works great, again except for the slight squeak that's still there. I may disassemble it again and apply some lubricant but I do not know what kind to get; I need to check that out.
Read less
Parts Used:
-
Jason from Cary, NC
-
Difficulty Level:A Bit Difficult
-
Total Repair Time:More than 2 hours
-
Tools:Screw drivers, Socket set
32 of 35 people
found this instruction helpful.
Was this instruction helpful to you?
Thank you for voting!