


Models
>
CW9003W
CW9003W (P1122813WW) Amana Washer - Overview
Sections of the CW9003W
[Viewing 8 of 8]


Keep searches simple, eg. "belt" or "pump".

Thrust Washer
PartSelect #: PS11740482
Manufacturer #: WP233520
This genuine OEM washer has a 3/4 inch outside diameter. This thrust washer can be used on most makes and models of dryers. A complete list of compatible dryers is available below. The washer is found...
$7.95
In Stock

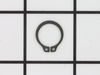
Retaining Ring
PartSelect #: PS11740487
Manufacturer #: WP23748
The metal retaining ring, which is under an inch long, holds the rear wheels on the axels of the dryer. The main reason why it would need to replaced is if the retaining ring has sprung out of place o...
$13.58
In Stock

Screw, 8/18 x 3/8
PartSelect #: PS11746840
Manufacturer #: WP90767
This screw is sold individually.
$5.42
In Stock
 – Part Number: WP28808")
V-Style Drive Belt (32.5 inches long)
PartSelect #: PS11740616
Manufacturer #: WP28808
This v-style drive belt is thirty-two and a half inches long and half of an inch wide.
$43.27
In Stock

Spring Retaining Clip
PartSelect #: PS11739294
Manufacturer #: WP22001650
This spring retaining clip is just under 1 inch long. The clip is made entirely of metal and is attached to the back wall of the washer, under the console. If your washer is vibrating and louder than ...
$11.10
In Stock

Hose Clamp
PartSelect #: PS11740613
Manufacturer #: WP285655
The hose clamp is used to hold the water hose in place which will prevent the hose from leaking water. Sometimes the clamp may lose its ability to latch on, causing a leaking washer. For the installat...
$11.10
In Stock

Lid Hinge Mounting Screw
PartSelect #: PS11748588
Manufacturer #: WPW10119828
Sold individually. NOTE: The color on the screw may not be the same as the image, but will still function the same.
$11.80
In Stock

Complete Hub and Seal Kit
PartSelect #: PS2174602
Manufacturer #: R9900552
This kit comes with hub, seal head, gasket, seal shroud, seal seat, screw, spline insert, drive bell and seal.
No Longer Available


Screw, 8-18 x 1/2
PartSelect #: PS11741443
Manufacturer #: WP3390631
This screw is sold individually.
$7.84
In Stock

Upper/Lower Bearing
PartSelect #: PS11742241
Manufacturer #: WP40004001
Bearing only.
$56.59
In Stock

Drive Bell and Seal Kit
PartSelect #: PS2174335
Manufacturer #: R9900189
This washing machine drive bell and seal kit comes with a seal, a plug, a shoulder screw, a drive bell, and some grease.
No Longer Available
Questions And Answers for CW9003W
We're sorry, but our Q&A experts are temporarily unavailable.
Please check back later if you still haven't found the answer you need.
Common Symptoms of the CW9003W
[Viewing 6 of 6]Noisy
Fixed by
these parts
these parts

Show All
Leaking
Fixed by
these parts
these parts


Show All
Will not agitate
Fixed by
these parts
these parts
Show All
Burning smell
Fixed by
these parts
these parts
Show All
Will not drain
Fixed by
these parts
these parts

Show All
Spins slowly
Fixed by
these parts
these parts
Show All


Keep searches simple. Use keywords, e.g. "leaking", "pump", "broken" or "fit".
Frayed V-belt
VERY EASY!!!
SAFETY FIRST-Always unplug the appliance.
Use 8mm socket to remove front panel screws. Loosened up two hose clamps connected to the pump and removed both lines (Hoses contain water, use a towel) which is located underneath the motor. Disconnect motor electrical connector on the left side of the motor. With socket, r ... Read more emove 4 mounting bracket screws that secure the motor and pump assembly. Pull back the tension/idler pulley to loosen belt off the main pulley to the washer drum. Tilt and pull out motor/pump assembly. Underneath the pump, use star-bit to remove the pump from motor assembly to remove the belt. Install new belt on motor pulley (Good time to check for debris or anything restricing free movement of pump) and re-install pump. Install the motor/pump assembly and loosely secure the motor/pump assembly. Place the belt onto the motor pulley and pull back the tensioner/idler pulley to allow slack of belt to be placed on washer drum pulley. Put the belt on the lip of the drum pulley and rotate while pulling back the tensioner/idler pulley until the belt is seated on the groove of the drum pulley. Tighten the motor/pump assembley. Re-attach the 2 hoses and tighten down the clamps. Re-connect the electrical connector to the motor...Don't forget to plug in the washer and secure the front panel...Piece 'O cake, you're done! About 15 minutes to do the job. Much like changing a belt on most vehicles.
Read less
Parts Used:
 – Part Number: WP28808")
-
John from Milton, PA
-
Difficulty Level:Really Easy
-
Total Repair Time:15 - 30 mins
-
Tools:Nutdriver, Screw drivers
59 of 66 people
found this instruction helpful.
Was this instruction helpful to you?
Thank you for voting!
The Seal On The Bottom Of The Tub Was Leaking
Removed the front of the washer, then lifted the top up and held it up with a prop. Pulled the agitator straight up and started the disasembly. Using the photos in the hub and seal kit was a big help. The large nut on the output shaft had to be cut off with my dremel tool and the hub removed with a wheeler puller. Assembly was pretty
... Read more
much straight forward. Primed the pump and started the machine for the stated time and was a sucess.
Read less
Parts Used:

-
HOWARD from CORTLAND, OH
-
Difficulty Level:Easy
-
Total Repair Time:1- 2 hours
-
Tools:Nutdriver, Screw drivers, Socket set, Wrench (Adjustable)
33 of 42 people
found this instruction helpful.
Was this instruction helpful to you?
Thank you for voting!
The washer tub seal leaked
After removing the agitator and drive bell by pulling on them HARD, I found that the lock nut and hub were corroded in place. I used grinding wheels to remove them which took over an hour. The internal and external threads needed to be cleaned up with tap and die and the splines had to be filed in order to get the new hub on the shaft. I
... Read more
did not use antiseize compound. The tub seal went on easily and the lock nut was guestimate torqued using a wrench made for water heater elements. The drive bell seal was very stubborn. It is normally pressed on with a special tool, but I had scrap pipe sections that fit the inner and outer press-points and used a large hammer to drive it into place. The washer does not leak any more. Total time was around four hours.
Read less
Parts Used:

-
Gerald from Seminole, FL
-
Difficulty Level:A Bit Difficult
-
Total Repair Time:More than 2 hours
-
Tools:Wrench set
17 of 19 people
found this instruction helpful.
Was this instruction helpful to you?
Thank you for voting!