Your coupon for will be reflected when you check out!
✖
Your coupon for
✖
Hello!
You're visiting the PartSelect site in U.S.
Would you like to shop on the Canadian site?
Stay on this site
Go to Canadian site
✖
Model Number Locations
1Select Category Type
Select Category Type
2Select Product Type
Select Product Type
3Select {MODEL} Type
Select {MODEL} Type
Sample Model Number Tags
Model numbers can be made up of numbers (1005400, for example) or a combination of letters and numbers (LAT1000AAE). The model number will most likely appear on either a paper sticker or a metal plate. Your appliance's model number tag may look similar to the sample model number tags shown here (model number highlighted in yellow):
Model has been saved to My Models. If you're not signed in, your lists are available on this device and will expire within 30 days.
Model has been saved to My Models.
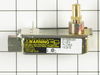
This is an oven igniter for various ranges. This part is used to ignite the burner within gas ovens. If your oven is not heating properly this igniter has likely failed and is in need of replacement. ...
Oven racks can become rusted or damaged from constant use, and need to be properly maintained and cleaned to keep them working properly. If you notice that your oven rack has been damaged or rusted, t...
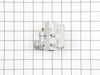
The anti-tip bracket kit comes with one metal bracket and two installation screws, and is sourced directly from the genuine manufacturer. It prevents the freestanding oven, range, or stove from tippin...
This steel washer is also known as the range washer and is used on your oven door. The measurements for the steel washer are a three quarter inch outer diameter, and a one quarter inch inner diameter....
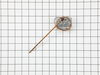
This genuine OEM oven thermostat control knob replaces a worn or missing temperature knob on select ranges, restoring smooth operation and clear temperature selection. Finished in white with grey mark...
This oven door gasket is designed to form a secure seal around the perimeter of the oven door, helping to retain heat during cooking and improve energy efficiency. By preventing heat from escaping, it...
This is a front burner assembly for the stovetop on your range. It delivers the gas to the main cooking area by dividing it through the slots or holes in order to create an evenly burning flame. Take ...
I am an HVAC tech by trade so it wasn't difficult to diagnose problem with safety valve. The hard part was being without an oven for a week. Repair was simple and effective--oven works good as new. Shut off gas and unplugged oven. Removed floor of oven between broiler and bake section, used wrenches to disconnect gas line from saf
... Read moreety valve in back of oven, used philipps head screwdriver to remove burner assembly and gas valve, reversed process to replace. Checked out operation--OK.
I was selling my home and did not realize that the anti-tip bracket was not originally installed. A home inspection caught the problem and the buyers required that I install one. I could not find the original and obviously the installer never put it in place to begin with. The buyers wanted this resolved within a week so I had to act f
... Read moreast. I could not find one locally so I found what I needed on your website. It arrived in a couple of days and was easy to install. I used the template provided in the kit and drove the screws through the bracket into the wood plate behind the drywall. Pushed the range back in place and that's it. Couldn't get any easier.
Unplug range, remove oven racks, remove 2 screws at the rear of oven bottom sheet metal panel. Lift the back of the panel and slide to the rear a little , then remove panel. Remove nut on top of heat shield and remove shield.. Open broiler draw slightly Note wire connections to gas valve. Remove Philips head screw from sheet metal guard
... Read more bottom left rear to access wire connection. remove 2 hex head screws the hold igniter in place and install new igniter. remove spade connectors from gas valve and connect spade connectors from new igniter. , remove molex connector from bottom left rear and connect one from new igniter..Install shield in left rear bottom. install heat shield over burner and install nut. Install sheet metal panel in bottom of oven and 2 rear screws.. install oven racks and plug range back in. set clock and test your repair.