


Models
>
BH20S5W-P1196501W
BH20S5W-P1196501W Amana Refrigerator - Overview
Sections of the BH20S5W-P1196501W
[Viewing 1 of 1]
Keep searches simple, eg. "belt" or "pump".

Light Bulb - 40W
PartSelect #: PS884734
Manufacturer #: 8009
This an authentic OEM 40-Watt replacement light bulb, used in a number of household appliances. It is specially designed to withstand extreme temperatures, which is why these replacement bulbs are mos...
$11.73
In Stock

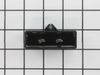
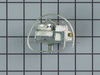
Refrigerator Door Switch
PartSelect #: PS12728638
Manufacturer #: W11384469
Door switch turns the light off when you close the door.
$38.48
In Stock

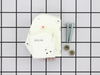
Condenser Fan Motor Kit
PartSelect #: PS395284
Manufacturer #: 833697
This condenser fan motor kit is designed for use with refrigerators. This fan draws air through the condenser coils and over the compressor. It does this with the goal of cooling the warm refrigerant ...
$63.18
In Stock

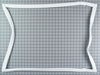
Freezer Door Gasket
PartSelect #: PS11738527
Manufacturer #: WP12550116Q
This freezer door gasket is white and made of rubber. It measures approximately 23-3/4 inches wide by thirty-one and a half inches long.
$106.12
In Stock

Screw, 8/18 x 3/8
PartSelect #: PS11746840
Manufacturer #: WP90767
This screw is sold individually.
$5.42
In Stock

Run Capacitor
PartSelect #: PS11743364
Manufacturer #: WP65889-4
This part helps the compressor kick on and off while maintaining a constant temperature to keep things frozen in your freezer. If you are noticing temperature issues with your refrigerator or freezer,...
$66.72
In Stock

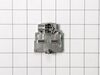
Defrost Timer Kit - 120V 60Hz
PartSelect #: PS2167006
Manufacturer #: R0131577
The timer will shut off the cooling system of the refrigerator and the defrost heater will turn on.
$51.04
In Stock

Bimetal Defrost Thermostat
PartSelect #: PS11738231
Manufacturer #: WP10442411
This refrigerator defrost thermostat will cut out at 55 degrees Fahrenheit and kick back in when the temperature drops to 20 degrees Fahrenheit. The thermostat itself is a little over an inch long whi...
$41.95
In Stock

Refrigerator Door Handle
PartSelect #: PS11747835
Manufacturer #: WPD7694803
This refrigerator door handle is twenty-one inches long. It is made of metal, but does not come with the white decorative handle insert.
$318.20
In Stock

Crisper Drawer Cover Support Post
PartSelect #: PS1564421
Manufacturer #: 10461901
This part helps support the crisper drawer lid.
$37.04
In Stock


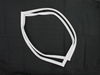
Refrigerator Door Gasket
PartSelect #: PS11738526
Manufacturer #: WP12550115Q
This door gasket is white and made of rubber. It measures approximately thirty-one and a half inches wide by thirty-eight and a half inches long.
$127.78
In Stock
Questions And Answers for BH20S5W-P1196501W
We're sorry, but our Q&A experts are temporarily unavailable.
Please check back later if you still haven't found the answer you need.
Common Symptoms of the BH20S5W-P1196501W
[Viewing 16 of 16]Fridge too warm
Fixed by
these parts
these parts


Show All
Light not working
Fixed by
these parts
these parts

Show All
Freezer section too warm
Fixed by
these parts
these parts
Show All
Will Not Start
Fixed by
these parts
these parts
Show All
Noisy
Fixed by
these parts
these parts

Show All
Freezer not defrosting
Fixed by
these parts
these parts
Show All
Door Sweating
Fixed by
these parts
these parts
Show All
Fridge runs too long
Fixed by
these parts
these parts
Show All
Fridge and Freezer are too warm
Fixed by
these parts
these parts
Show All
Frost buildup
Fixed by
these parts
these parts
Show All
Clicking sound
Fixed by
these parts
these parts
Show All
Door won’t open or close
Fixed by
these parts
these parts

Show All
Too warm
Fixed by
these parts
these parts
Show All
Fridge too cold
Fixed by
these parts
these parts

Show All
Freezer too cold
Fixed by
these parts
these parts
Show All
Leaking
Fixed by
these parts
these parts
Show All


Keep searches simple. Use keywords, e.g. "leaking", "pump", "broken" or "fit".
Sometimes the condenser fan would start causing the refrigerator to overheat.
Unplug the appliance.
Removed the screws holding the back panel.
Removed the fan blade.
removed 3 screws holding the condenser fan.
Remove the 3 metal brackets attached to the fan.
(First note which studs the brackets are attached to. Attach the 3 metal brackets to the new fan. (New screws were supplied)
Cut ... Read more and strip the wire about two inches from the fan.
Cut and strip the new wire. I cut the new wire in half (about 6 inches.) Connect the two wires, twist and used 2 wire nuts. Tie wrap the wire to the wire harness. Mount the new fan (three screws)
Screw the back panel back on.
Mount the new
Read less
Parts Used:

-
Tom from Franklin, WI
-
Difficulty Level:A Bit Difficult
-
Total Repair Time:15 - 30 mins
-
Tools:Nutdriver, Pliers
180 of 204 people
found this instruction helpful.
Was this instruction helpful to you?
Thank you for voting!
freezer door gasket needed replacing
Unplug refrigerator. Open freezer door. Lift the old gasket from the edge closest to the center of the door to expose the hex-head screws. Get a nut driver the appropriate size (1/4" if I remember) and loosen, but do not remove all of the screws. Once loosened, the old gasket can be removed. Slip the new gasket in just like the old o
... Read more
ne was. Lift the edges closest to the center of the door and tighten the screws. Test the fit of the new gasket by closing the door and sighting carefully down each of the four seal lines. Typically there will be spots where there are gaps, that is, the gasket is not "pulled out" enough to contact the refrigerator body. This is due to kinks that occur to the gasket during shipping. A paper that comes with the gasket notes the effect and recommends using a hair dryer to remove the kinks. Although the recommendation is to use the dryer BEFORE putting the gasket on, I used the dryer after, when I could see exactly where the gaps were. After noting the spots, open the door and with the dryer on HIGH setting, wave the hot air stream back and forth for a minute or two on each spot. Pull each spot out by hand with the hot air off and if/when the gasket is cool enough to touch but still warm. Close the door, inspect and repeat the process if necessary. I was able to achieve a good seal all the way around this way.
Read less
Parts Used:

-
Jeffrey from Palo Alto, CA
-
Difficulty Level:A Bit Difficult
-
Total Repair Time:30 - 60 mins
-
Tools:Nutdriver, Screw drivers
137 of 152 people
found this instruction helpful.
Was this instruction helpful to you?
Thank you for voting!
Fridge and freezer didn't cool enough
I diagnosed the problem via the internet. Diagrams helped a lot. Coils were frozen over. Thawed them out overnight. Manually advanced timer and the defrost heater was operable. The defrost timer wasn't "turning" on it's own. I turned the fridge back on while I awaited the part. It worked fine for the time I had to wait. (over two
... Read more
weeks since I had delayed ordering the part) New timer arrived as promised. Undid 4 hex head (1/4") screws. Unplugged 4 prong connection. Plugged in new timer and replaced the 4 screws. Frigde works great.
Read less
Parts Used:

-
Peter from Eden, UT
-
Difficulty Level:Really Easy
-
Total Repair Time:Less than 15 mins
-
Tools:Socket set
106 of 117 people
found this instruction helpful.
Was this instruction helpful to you?
Thank you for voting!