


B460 - Overview
Models starting with B460
Click on the best match to narrow your results.
- B460 (U08026001001-U08026999999) Shindaiwa Brush Cutter (Brushcutters (B))
- B4600 (0601632835) Bosch Reciprocating Saw (Reciprocating Saw)
- B4603T Chamberlain Garage Door Opener (B4603t Ultra-Quiet Wi-Fi Garage Door Opener With Wireless Keypad)
- B4603TC Chamberlain Garage Door Opener (B4603tc Ultra-Quiet Wifi Garage Door Opener With Wireless Keypad)
- B4603TCMC Chamberlain Garage Door Opener (B4603tc Ultra-Quiet Wifi Garage Door Opener)
- B4603TMC Chamberlain Garage Door Opener (B4603t Ultra-Quiet Wi-Fi Garage Door Opener With Wireless Keypad)
- B4607B0 Roper Range (Gas)
- B4607B1 Roper Range (Gas)
- B4607X0 Roper Range (Gas)
Keep searches simple, eg. "belt" or "pump".

Light Bulb - 40W
PartSelect #: PS884734
Manufacturer #: 8009
This an authentic OEM 40-Watt replacement light bulb, used in a number of household appliances. It is specially designed to withstand extreme temperatures, which is why these replacement bulbs are mos...
$19.54
In Stock

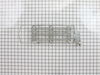
Dryer Heating Element
PartSelect #: PS11742505
Manufacturer #: WP4391960
This element carries 5200W and 240V.
Note: This element no longer includes two terminals and two adapter leads. They must be ordered separately.
$33.69
In Stock

Range Round Carborundum Oven Igniter
PartSelect #: PS360921
Manufacturer #: 4342528
This round style gas oven igniter, or also known as a broil or bake igniter, has an amperage range between 2.5 and 3.0. It glows white hot to ignite the gas for the oven. The igniter does this by attr...
$66.77
In Stock

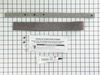
2 Piece Broiler Pan
PartSelect #: PS971245
Manufacturer #: 4396923
This broiler pan and roasting rack set is designed to help reduce mess while cooking by allowing grease to drain away from food. Its durable porcelain-coated construction stands up to high temperature...
$49.50
In Stock

Temperature Sensor
PartSelect #: PS11744825
Manufacturer #: WP8053344
This temperature sensor is used to measure the inside temperature of a self-cleaning oven. Its 1000-ohm resistance increases with temperature. The sensor has male leads, is 6 inches in length, and com...
No Longer Available

Range Hex Nut
PartSelect #: PS11738304
Manufacturer #: WP112432
This 10-32-inch hex nut works with multiple appliances in your home as a fastener. This specific model is sold individually. Hex nuts usually have 6 even sides and together they are used with bolts an...
$7.47
In Stock

Bearing and Seal Kit
PartSelect #: PS334171
Manufacturer #: 279264
This front bearing and seal kit comes with the adhesive.
$67.82
In Stock

Refrigerator Screw
PartSelect #: PS11742733
Manufacturer #: WP489128
This screw is sold individually.
$11.77
In Stock
 – Part Number: WP4314961")
Range Rocker Switch (Black)
PartSelect #: PS11742364
Manufacturer #: WP4314961
This rocker switch can be used for both the oven selector and/or the oven light.
$53.20
In Stock

Fuel Filter Assy.
PartSelect #: PS16478678
Manufacturer #: A369000460
The Fuel Filter is a white and silver, individually sold, steel part. It reuires pliers to install and its installation is rated as Easy.
The part attaches inside of the fuel tank and is used to cle...
$11.70
In Stock


Common Symptoms of models starting with B460
[Viewing 8 of 8]Will Not Start
Fixed by
these parts
these parts


Show All
Not Heating
Fixed by
these parts
these parts
Show All
Little to no heat when baking
Fixed by
these parts
these parts
Show All
Noisy
Fixed by
these parts
these parts
Show All
Element will not heat
Fixed by
these parts
these parts
Show All
Gas igniter glows, but will not light
Fixed by
these parts
these parts
Show All
Oven not heating evenly
Fixed by
these parts
these parts
Show All
Oven is too hot
Fixed by
these parts
these parts
Show All


Keep searches simple. Use keywords, e.g. "leaking", "pump", "broken" or "fit".
Dryer quit heating. Suspected heating element was open
Unplugged the 220 volt source. Disconnected the vent line from the back of the drier. Removed the six screws holding the back panel with a 1/4 inch nut driver. Tipped the drier up at a 45 degree angle against the wall to give better access to the inside. Removed the screws holding the two thermostats to the side of the heater box and
... Read more
laid them aside. Disconnected the two red power lines to the heater element. Removed the large screw at the top of the heater box and removed the flexible bracket holding the heater box, then lifted the heater box up and away from the drier. Removed the one screw holding the heater element inside the heater box and pulled out the old heating element. The old element was open as found using an ohmeter on the two main terminals. Threw away the old element. Removed the new heating element from the box and slid it into the heater box making sure to align the terminal bracket with the hole in the heater box for the reinstallation of the mounting screw. Tightened this screw. Remounted the heater box to the two mounting slots and reinstalled the flexible mounting bracket to the top of the heater box and installed and tightened the large screw holding this bracket. Cut off and removed the old electrical push-on terminals from the two red power wires for the heater element. These were discolored and oxidated from the conducted heat over the years of operation. Using the supplied short red leads with push-on terminals already installed, I wire tied these new leads to the existing red power leads and pushed them onto the heater element terminals. Rechecked the soundness of the twisted wire connections to make sure they were tight. Replaced the back panel and reinstalled the six 1/4" screws with the 1/4' nut driever. Reinstalled the driver vent line and tightened its holding ring. Slid the drier back into position on the floor. Checked the level and readjusted the leveling legs for a steady floor stance. Reinstalled the 220 volt power connecter and set the controlls for a drying cycle. Let the drier run for aproximately 1 minute and then checked the air temperature inside the drier. IT WAS NOW PRODUCING HOT AIR. Project completed successfully and I was now a HERO in my wifes eyes. Absolutely no technical problems encountered. Just remember, unplug the drier before starting ANY repairs. To forget this COULD RUIN YOUR DAY.
Read less
Parts Used:
-
Bill from Morristown, TN
-
Difficulty Level:Easy
-
Total Repair Time:15 - 30 mins
-
Tools:Nutdriver, Screw drivers, Wrench (Adjustable)
289 of 323 people
found this instruction helpful.
Was this instruction helpful to you?
Thank you for voting!
Dryer was not heating
This is the second heating element I have replaced in this dryer which I bought new in 1977. That's right it is 32 years old and still works great!
The replacement process is simple:
One: pull the dryer away from the wall so that you have room to work in the back.
Two: Disconnect the dryer vent hose from the back of t ... Read more he dryer.
Three: Remove the five - 5/16" hex head sheet metal screws that hold the back cover in place and set the cover to the side.
Four: Go to the front of the dryer and remove the lint filter and the two slot head screws that hold the lint filter opening to the internal frame.
Five: Pop the top of the dryer open and remove the one 5/16" hex head screw that holds the top of the heating element strap to the frame.
Six: Go to the back of the dryer and remove the two leads from the thermostat that is mounted to the heating element casing. CAUTION: Be careful to note the position of the wires and be certain that you reattach the correct wire to the correct lead.
Seven: Lift the heating element case up about 1/2" to disengage the hooks at the bottom that hold it in place.Then pull the bottom of the heating toward you slightly while sliding it down. This will allow you to remove the heating element and casing.
Eight: Remove the heating element from the casing and insert the replacement heating element.
Reverse the above process to reassemble.
This entire process only takes about 20 minutes.
An additional note: Be certain that you pay careful attention to the positioning of the strap that holds the top of the heating element case to the dryer frame. If you install it incorrectly, the heating element case can fall away from the back of the drum assembly.
Read less
Parts Used:
-
Frank from Fort Collins, CO
-
Difficulty Level:Really Easy
-
Total Repair Time:15 - 30 mins
-
Tools:Nutdriver, Screw drivers
100 of 109 people
found this instruction helpful.
Was this instruction helpful to you?
Thank you for voting!
The lower burner would not ignite.
First I removed the oven racks. Then I loosened the two screws in the back of the oven floor and figured out how to remove it. Then I loosened the two screws at the front of the diverter and, with some pushing and pulling and twisting, was able to get that to come out, too. Then I tried lighting the oven and noticed that the igniter wa
... Read more
s not glowing. When I saw that the upper (broiler) burner was working fine, I hoped that the problem was the lower igniter itself. I checked the wires and they seemed fine. I saw that two bolts held the igniter onto its bracket, so with a socket wrench (which size I got right on the first guess!) I removed those bolts and the igniter came loose. I found the connecter for the wires when I removed the drawer under the oven and was able to pull it apart easily. The igniter came out completely. There was nothing unusual about it, but I decided to take a chance and order a new one, hoping that replacing it would solve the problem. I put the rest of the oven together and waited. About three days later the part arrived (it was sent on a holiday; FedEx is soooo much better than USPS). I retraced the steps of taking the oven apart, put the two bolts into the new igniter to attach it to the bracket, and went back underneath behind the drawer to connect the wires. Then came the moment of truth: I tried turing on the oven. I held the button down to keep the light off, and after a few seconds I saw it: IT GLOWED!! It worked!! After yelling a satisfying "YEAH!!," I turned it off, put back the drawer, the diverter (more pulling and pushing and twisting), and the oven floor. Now it's all working perfectly and it took a very short time to fix. And a little luck that the problem was with such a simple part.
Read less
Parts Used:
-
Mark from Rego Park, NY
-
Difficulty Level:Easy
-
Total Repair Time:Less than 15 mins
-
Tools:Screw drivers, Socket set
80 of 87 people
found this instruction helpful.
Was this instruction helpful to you?
Thank you for voting!