This an authentic OEM 40-Watt replacement light bulb, used in a number of household appliances. It is specially designed to withstand extreme temperatures, which is why these replacement bulbs are mos...
This part is for oven ranges, it connects individual wires and protects the device from electrical surges, voltages, and current. With this part, the house power is connected to the range wire harness...
This is cookware designed for use in your range or oven. It is a two-piece dish that is used to grill or cook food while the broil function is on, meaning it can withstand high temperatures. This set ...
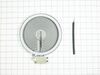
This surface element is made for under glass set-ups and supplies the heat to a cooking area on top of the range. It has an outside diameter of approximately 7 inches (1500 watts), and is a genuine OE...
The hinge kit, or oven door hinge, is used in ranges and wall ovens. The hinge attaches to the right side of the door and controls how fast the door opens. At a specific angle, it allows the door to r...
Turned off power to unit. Tilted up Glass top and removed two screws holding rear hinges to range. Then I unplugged wire harness from lower range and placed the Glass top facing down on counter top with towel for cushion. Removed 1 screw holding center of burner to support frame, two alignment screws on perimeter, and two screws hol
... Read moreding support frame to glass top. This allowed me to slide out the old element with all wiring connections intact. Placed the new assembly in same location under support frame, noting numbered positions of two alignment screws from old unit. This is necessary to properly align heater to surface glass. Replaced all screws connecting burner to frame. Then I removed each wire one-by-one from old unit, reconnecting to same location on new unit.
Replaced top in reverse order from removal. Powered on the circuit breaker and verified proper operation of dual unit with large/small selecttor switch. Total time to repair about 30 minutes.
Pulled the power plug. Removed all the screws holding the back of the range in place. Checked all wiring to make sure there were no burns, cracks, or other problems. Removed the output wire from the thermocouple, reinserted the power cord and checked for voltage. Removed power cord, then removed the 4 screws holding the control in pla
... Read morece. Removed all electrical connections, making sure of where they went, then installed the new control. While still hanging loose, put the power plug back in and saw the time light up. Pulled power plug, put everything back together, put the power plug back in, shoved the range back in place and the owner proceded to bake an anglefood cake. All is well.


 – Part Number: Y0315570")