Your coupon for will be reflected when you check out!
✖
Your coupon for
✖
Hello!
You're visiting the PartSelect site in U.S.
Would you like to shop on the Canadian site?
Stay on this site
Go to Canadian site
✖
Model Number Locations
1Select Category Type
Select Category Type
2Select Product Type
Select Product Type
3Select {MODEL} Type
Select {MODEL} Type
Sample Model Number Tags
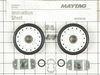
Model numbers can be made up of numbers (1005400, for example) or a combination of letters and numbers (LAT1000AAE). The model number will most likely appear on either a paper sticker or a metal plate. Your appliance's model number tag may look similar to the sample model number tags shown here (model number highlighted in yellow):
Model has been saved to My Models. If you're not signed in, your lists are available on this device and will expire within 30 days.
Model has been saved to My Models.
This dryer drum belt (Whirlpool Dryer Belt, Drive Belt) has four ridges, three grooves and is 1/4" wide, and 92 1/4 inches in length. It comes in black and is made of rubber. The belt transfers the ro...
This dryer heating element kit is 240 volts and 4750 watts. The function of the heating element is to produce the heat that allows you to dry your clothing during your dryer cycle. If your clothes tak...
This blower wheel clamp, used in a clothes dryer, is a clamp that holds the blower wheel to the motor shaft. This part helps hold the blower wheel in place to function easily and properly. If your clo...
The rear dryer drum roller functions by holding the drum in place while the drum rotates on support wheels during the drying spin/tumble cycle. Included in this rear drum support roller kit are four s...
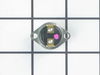
This high limit/safety thermostat is used on many gas and electric clothes dryers. It is made of metal, and is almost two inches long. With this thermostat, a dryer's heating element will cut out if t...
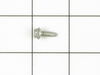
This part is the replacement thermal fuse for your dryer. It measures a little more than an inch wide, and about ¾ inch long. The thermal fuse is a safety device that shuts off the burner in a gas dry...
This is a 120 volt, 25-watt light bulb that fits a variety of medium to large kitchen appliances. It functions by illuminating when the appliance door is open. It has a small base with a twist lock. T...
No Longer Available
Questions And Answers for ADE20K3H
Be the first to ask our experts a question about this model!
✖
Ask a Question
Ask our experts a question on this model and we'll respond as soon as we can.
I was about to purchase a new dryer because of the age of my dryer and not wanting to hire someone to fix it. After a little web research, I saw several do-it -yourself stories indicating this was a very easy repair.
This was an extremely easy repair and it save me lots of $$: (1) Disconnected power (2) Opened the
... Read moretop of the dryer (3) Disconnected wires to temperature sensor. (4) Used a 1/2" socket wrench with extension and a drill to remove 2 screws holding down the temperature sensor (5) Removed 1 screw holding down the heating element. (6) Removed wires connected to heating element and pulled out old element. (7) Reassembled new element. (8) Turned on empty dryer for 30 minutes to burn off smell from the new element.
1. Removed the screws from the lint catcher 2. Removed the bolts from upper rear of dryer 3. Pried off the dryer top from the front (it rests on rear hinges) 4. Disconnected dryer door wiring 5. Removed bolt from inside upper front corners; removed front panel (be careful: the edges are sharp and the tumbler will fall
... Read morewhen it loses support) 6. Removed broken belt and lint from interior parts; removed tensioner (which had fallen out of place). Note: The newer models have a tensioner pulley; my older model had a smooth semicircle that was confusing at first glance 7. Flipped dryer onto its back (for easier reinsertion of new belt and tumbler) 8. Placed new belt on tumbler; reinserted tumbler 9. Inserted new belt through tensioner, inserted tensioner "legs" into grooves on floor. Note: The belt will pull the tensioner upright when it's inserted properly (which isn't obvious at first) 10. Made sure belt and tumbler seal were properly installed 11. Replaced parts in reverse order The process took over an hour because I couldn't figure out how to insert the belt through the tensioner. The trick is to insert the folded belt through the tensioner and onto the motor pulley. If I had to do it again, it would take about 30 minutes (including cleaning lint)
Started out taking the back off, then found online that access is from the front and much easier to get to. Simply pop the hinges in the back of the top panel and then the front of the top is popped off. From there, it is easy to remove the old belt, clean the innards (found 31 cents) and replace the new belt. It was a little disconcer
... Read moreting to see the idler pulley laying loose inside, but the diagram showed exactly how to put it back in place, with the new belt keeping it in place.


 Diagram and Parts List for Admiral Dryer")
 Diagram and Parts List for Admiral Dryer")
 Diagram and Parts List for Admiral Dryer")
 Diagram and Parts List for Admiral Dryer")
 Diagram and Parts List for Admiral Dryer")
 Diagram and Parts List for Admiral Dryer")


 – Part Number: WP53-0771")


")


