


Models
>
64289
64289 ((AB1ESEA)) LG Wall Oven - Overview
Sections of the 64289
[Viewing 8 of 8] LG Wall Oven")
 LG Wall Oven")
 LG Wall Oven")
 LG Wall Oven")
 LG Wall Oven")
 LG Wall Oven")
 LG Wall Oven")
 LG Wall Oven")
Exact Part matches for your search term
[Viewing 1 of 1]
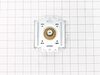
Stator assembly
This part number matches the current model number 64289
PartSelect #: PS12480566
Manufacturer #: 64289
No Longer Available
Keep searches simple, eg. "belt" or "pump".

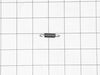
Micro Switch
PartSelect #: PS3598700
Manufacturer #: 6600W1K001R
This micro-switch is designed for use in your microwave. The function of this part is to monitor the door latch position and communicate to the electronic control board whether the latch is open or cl...
$8.67
In Stock

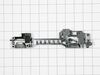
Locker
PartSelect #: PS3522838
Manufacturer #: 4026W2A019A
The locker, or door latch assembly fits to the inside of the microwave door, and keeps the door closed. If the door on your microwave oven doesn’t appear to close properly, you may have a problem with...
$8.17
In Stock

Turntable Motor Coupler
PartSelect #: PS3522918
Manufacturer #: 4370W1A006B
The turntable motor coupler connects the turntable motor to the tray. If the turntable on your microwave will not rotate, you may have a faulty motor coupler. The coupler commonly has a D shaped openi...
$12.29
In Stock

Fuse,Time Delay
PartSelect #: PS3522743
Manufacturer #: 3B74133Q
The fuse-time delay may also be known as a line fuse or a microwave fuse, and it is a piece for your microwave. The function of this part is to shut off the microwave if there is a power surge, in ord...
$7.73
In Stock

Magnetron
PartSelect #: PS3529034
Manufacturer #: 6324W1A001L
This magnetron in your microwave creates the radiation needed for cooking or warming your food. It is located inside the main cavity, typically near the transformer or waveguide. When the magnetron be...
$180.80
In Stock


Questions And Answers for 64289
We're sorry, but our Q&A experts are temporarily unavailable.
Please check back later if you still haven't found the answer you need.
Common Symptoms of the 64289
[Viewing 5 of 5]No heat
Fixed by
these parts
these parts


Show All
Door not closing properly
Fixed by
these parts
these parts

Show All
Won’t turn on
Fixed by
these parts
these parts
Show All
Tray won’t turn
Fixed by
these parts
these parts

Show All
Doesn’t shut off
Fixed by
these parts
these parts
Show All
Keep searches simple. Use keywords, e.g. "leaking", "pump", "broken" or "fit".
One of the switches in a component that door activates when shut.
I replaced the whole component with all three switches in it even though only one switch was bad . Taking out one switch out of the holder unit would probably have damaged the unit that was holding the switches. Easy install and it works great again .
Parts Used:
-
Jimmy from OZARK, MO
-
Difficulty Level:Easy
-
Total Repair Time:30 - 60 mins
-
Tools:Pliers, Screw drivers
9 of 9 people
found this instruction helpful.
Was this instruction helpful to you?
Thank you for voting!
would not start.
diagnosed defective 'door-shut switch' in the switch holder assembly. rather than replace switch, replaced entire locker holder assembly which made for a very simple and easy repair...not to mention very inexpensive.
Parts Used:
-
James from VIRGINIA BCH, VA
-
Difficulty Level:Really Easy
-
Total Repair Time:30 - 60 mins
-
Tools:Screw drivers
8 of 10 people
found this instruction helpful.
Was this instruction helpful to you?
Thank you for voting!
Magnitron failed
Over the stove microwave installed in top cabinet row.
1. Unplug device.
2. Two people to remove from wall/cabinet (remove two, large, top mounting screws and rotate entire microwave down and off the wall mount). Should be some wood spacers between top of device and bottom of cabinet.
3. Remove screws from sheet metal cover ... Read more .
4. Remove one screw holding blowers in place and rotate out of the way, in order to gain access to 2 of 5 screws that hold the magnetron in place.
5. Unplug magnetron and remove the 5 screws.
6. Drop in new magnetron and re-assemble microwave in reverse order (steps 5-3).
7. Two people restore micro to wall/cabinet. Replace wood spacers, re-install two, large mounting screws (finger-tight). Test device. Secure the two large screws.
Read less
Parts Used:
-
Joseph from WILTON, NH
-
Difficulty Level:A Bit Difficult
-
Total Repair Time:1- 2 hours
-
Tools:Screw drivers
8 of 12 people
found this instruction helpful.
Was this instruction helpful to you?
Thank you for voting!