


Models
>
5648630180
5648630180 Kenmore Refrigerator - Overview
Sections of the 5648630180
[Viewing 4 of 4]


Keep searches simple, eg. "belt" or "pump".

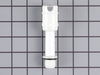
Drain Check Valve with O-Ring
PartSelect #: PS382661
Manufacturer #: 675238
This water inlet valve should be located behind the lower kickplate panel in either the right or left corner. The attaching solenoids on the valve open and close according to the desired amount of water needed.
$49.77
In Stock


Questions And Answers for 5648630180
We're sorry, but our Q&A experts are temporarily unavailable.
Please check back later if you still haven't found the answer you need.
Common Symptoms of the 5648630180
[Viewing 3 of 3]Not draining
Fixed by
these parts
these parts
Show All
Leaking
Fixed by
these parts
these parts
Show All
Not cleaning dishes properly
Fixed by
these parts
these parts
Show All

Keep searches simple. Use keywords, e.g. "leaking", "pump", "broken" or "fit".
Dishwasher Not Draining
Ordered both drain & wash impeller kit and the drain check valve with o-ring. Decided to test the cheaper drain check valve first. Pulled dishwasher out from wall & adjacent cabinetry; removed drain hose from disposer and drained as much water as possible; "jacked" side of dishwasher to gain access to drain hose and drain check valve; us
... Read more
ed pliers to remove hose clamp; placed flat pan underneath to catch remaining water drainage; unscrewed drain check valve; tested under bathroom faucet--determined faulty; replaced with the new one, restored connections, reset dishwasher in proper location; voila--fixed! Plan to return the unneeded impeller kit.
Read less
Parts Used:

-
Lewis from Portsmouth, NH
-
Difficulty Level:Really Easy
-
Total Repair Time:30 - 60 mins
-
Tools:Pliers, Screw drivers
163 of 211 people
found this instruction helpful.
Was this instruction helpful to you?
Thank you for voting!
standing water in tub , not draining
removed old check valve from bottom of dishwasher and replaced with new one. I used channel locks to do this, disconnect hoses and screw out check valve, and put back in opposite order, make sure the dishwasher is empty of water or have a plastic bowl or such to catch water. Take off two front covers on bottom of dishwasher to access chec
... Read more
k valve ,white with hose attached.
Read less
Parts Used:
-
paul from CHARLOTTESVLE, VA
-
Difficulty Level:A Bit Difficult
-
Total Repair Time:30 - 60 mins
-
Tools:Pliers
4 of 5 people
found this instruction helpful.
Was this instruction helpful to you?
Thank you for voting!
Bottom of dishwasher retained an inch of water after cycles complete. Had to pump out dirty water before starting new cycle.
Once the covers under the door are removed, the check valve is visible (unless its too dark, hence the headlight), and pointing right at you. Since I was working under the dishwasher, I gathered all the tools I thought I might need and laid them on the floor next to. Removed 2 covers, placed pan under check valve and hose to catch any wa
... Read more
ter, squeezed clamp with (wrong) pliers, it eventually came loose. Carefully twisted hose off check valve. Water came out, some of it got into the pan, most of it on the floor. I guess I should have pumped it out before I started this. Plastic check valve is screwed into the big piece of whatever, carefully grabbed it with (wrong again) pliers and turned it out. Installation is reverse of removal - but use a large pliers with a ROUNDED jaw to grab the round check valve body. Don't squeeze too hard or overtighten it. Put the clamp on the valve before pushing the hose on. Be sure the hose seats all the way onto the little lugs. Compress the clamp, slide it over the end of the hose and release. That's all folks, works good now.
Read less
Parts Used:
-
Sam from MAPLE VALLEY, WA
-
Difficulty Level:Easy
-
Total Repair Time:30 - 60 mins
-
Tools:Pliers, Screw drivers
3 of 3 people
found this instruction helpful.
Was this instruction helpful to you?
Thank you for voting!