


Models
>
31422
31422 LG Washer - Overview
Sections of the 31422
[Viewing 1 of 1]
Exact Part matches for your search term
[Viewing 3 of 3]
CODE H
This part number matches the current model number 31422
PartSelect #: PS1446686
Manufacturer #: 31422
No Longer Available
LEVER
This part number matches the current model number 31422
PartSelect #: PS8951057
Manufacturer #: 31422
No Longer Available
Sprocket
This part number matches the current model number 31422
PartSelect #: PS11952690
Manufacturer #: 31422
No Longer Available
Keep searches simple, eg. "belt" or "pump".

PULSATOR ASSEMBLY
PartSelect #: PS12588963
Manufacturer #: AGZ72909711
This is a pulsator assembly, also known as an agitator, for your washing machine. This pulsator sits at the bottom of your washer and is what is used as the main driving force to wash your clothes. Th...
$179.18
In Stock

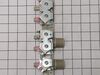
Water Inlet Valve Assembly
PartSelect #: PS3527446
Manufacturer #: 5221EA1008F
This is an authentic LG water inlet valve for a top-load washer. It is designed to control the flow of water into the washer. If your washer is filling slowly, making loud noises, overflowing, or stop...
$160.04
On Order

Tub-to-Pump Hose
PartSelect #: PS3617213
Manufacturer #: AEM73213001
This is a drain hose assembly for top-load models of LG washing machines. This hose specifically is used to allow water to drain from the tub to the drain pump of the washer. This hose is made of plas...
$32.17
In Stock

Switch Assembly,Sensor
PartSelect #: PS3529177
Manufacturer #: 6501EA1001R
This water-level pressure switch in your wash monitors and regulates the water levels throughout the fill, wash, and rinse cycles. You will usually find it inside the control panel or near the tub. It...
$49.27
In Stock

HOSE ASSEMBLY,DRAIN
PartSelect #: PS8749199
Manufacturer #: AEM73732901
This drain hose is a genuine OEM replacement part supplied by LG for use in their washing machines. It is a light gray pipe with a diameter of 1.25 inches. The drain hose is connected to the drain pum...
$36.10
In Stock


Questions And Answers for 31422
We're sorry, but our Q&A experts are temporarily unavailable.
Please check back later if you still haven't found the answer you need.
Common Symptoms of the 31422
[Viewing 2 of 2]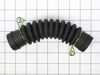

Keep searches simple. Use keywords, e.g. "leaking", "pump", "broken" or "fit".
Washer was noisy, made noise when agitating and spinning.
I had a hard time removing the agitator, had to get thin prybar to get a hold of washplate. After I removed washplate, I found that the shaft that the washplate attaches to was actually worn out. What used to be a spline was smooth. So I ordered a new clutch assembly. There are a lot of bolts that hold the clutch assembly on to the
... Read more
basket. There are a lot of videos on Utube that will walk you through step by step. The only problem I encountered with this was removing the nut that holds the basket to the tub. One video said it was reverse thread, which it wasn’t. You can check the thread on new clutch assembly to see which way is correct. After I put back together. Works like new.
Read less
Parts Used:
-
Paul from NANTICOKE, PA
-
Difficulty Level:Really Easy
-
Total Repair Time:1- 2 hours
-
Tools:Socket set, Wrench (Adjustable)
5 of 9 people
found this instruction helpful.
Was this instruction helpful to you?
Thank you for voting!
Agitator was free spinning
Removed the center cover cap carefully on top of the agitator with a small screw driver. There are 3 (on mine) little slots around the edge of the bottom of the cap where it meets the agitator. Insert the small flat blade screwdriver and gently twist at each one till the cap pops loose and comes off.
There was a 10MM bolt under ... Read more the cap on mine that you need to remove. I used an cordless impact driver but you could use a socket wrench as well. Remove the bolt and the agitator comes off. May take a little wiggling or it may come right off.
The teeth on the agitator were wore all the way down and gone on mine so it came off easy and this was the issue I had why it was spinning freely. I took the small flat blade screwdriver and used the edge and corner of the blade to clean the teeth on the shaft where the agitator attaches and wiped it down before installing the new part as there was quite a bit of metal shavings from the damaged part.
I just reversed the order of removal to install the new part. Took about 15 min. I ran a rinse and spin cycle to remove any additional metal shavings and to check to see if it all worked properly. THATS IT! TOO EASY!
Read less
Parts Used:
-
Joel from JASPER, MO
-
Difficulty Level:Very Easy
-
Total Repair Time:Less than 15 mins
-
Tools:Nutdriver, Screw drivers
5 of 9 people
found this instruction helpful.
Was this instruction helpful to you?
Thank you for voting!
The old water assembly valve split on the bottom and started leaking.
After unplugging the washer I cut the water off. I took the water hoses off, then the back top panel using a phillips head screw driver. I then used a pair of pliers to take off the two hoses and clamps. I unplugged the electric connection on each solenoid, took out 5 screws replaced the part and did everything in reverse order. Problem s
... Read more
olved. Thanks for the fast service on my order.
Read less
Parts Used:
-
Jerry from CARYVILLE, TN
-
Difficulty Level:Very Easy
-
Total Repair Time:15 - 30 mins
-
Tools:Pliers, Screw drivers
3 of 5 people
found this instruction helpful.
Was this instruction helpful to you?
Thank you for voting!