


Models
>
2543
2543 - Overview
Models starting with 2543
Click on the best match to narrow your results.
- 2543 Magic Chef Range (GAS RANGE)
- 25430 ( 313000001-313000500 ) Toro Chainsaw (Rt600 Traction Unit, 2013)
- 25430 ( 313000501-313999999 ) Toro Chainsaw (Rt600 Traction Unit, 2013)
- 25430 ( 314000001-314999999 ) Toro Chainsaw (Rt600 Traction Unit, 2014)
- 25430A ( 315000001-315000500 ) Toro Chainsaw (Rt600 Traction Unit, 2015)
- 25430A ( 315000501-315999999 ) Toro Chainsaw (Rt600 Traction Unit, 2015)
- 25430C ( 315000001-315000500 ) Toro Chainsaw (Rt600 Traction Unit, 2015)
- 25430C ( 315000501-315999999 ) Toro Chainsaw (Rt600 Traction Unit, 2015)
- 25430W ( 315000001-315000500 ) Toro Chainsaw (Rt600 Traction Unit, 2015)
- 25430W ( 315000501-315999999 ) Toro Chainsaw (Rt600 Traction Unit, 2015)
- 25431 ( 313000001-313999999 ) Toro Lawn Tractor Accessories (Centerline Trencher, Rt600 Traction Unit, 2013)
- 25431 ( 314000001-314999999 ) Toro Lawn Tractor Accessories (Centerline Trencher, Rt600 Traction Unit, 2014)
- 25431 ( 315000001-315999999 ) Toro Lawn Tractor Accessories (Centerline Trencher, Rt600 Traction Unit, 2015)
- 25431 ( 316000001-316999999 ) Toro Lawn Tractor Accessories (Centerline Trencher, Rt600 Traction Unit, 2016)
- 25431 ( 400000000-999999999 ) Toro Lawn Tractor Accessories (Centerline Trencher, Rt600 Traction Unit, 2017)
- 25431E ( 313000001-313999999 ) Toro Lawn Tractor Accessories (Centerline Trencher, Rt600 Traction Unit, 2013)
- 25431E ( 315000001-315999999 ) Toro Lawn Tractor Accessories (Centerline Trencher, Rt600 Traction Unit, 2015)
- 25431E ( 316000001-316999999 ) Toro Lawn Tractor Accessories (Centerline Trencher, Rt600 Traction Unit, 2016)
- 25431E ( 400000000-999999999 ) Toro Lawn Tractor Accessories (Centerline Trencher, Rt600 Traction Unit, 2017)
- 25432 ( 313000001-313999999 ) Toro Chainsaw (Heavy Duty Backhoe 125, Rt600 Traction Unit, 2013)
- 25432 ( 314000001-314999999 ) Toro Chainsaw (Heavy Duty Backhoe 125, Rt600 Traction Unit, 2014)
- 25432 ( 315000001-315999999 ) Toro Chainsaw (Heavy Duty Backhoe 125, Rt600 Traction Unit, 2015)
- 25432 ( 316000001-316999999 ) Toro Chainsaw (Heavy Duty Backhoe 125, Rt600 Traction Unit, 2016)
- 25432 ( 400000000-999999999 ) Toro Chainsaw (Heavy Duty Backhoe 125, Rt600 Traction Unit, 2017)
- 25432E ( 313000001-313999999 ) Toro Chainsaw (Heavy Duty Backhoe 125, Rt600 Traction Unit, 2013)
- 25432E ( 315000001-315999999 ) Toro Chainsaw (Heavy Duty Backhoe 125, Rt600 Traction Unit, 2015)
- 25432E ( 316000001-316999999 ) Toro Chainsaw (Heavy Duty Backhoe 125, Rt600 Traction Unit, 2016)
- 25432E ( 400000000-999999999 ) Toro Chainsaw (Heavy Duty Backhoe 125, Rt600 Traction Unit, 2017)
- 25433 Toro Chainsaw (Backhoe Drive Release Kit, Rt600 Traction Unit With Backhoe)
- 25433E Toro Chainsaw (Backhoe Drive Release Kit, Rt600 Traction Unit With Backhoe)
- 25435 Toro Chainsaw (48in Heavy Duty Crumber, Rt600 Traction Unit)
- 25435E Toro Chainsaw (48in Heavy Duty Crumber, Rt600 Traction Unit)
- 25436 Toro Chainsaw (60in Heavy Duty Crumber, Rt600 Traction Unit)
- 25436E Toro Chainsaw (60in Heavy Duty Crumber, Rt600 Traction Unit)
- 25437 Toro Chainsaw (48in Heavy Duty Rock Boom With Restraint Bar, Rt600 Traction Unit)
- 25437E Toro Chainsaw (48in Heavy Duty Rock Boom With Restraint Bar, Rt600 Traction Unit)
- 25438 Toro Chainsaw (60in Heavy Duty Rock Boom With Restraint Bar, Rt600 Traction Unit)
- 25438E Toro Cultivator (60in Heavy Duty Rock Boom With Restraint Bar, Rt600 Traction Unit)
- 25439 Toro Chainsaw (Counterweight Kit, Rt600 Traction Unit)
- 25439E Toro Cultivator (Counterweight Kit, Rt600 Traction Unit)
Exact Part matches for your search term
[Viewing 2 of 2]
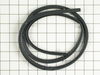
Switch assembly
This part number matches the current model number 2543
PartSelect #: PS12428596
Manufacturer #: 2543
No Longer Available
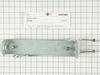
Housing-Switch Opc
This part number matches the current model number 2543
PartSelect #: PS16737964
Manufacturer #: 2543
No Longer Available
Keep searches simple, eg. "belt" or "pump".

Light Bulb - 40W
PartSelect #: PS884734
Manufacturer #: 8009
This an authentic OEM 40-Watt replacement light bulb, used in a number of household appliances. It is specially designed to withstand extreme temperatures, which is why these replacement bulbs are mos...
$11.73
In Stock

Flat Style Oven Igniter Kit
PartSelect #: PS1573892
Manufacturer #: 12400035
The flat style oven igniter kit is used in gas ovens and ranges. It is what provides the heat needed to open the gas valve, and it ignites fuel for the burner assembly. This part can be used for both ...
$57.79
In Stock

Burner Head Cap with Spark Electrode
PartSelect #: PS11741732
Manufacturer #: WP3412D024-09
The burner head cap with spark electrode directs the gas to the front and back burner heads and will equally distribute the gas across cooking areas. This part can help the following symptoms: if your...
$67.94
In Stock

Screw
PartSelect #: PS12349731
Manufacturer #: W11233072
This is a multi-use and multi-appliance screw. It can be used on a microwave, refrigerator, range/oven, air conditioner, dehumidifier, washer, or dryer. The measurements of this screw are 8 x 1/2 inch...
$20.79
In Stock

Oven Rack
PartSelect #: PS11744745
Manufacturer #: WP7801P173-60
This is a replacement oven rack and it is designed for use with ranges and ovens. This is a genuine OEM replacement part. The rack provides a level and stable surface for cookware inside of your appli...
$90.62
In Stock

Door Seal
PartSelect #: PS11743947
Manufacturer #: WP7212P043-60
This door seal is used for ranges and ovens. The seal prevents hot air escaping from the oven to maintain a certain temperature when baking. The clips sticking out of the seal help secure it to the ra...
$61.25
In Stock

Spark Module - Surface Burners
PartSelect #: PS2003170
Manufacturer #: 12001596
This part may differ in appearance, but functions same as original part. : This part sends enough current to the igniter to create a spark to the bottom of the burner cap.
$61.76
In Stock

Frame Screw
PartSelect #: PS11743908
Manufacturer #: WP7101P126-60
Sold Individually.
$7.76
In Stock

Orifice and Tube Assembly
PartSelect #: PS2002841
Manufacturer #: 12001074
This includes front and rear tube.
No Longer Available

Anti-Tip Bracket
PartSelect #: PS11741944
Manufacturer #: WP3801F656-51
Sold individually.
$9.25
In Stock

Stand Mixer Screw
PartSelect #: PS11742292
Manufacturer #: WP4159193
This screw is sold individually.
$8.63
In Stock

Common Symptoms of models starting with 2543
[Viewing 9 of 9]Gas igniter glows, but will not light
Fixed by
these parts
these parts


Show All
Will Not Start
Fixed by
these parts
these parts
Show All
Little to no heat when baking
Fixed by
these parts
these parts
Show All
Element will not heat
Fixed by
these parts
these parts
Show All
Oven not heating evenly
Fixed by
these parts
these parts
Show All
Gas smell
Fixed by
these parts
these parts
Show All
Little to no heat when broiling
Fixed by
these parts
these parts
Show All
Oven is too hot
Fixed by
these parts
these parts
Show All
Door won’t close
Fixed by
these parts
these parts
Show All


Keep searches simple. Use keywords, e.g. "leaking", "pump", "broken" or "fit".
Oven would not work but the Broiler did
The oven had been working intermittently for a while and after repeated threats of starvation from my spouse I finally took a look even though it was summer and the grill was working fine. The Igniter would glow red when the oven was turned on but the gas would not flow to it no matter what the temperature setting. I searched online and f
... Read more
ound this site that explained it was possible for the igniter to glow but if it was not drawing the correct amperage (because its resistance was too high) then the main brain would not allow the gas valve to open. So I took a look at the broiler and it had the same igniter. I measure the resistance of both of them and the oven igniters resistance was higher (don't rememeber the reading) then I moved the Igniter from the broiler to the oven and the oven worked from there it was just a matter of ordering the part. End of story except for I am still doing all the cooking on the barbecue outside.
Read less
Parts Used:

-
James from Ferndale, MI
-
Difficulty Level:A Bit Difficult
-
Total Repair Time:15 - 30 mins
-
Tools:Nutdriver, Screw drivers, Socket set
337 of 371 people
found this instruction helpful.
Was this instruction helpful to you?
Thank you for voting!
Oven would'nt light
In most cases if your oven won't light or takes a long time to light you may have a bad igniter even if it glows. To check the igniter use a voltmeter to check for 120 A/C volts going to the igniter and3.5 A/C volts going between the ingniter and the gas valve. My bad ingniter glowed but had only only 3.0 A/C volts going to the gas valve
... Read more
for the oven. The new igniter took only 45 minutes to install and supply's 3.6 A/C volts to the gas valve and the oven works fine.
Read less
Parts Used:
-
Charles from Charlestown, RI
-
Difficulty Level:Easy
-
Total Repair Time:30 - 60 mins
-
Tools:Pliers, Screw drivers
130 of 141 people
found this instruction helpful.
Was this instruction helpful to you?
Thank you for voting!
oven failed to light
My son replaced the broiler igniter this spring, so I had a clue as to what was required. This was even easier and since I had back surgery recently & my husband was out of town that was a giant plus!
I unplugged the oven, removed the oven door, found the release latch and removed the oven floor. I then removed the 2 screws ... Read more that held the igniter in place (I received this stove used and the igniter had evidently been replaced before as it was the same shorter version included in the kit). I pulled the igniter out then removed some insulation and tugged the connector out of the oven floor. I disconnected the igniter and plugged the new one in. I then replaced the connector in the floor, attached the igniter with the screws, replaced the insulation and did a test run (plugged in the oven & turned it on). That was successful so I put the floor back in and put the door back on.
Ta-Dah!
Read less
Parts Used:
-
Beryl from Dawsonville, GA
-
Difficulty Level:Really Easy
-
Total Repair Time:Less than 15 mins
-
Tools:Screw drivers
69 of 74 people
found this instruction helpful.
Was this instruction helpful to you?
Thank you for voting!