This 8-cube ice maker is used to create ice for your refrigerator. The ice maker receives water from the water inlet valve and will freeze until ice cubes are formed. Once the water has been frozen t...
This replacement icemaker may also be known as the ice maker assembly and is compatible with your refrigerator/freezer. This assembly replaces the heat-release ice maker unit only. The kit comes with ...
This OEM 40 watt appliance light bulb is used for some ranges, refrigerators, freezers, and microwaves. Simply locate the existing bulb, unscrew it from its socket, and replace with new light bulb. If...
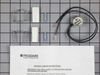
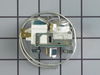
This limiter thermostat cuts out when the temperature inside your refrigerator reaches 55 degrees Fahrenheit and kicks back in when the internal temperature drops to 20 degrees Fahrenheit. If you disc...
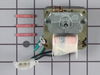
The evaporator fan motor kit is specifically made for your refrigerator to run the evaporator fan in your refrigerator. It is mounted on the center hub and has three lead wire terminals; its shaft has...
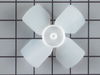
This evaporator fan blade is a genuine OEM part that is sourced directly from the manufacturer. The evaporator fan blade circulates air through the refrigerator to control the amount of cold air goes ...
The light socket on your refrigerator houses the light bulb and connects it to the power source. If you notice that your refrigerator light does not come on when you open the door, you may need to rep...
This defrost timer is designed for use in your refrigerator. The defrost timer acts as a clock, that switches the refrigerator from the freezing cycle to the defrost cycle and back. If your refrigerat...
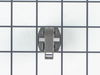
The ejector drive gear is a part for your refrigerator. This icemaker drive gear is for the ejector blades. The part rotates the cube ejector arm, which cycles the icemaker and pushes the cubes out an...
$21.03
In Stock
Questions And Answers for 2539308711
Be the first to ask our experts a question about this model!
✖
Ask a Question
Ask our experts a question on this model and we'll respond as soon as we can.
Unplugged faulty ice maker, removed two screws holding it to the refrigerator and took it out. Reversed the operation with the new ice maker and after a few minutes presto, we have ice.
It was pretty straight forward. Remove the two screws that hold the unit to the wall of the freezer. In my case, I had to use a different ice maker than what came with the frig. In order to install the replacement unit they sent a wire adaptor so it would attach to the existing wiring. That too was all fine and dandy. The only p
... Read moreroblem was that the end of the wire adaptor did not fit through the existing hole in the rear of the frig. I used a utility knife to cut through the thin metal lining. That worked just fine. However, I could not cut through the insulation because I could not reach it through the small hole. The excess wire was supposed to be pulled through the hole and out through the back of the unit. So now the excess is between the wall of the freezer and the insulation. The unit is working wonderfully. In fact, it is making more ice than I can use. I am very pleased with the replacement unit. This is the 3rd ice maker that has been in this frig. All the others had a design flaw that had a leak in the rear of the unit. This caused all the ice to form into a big block. The replacement unit has not had this problem so far. Thank you for allowing me to explain my situation so that maybe others may benifit from my experience. Thank you. Jack
1. Removed the 7 nuts using the nut driver from the freezer back panel inside the freezer. 2. Remove the back panel. The evaporator motor and fan are located above the coils. 3. Unplug the wiring harness. 4. Remove the two gold mounting screws holding the motor and fan in place. 5. Remove the motor and fan including th
... Read moree brackets. 6. Install the new motor and fan onto the mounting bracket. 6a. Attach the green ground to the mounting bracket. 7. Screw the two gold screws back into the freezer. 8. Attach the new wiring harness. Note, the old harness had a mounting hole/space for it to connect to the wiring harness of the freezer. The new motor's harness was not long enough for this, so it is connected freely to the freezer harness. 9. Use the hair dryer to melt any ice that may have formed on the coils and hole where the fan goes. 10. Turn the freezer on to see if the fan turns on. 11. Reinstall the back panel. All done!