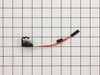
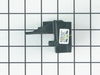
This Defrost Timer works like a clock by switching on the defrost heater circuit after a predetermined amount of compressor run time. This allows the defrost circuit to clear the evaporator of ice or ...
The door shelf end cap, or door bin support, secures the rack in a refrigerator or freezer door. Note that this fits on either the left or right hand side. If the end caps of your refrigerator or free...
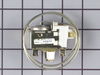
This refrigerator defrost thermostat is a genuine OEM part and is sourced directly from the manufacturer. Located on the back wall of the freezer section in the refrigerator, the defrost thermostat is...
This white door shelf bar is approximately 31 inches long and provides storage space on your refrigerator door. If it becomes loose, cracked, or detached, it needs to be replaced. A damaged shelf bar ...
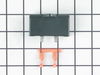
The run capacitor helps the compressor kick on and off while maintaining a constant temperature in your fridge and freezer. You may need to replace your run capacitor if your refrigerator or freezer s...
This replacement icemaker may also be known as the ice maker assembly and is compatible with your refrigerator/freezer. This assembly replaces the heat-release ice maker unit only. The kit comes with ...
This OEM 40 watt appliance light bulb is used for some ranges, refrigerators, freezers, and microwaves. Simply locate the existing bulb, unscrew it from its socket, and replace with new light bulb. If...
This is the replacement crisper drawer cover support for your refrigerator. The crisper shelf rests on the support, which keeps it level. If your drawer cover or shelf will not stay level, or will not...
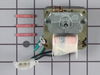
The evaporator fan motor kit is specifically made for your refrigerator to run the evaporator fan in your refrigerator. It is mounted on the center hub and has three lead wire terminals; its shaft has...
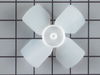
This evaporator fan blade is a genuine OEM part that is sourced directly from the manufacturer. The evaporator fan blade circulates air through the refrigerator to control the amount of cold air goes ...
The light socket on your refrigerator houses the light bulb and connects it to the power source. If you notice that your refrigerator light does not come on when you open the door, you may need to rep...
My freezer would freeze up and not allow cold air to refrigerator side. First I took off bottom face plate, located the timer on left side bottom, removed the two screws and unpluged the timer. Replaced the timer with new one. Second I removed all food from freezer. Took of back of freezer wall with nut driver. Located the thermostat whic
... Read moreh was very easy to remove. Just one clip holding thermostat. Unplugged the two wires from the old thermostat and plugged in new wires. Thanks to Partselect.com, the parts were an exact match. Very easy to do. Saved my tons of money. Freezer and refer works like new.
It was pretty straight forward. Remove the two screws that hold the unit to the wall of the freezer. In my case, I had to use a different ice maker than what came with the frig. In order to install the replacement unit they sent a wire adaptor so it would attach to the existing wiring. That too was all fine and dandy. The only p
... Read moreroblem was that the end of the wire adaptor did not fit through the existing hole in the rear of the frig. I used a utility knife to cut through the thin metal lining. That worked just fine. However, I could not cut through the insulation because I could not reach it through the small hole. The excess wire was supposed to be pulled through the hole and out through the back of the unit. So now the excess is between the wall of the freezer and the insulation. The unit is working wonderfully. In fact, it is making more ice than I can use. I am very pleased with the replacement unit. This is the 3rd ice maker that has been in this frig. All the others had a design flaw that had a leak in the rear of the unit. This caused all the ice to form into a big block. The replacement unit has not had this problem so far. Thank you for allowing me to explain my situation so that maybe others may benifit from my experience. Thank you. Jack
1. Removed the 7 nuts using the nut driver from the freezer back panel inside the freezer. 2. Remove the back panel. The evaporator motor and fan are located above the coils. 3. Unplug the wiring harness. 4. Remove the two gold mounting screws holding the motor and fan in place. 5. Remove the motor and fan including th
... Read moree brackets. 6. Install the new motor and fan onto the mounting bracket. 6a. Attach the green ground to the mounting bracket. 7. Screw the two gold screws back into the freezer. 8. Attach the new wiring harness. Note, the old harness had a mounting hole/space for it to connect to the wiring harness of the freezer. The new motor's harness was not long enough for this, so it is connected freely to the freezer harness. 9. Use the hair dryer to melt any ice that may have formed on the coils and hole where the fan goes. 10. Turn the freezer on to see if the fan turns on. 11. Reinstall the back panel. All done!