


Models
>
1191-0-580327201,10
1191-0-580327201,10 Craftsman Generator - Overview
Sections of the 1191-0-580327201,10
[Viewing 17 of 17]
Keep searches simple, eg. "belt" or "pump".

Fuel Valve W/Bushing
PartSelect #: PS8911051
Manufacturer #: 192980GS
Made of durable rubber and plastic components, this Fuel Valve and Bushing are designed for use in over 150 models of generators and pressure washers. This item is sold as a kit, including the valve a...
$19.31
In Stock


Line-Fuel
PartSelect #: PS9140673
Manufacturer #: 791745
This fuel line is compatible with several different makes and models of small engine equipment and is sold as an individual part. Equipped with the securing clamp, this rubber fuel line is used to tra...
$10.16
In Stock
 – Part Number: 695708")
Gear-Pinion (Plastic and Aluminum Ring Gear)
PartSelect #: PS9066374
Manufacturer #: 695708
$7.18
In Stock

Solenoid-Starter
PartSelect #: PS9064363
Manufacturer #: 691656
A starter solenoid, also known as a starter relay, is an electrical component that is used within small engine systems to control the starter motor by engaging it when an ignition key is turned - acti...
$34.68
In Stock


 – Part Number: 805049S")

Engine Starter Motor
PartSelect #: PS9138250
Manufacturer #: 795121
This starter motor is for lawn and garden equipment engines.
Starter motor spins the flywheel to start the engine.
Wear work gloves to protect your hands when installing this part.
$143.85
In Stock

Questions And Answers for 1191-0-580327201,10
We're sorry, but our Q&A experts are temporarily unavailable.
Please check back later if you still haven't found the answer you need.
Common Symptoms of the 1191-0-580327201,10
[Viewing 1 of 1]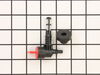
Keep searches simple. Use keywords, e.g. "leaking", "pump", "broken" or "fit".
Wouldn’t start.
I installed a new solenoid starter. Took me a total of 20 minutes. Started right up.
Parts Used:

-
Bruce from CARNATION, WA
-
Difficulty Level:Really Easy
-
Total Repair Time:30 - 60 mins
10 of 21 people
found this instruction helpful.
Was this instruction helpful to you?
Thank you for voting!
Dry rotted rubber
Put some dish soap on the rubber, push into the tank hole, slip 1x2 into the handle of the tank and over the new part and pry down pushing it into the hole. Took about 2 minutes.
Parts Used:

-
James from PICAYUNE, MS
-
Difficulty Level:Very Easy
-
Total Repair Time:Less than 15 mins
5 of 7 people
found this instruction helpful.
Was this instruction helpful to you?
Thank you for voting!
Exhaust push rod
Reverse of how i took broken exhuast value out.
It was simple just watch what you do. Also make sure you lash the value. U tube it.
It was simple just watch what you do. Also make sure you lash the value. U tube it.
Parts Used:
(Aluminum) – Part Number: 691758")
-
GERALD from CLIO, MI
-
Difficulty Level:Easy
-
Total Repair Time:30 - 60 mins
-
Tools:Socket set, Wrench set
5 of 7 people
found this instruction helpful.
Was this instruction helpful to you?
Thank you for voting!